Last Updated: March 20 2024
Overview
You can manage the majority of your Connect settings within Simpro Premium. These settings apply to all Connect users.
To access your Connect settings in Simpro Premium, go to System ![]() > Setup > Mobile, then adjust settings through the General, Pages, and Statuses sub-tabs as required. You can also set up geostamping in Simpro Premium to track where and when field technicians update their mobile job statuses.
> Setup > Mobile, then adjust settings through the General, Pages, and Statuses sub-tabs as required. You can also set up geostamping in Simpro Premium to track where and when field technicians update their mobile job statuses.
To manage how an individual Connect device retrieves, sends and displays data, access your Set up Connect within the app. To manage audits in Connect, learn more in How to Set Up Connect Audits.
Adjust general and billing settings for Connect
Set up your Connect workflow
Set up and navigate Connect
 Adjust general and billing settings for Connect
Adjust general user permissions, runsheet settings and billing settings for Connect in Simpro Premium. These settings apply to all Connect users.

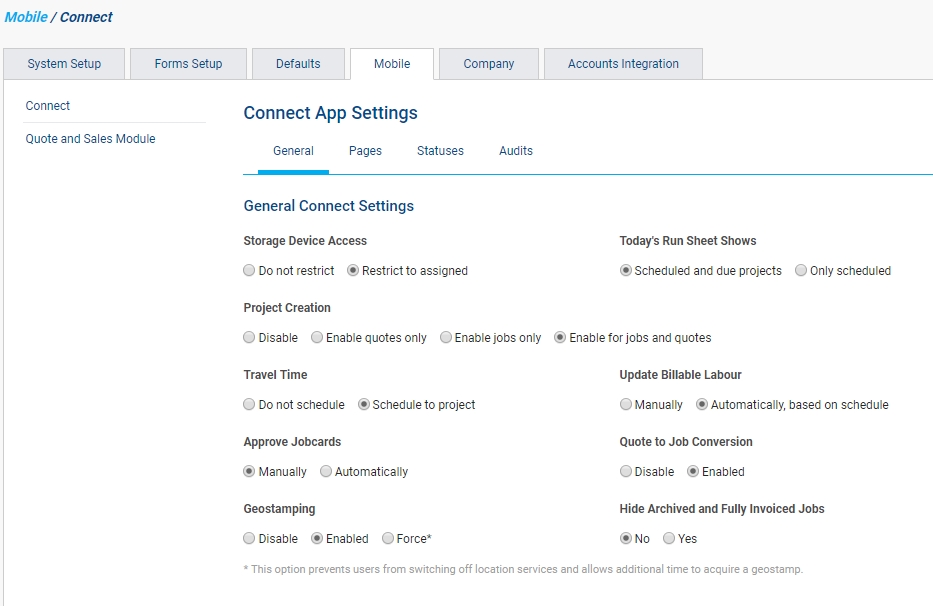
To adjust general and billing settings for Connect, go to System ![]() > Setup > Mobile > General. You can then restrict Connect functionality as required with the following options:
> Setup > Mobile > General. You can then restrict Connect functionality as required with the following options:
|
Storage Device Access |
This setting is separate from the security group permissions for assigning and transferring stock in Simpro Premium. Select Do not restrict to give Connect users access to stock in all storage devices. Select Restrict to assigned to restrict access to the assigned storage devices in their employee / contractor card files. |
|
Today's Run Sheet Shows |
Select Scheduled and due projects to show both scheduled and due jobs and quotes on the Today runsheet in Connect. Learn more in View the runsheet. Select Only scheduled to show only scheduled jobs and quotes. Jobs or quotes that are assigned but not scheduled only appear in the Today runsheet when their due date is the same as the focus date. |
|
Project Creation |
Select Enable for jobs and quotes to allow users to Create a job in Connect and Create a quote in Connect. The created jobs or quotes appear in Simpro Premium after syncing. Select Enable for jobs only or Enable quotes only as applicable. Select Disable to prevent Connect users from creating jobs or quotes. |
|
Travel Time |
Select Schedule to project to schedule travel time to the project as a job cost. Select Do not schedule for travel time to be non-billable. |
|
Update Billable Labour |
Select Automatically, based on schedule to have Connect update billable labour automatically when a job has been submitted. Select Manually to have Connect users manually update billable labour. |
|
Quote to Job Conversion |
Select Enabled to allow technicians to convert their quotes into jobs. Select Disabled if you do not want to allow this. |
|
Approve Jobcards |
Select Automatically to automatically approve submitted job cards. Select Manually to have job cards manually approved in Simpro Premium. |
|
Geostamping |
Select Enabled to record the geographical location of a Connect user's mobile status updates, such as starting travel or starting a job. Select Force to prevent users from switching off location services and allow additional time to acquire a geostamp. Learn more in Geostamping settings. |
|
Hide Archived and Fully Invoiced Jobs |
Select No to allow employees to retrieve all jobs in Connect. Select Yes to restrict employees from retrieving jobs that are archived or fully invoiced. If you choose to hide invoiced and archived jobs, you can still retrieve partially invoiced jobs. |
Billing settings
To adjust billing settings in Connect, go to System ![]() > Setup > Mobile > General.
> Setup > Mobile > General.
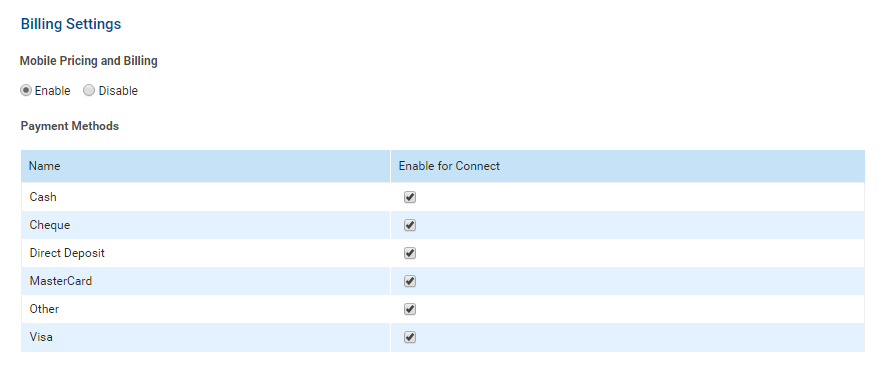
Select Enable under Mobile Billing and Pricing to allow field technicians to collect payments, view and adjust the quote Pricing page, and convert quotes to jobs in the field.
Under the Payment Methods table, select Enable for Connect for the payment methods you want to enable field technicians to collect in the field. These can include Simpro Premium Payments-associated card types.
Set up your Connect workflow
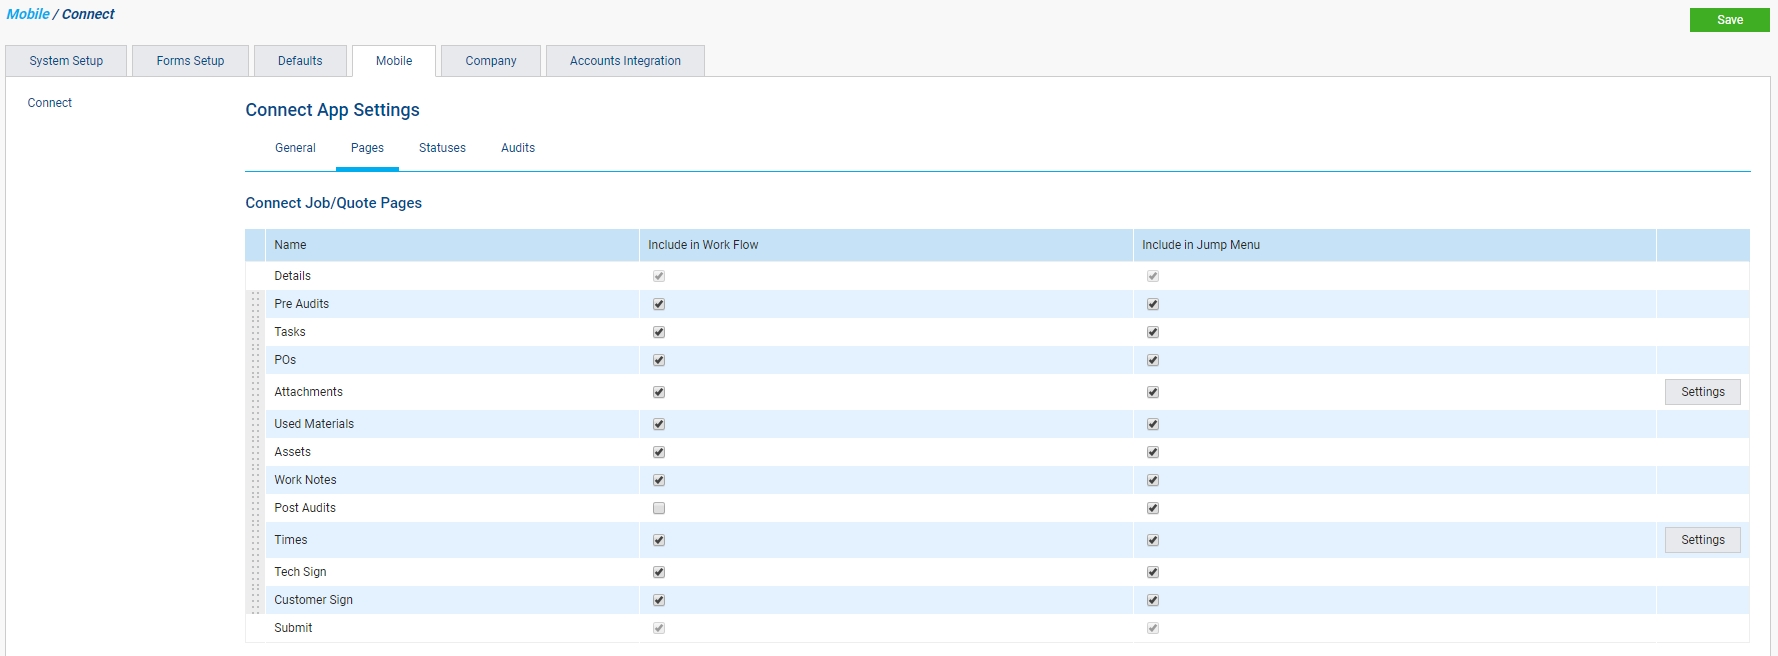
You can control which pages are visible to field technicians using Connect, as well as the order of pages in the workflow and jump menu. Disable unnecessary pages to reduce the number of steps in the workflow, making it faster for your field technicians to complete jobs.
To access the jump menu in Connect, access a job or quote from the runsheet, then tap the list icon in the top left.
Customise your workflow
To customise your Connect workflow in Simpro Premium:
- Go to System
 > Setup > Mobile > Pages.
 - Select Include in Work Flow for the pages you want your field technicians to navigate through when completing a job / quote.
- Select Include in Jump Menu for the pages you want your field technicians to be able to access through the jump menu.
- Click and drag the grey drag handle to move pages into the required workflow order.
- Click Save.
You need to Sync Connect with Simpro Premium to update these changes.
If you are unsure about the right mobile job workflow for your business, we recommend starting with our standard workflow and reviewing enabled pages after using Connect. To view the workflow, see Connect Jobs.
You cannot remove the Details and Submit pages from the Connect workflow or jump menu. When working through quotes in Connect, the Pricing page always appears after the Details page.
Manage Attachments and Times
The Attachments and Times pages have additional settings.
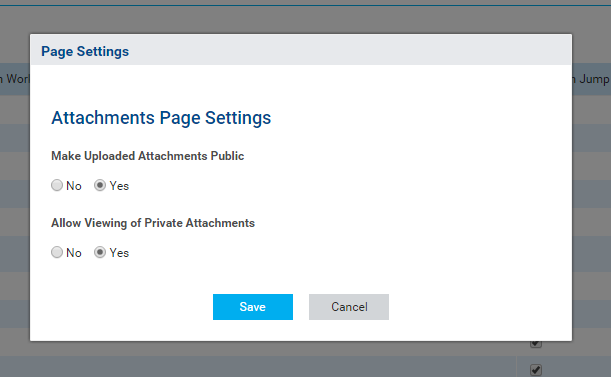
To manage the Attachments page settings:
- Go to System > Setup > Mobile > Pages > Attachments.
- Click Settings.
- Select whether to Make Uploaded Attachments Public.
- Select whether to Allow Viewing of Private Attachments as defined in Simpro Premium.
- Allow Viewing of Private Attachments allows Connect users to see all Attachments. To prevent Connect users from viewing private job attachments, select No.
- Click Save.

To manage Times page settings:
- Go to System > Setup > Mobile > Pages > Times.
- Click Settings.
- Under Allow Employee to Specify Overtime, select Yes to let field technicians specify their own overtime in Connect.
- Enter the Time Block Threshold. Learn more in Timesheet Module.
- Click Save.
Set up Connect statuses

Set up mobile statuses
Enable job and quote statuses for field technicians to update in Connect and Simpro Mobile. You can use mobile status colours to make it easier for field technicians to view the status of all the jobs on their Run Sheets.
The mobile job statuses can also update the job status in Simpro Premium to reflect the progress of the job according to the automatic triggers set up for Mobile Jobs.
To create a new job status:
- Go to System > Setup > Mobile.
- Go to the Statuses tab.
- Click Create Job Status.
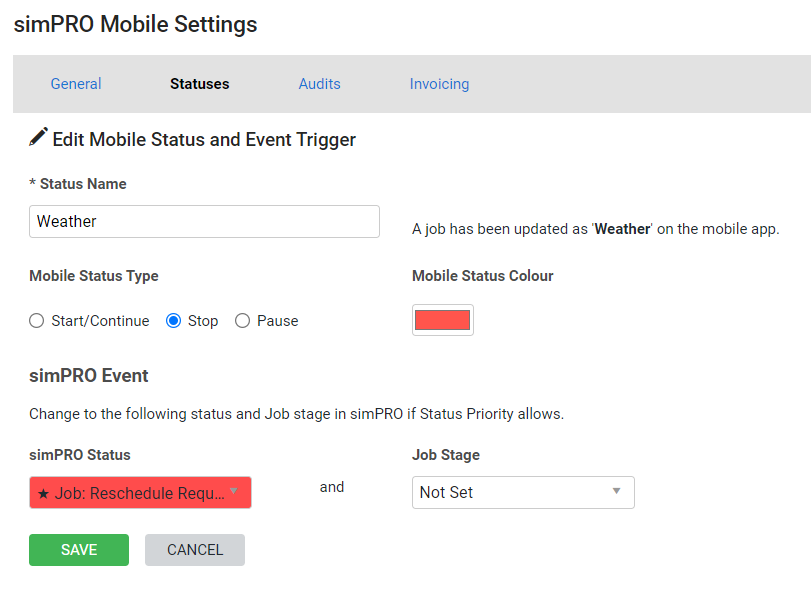
- Enter a Name for the status.
- Under Mobile status type:
- Select Start/Continue to end time recording and create a timestamp on the job card indicating the technician is still on site, when this status is selected. When the technician selects a status that continues the work, this does not trigger an alert in Simpro Premium for job card approval.
- Select Stop to end the time recording. If Automatic Job Card Approval is toggled off, when the technician selects this status, an alert is triggered in Simpro Premium that the job card requires approval.
- Select Pause to temporarily pause the time recording. When the technician selects a status that pauses time, this does not trigger an alert in Simpro Premium for job card approval. In Simpro Mobile > Service module, you can use PAUSE WORK if there is at least one Mobile Status set up in Simpro Premium for paused work.
- Select the Status Colour.
- Under Simpro Premium Event:
- Select the Simpro Premium Status that the job updates to when this mobile job status is selected. Statuses indicated with the star icon are selected to Ignore Status Priority. Learn more in Status Codes and Automatic Triggers.
- Select the Job Stage that the job updates to when this mobile job status is selected.
- Select the Status Colour.
- Click Save.
To create a new quote status, go to the Quote sub-tab and follow the same steps.
To change the order of a Mobile Status in Simpro Mobile click and move the status using the drag handles.
To edit mobile statuses, click the required status and update status details. Remove individual mobile statuses from appearing in Simpro Mobile on Connect by clicking the delete icon.
Note that you cannot change the Name or Time Tracking option of the Completed and Rejected statuses. The Completed status cannot be deleted.
Geostamping settings
Use geostamping for GPS-enabled Connect devices to know where and when your field technicians updated their mobile job and quote statuses.
To enable Connect geostamping in Simpro Premium, go to System ![]() > Setup > Mobile > Geostamping and select Enabled.
> Setup > Mobile > Geostamping and select Enabled.
Select Force to prevent field technicians from progressing through the workflow or updating the job or quote status if their device's location services are disabled or unavailable. This also allows extra time to acquire a signal for the device.
It is not recommended to enable Force mode for Geostamping if users frequently operate in remote areas with poor signals.
View status updates
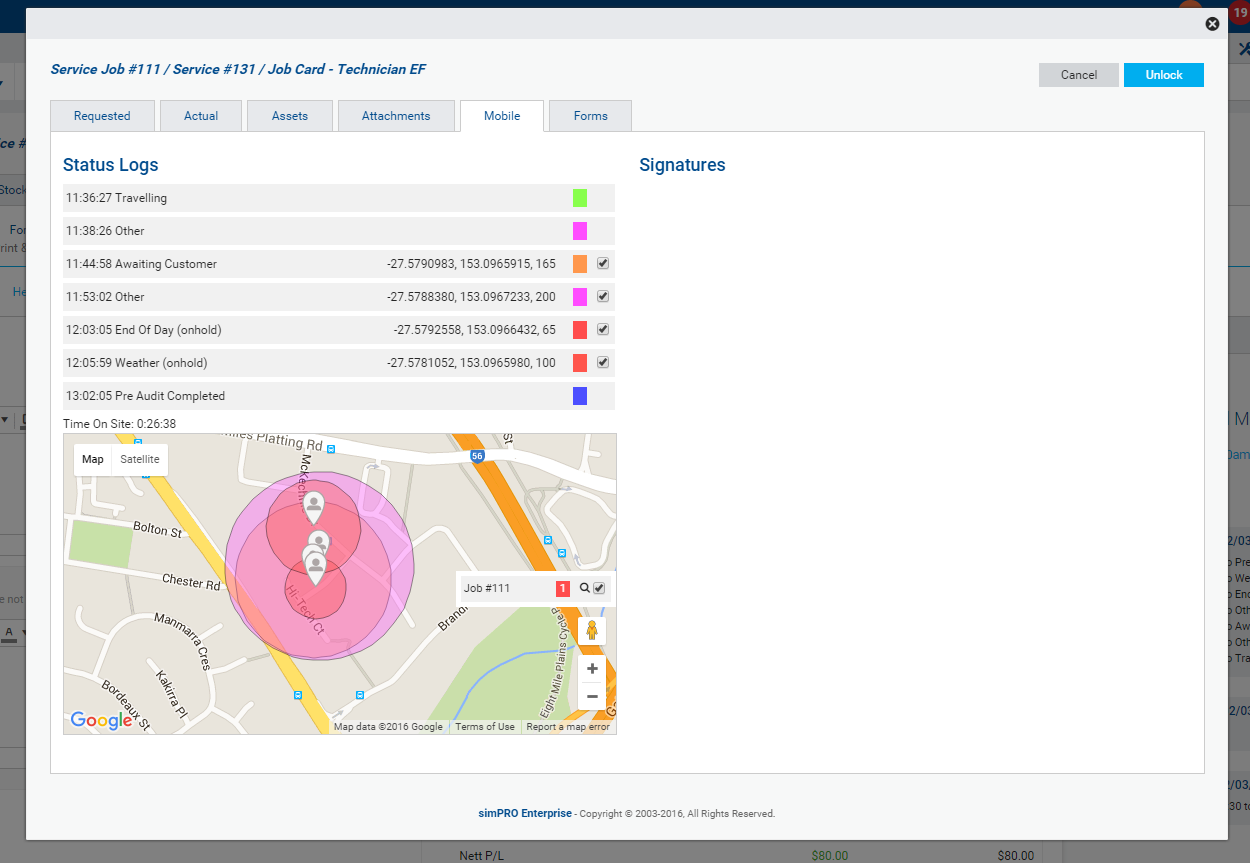
Once geostamping is enabled, you can view geostamped mobile status updates for multiple jobs and quotes in the Mobile Status Log Report.
To view the mobile status updates for a specific job, go to the Mobile tab in a job card or the Schedule tab in a job.
The size of the circle on the map represents the accuracy of the geostamp, which can be affected by the strength of your network signal. You can adjust the status colour of the circle in your Set up Connect statuses.
Set up Connect within the app
Use in-app settings in Connect to manage what type of data your Connect device retrieves. You can also use the settings page to find information about your device's sync operations as well as the current version, server and user.
To access in-app settings, go to the Connect dashboard, then tap Settings. Alternatively, if you have not logged in to Connect, tap Settings on the login page.
Change the default language
You can change the default language in which you view Connect to proceed through the workflow more efficiently.
The current languages available in Simpro Premium and Connect are:
- English (Australia) / English (United Kingdom) / English (United States)
- Spanish
You can change the default language that you view in Connect in the employee card in Simpro Premium. Learn more in Adjust employee settings. Alternatively, set your default language in Connect by going to Settings > Language, then selecting the language from the drop-down list.
When you change the default language in Connect, your changes reflect in Simpro Premium, and vice versa.
The login screen remains in English.
Manage data retrieval
To manage which jobs, quotes and tasks are available when you View the runsheet, you need to set up what data your Connect device retrieves from Simpro Premium.
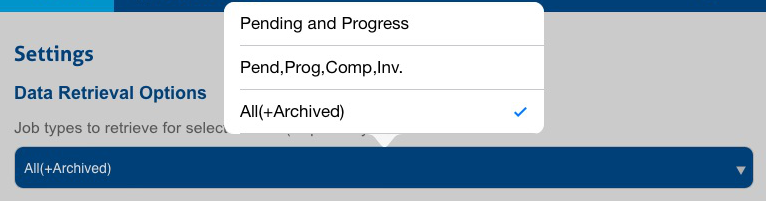
Under Data Retrieval Options, tap the drop-down list to select the job types to retrieve from your Simpro Premium server:
|
Pending and Progress |
View all outstanding assigned or scheduled jobs and quotes. |
|
Pend, Prog, Comp, Inv. |
View all outstanding, completed and invoiced jobs and quotes that you have been assigned or scheduled to. Completed and invoiced jobs and quotes appear in your Other runsheet. |
|
All (+Archived) |
View all outstanding, completed, invoiced and archived jobs and quotes, you have been assigned or scheduled to regardless of date. Completed, invoiced and archived jobs and quotes appear in your Other runsheet. |
To view only outstanding assigned jobs and quotes, select Pending and Progress from the drop-down list, then select Also retrieve all pending/progress (Jobs / Quotes / Tasks) for other days. Your pending and progress jobs or quotes due or scheduled for dates other than the specified focus date appear in your All runsheet.
When you select Also retrieve all pending/progress (Jobs / Quotes / Tasks) for other days, the Other runsheet is called the All runsheet.
For information on troubleshooting data retrieval issues in Connect, see Connect Troubleshooting.
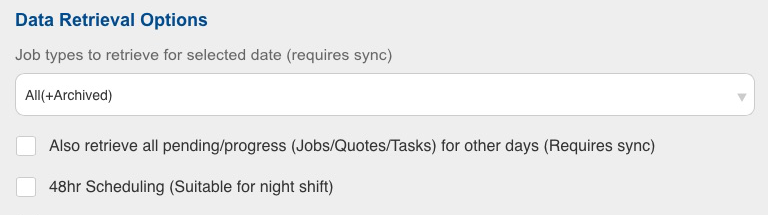
Select 48hr Scheduling to display all scheduled jobs or quotes within a 48-hour period of time when you View the runsheet for a 48-hour period, for example, if you have a night shift scheduled.
When you have finished setting up your data retrieval options, tap Finished to have Connect Sync in the background.
Manage sync operations

Manage your Sync Operations to monitor how Connect operates on your device.
Tap Go Offline, then Finished to use Connect without an internet connection. This option is useful when Connect cannot perform a sync due to an unreliable internet connection, for example, when a field technician is working on a job site in a remote area with poor mobile coverage.
When you use Connect in offline mode, all data is stored on the device while you work in existing jobs and quotes. You cannot sync updated data to Simpro Premium, request a purchase order, or create jobs, quotes or activities in offline mode. To allow the app to connect to the internet and sync with Simpro Premium, tap Go Online, then Finished and Connect automatically syncs all updated data.
Tap View Log to view a log of app activity. If you are working with Simpro Support to resolve any issues you are having with Connect, you may need to send a copy of the log by tapping Post.
Tap Reset Database to delete all data from Connect and log out the current user. If you are working with Simpro Support to resolve issues with corrupt data, you may need to tap this option.
Various functionalities are restricted when you Work offline in Connect.
View Connect information
You can view the following information under About Simpro Connect:
|
Version |
The current version of Connect used on the device. You need to access your device's app store to ensure you are using the latest version of Connect. |
|
Server |
The Simpro Premium build that the app is connected to and syncing with. |
|
User |
The current user's name, or, if viewing Connect settings while logged out of the app, the name of the last user to have logged in. |
|
Last Sync |
A timestamp of the most recently recorded sync between Connect and Simpro Premium. |
|
Uploaded Status |
Indicates whether there is data that needs to be synced with Simpro Premium. |
|
Device |
The mobile device type and operating system. |