Last Updated: December 08 2025
Overview
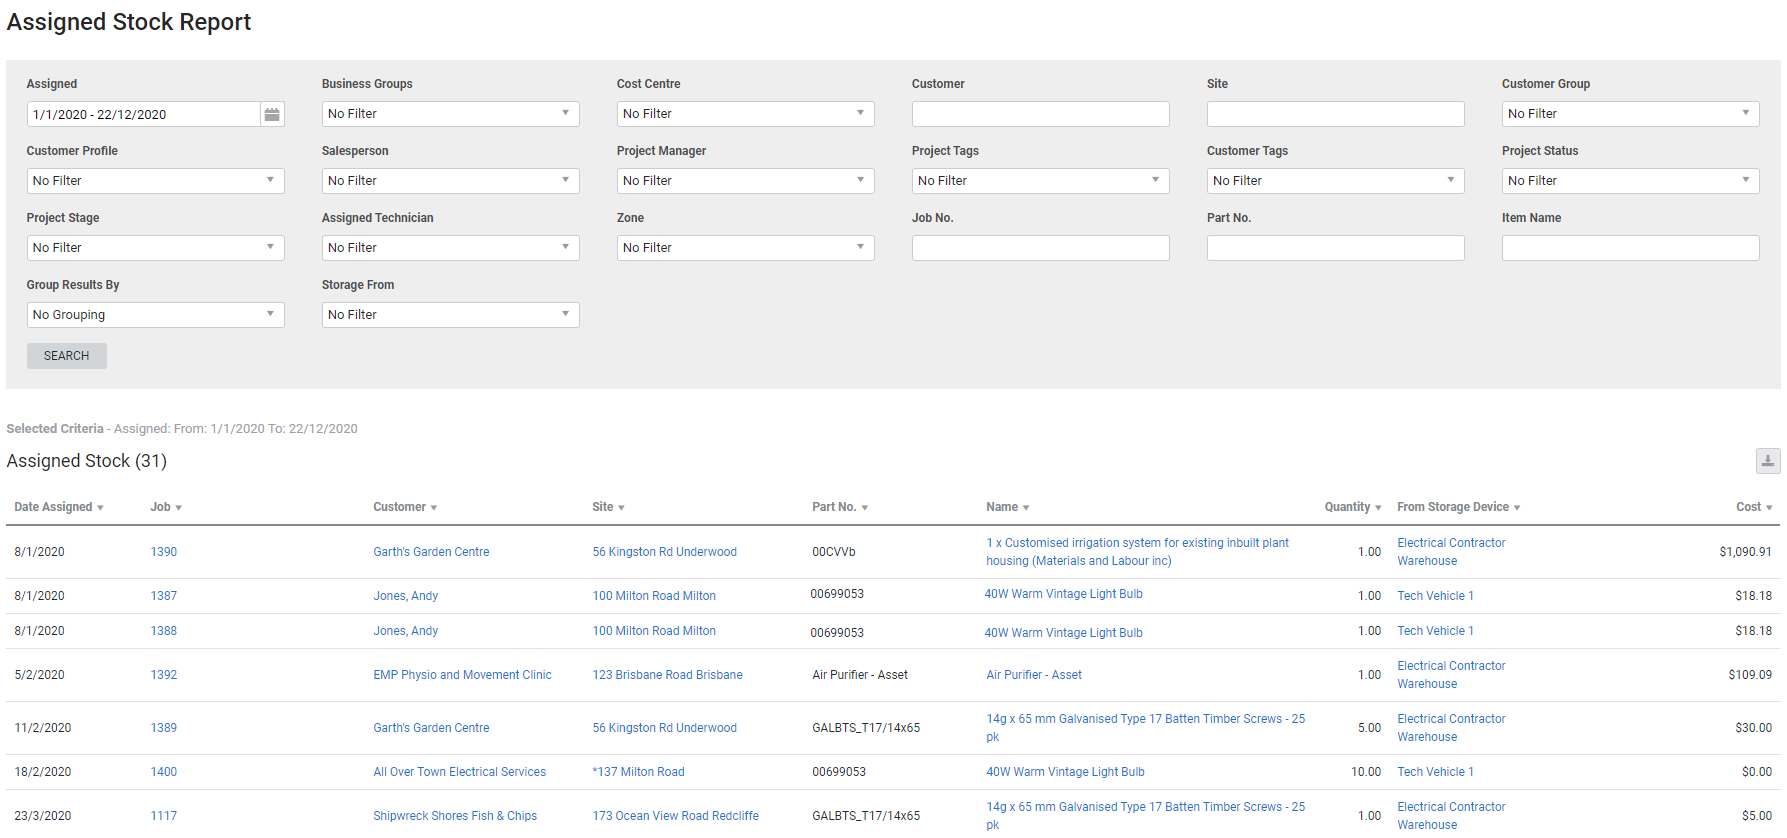
This report displays the quantities and values of stock items assigned to jobs in the Stock > Allocated sub-tab within the specified date range. Use the Group Results By filter to view stock items by the job they are assigned to, part number, or date allocated.
This is useful for determining which jobs have stock assigned, and whether stock purchase orders need to be made.
Learn about other Stock reports in Stock Reports.
US only: If you use Simpro Premium in the United States, the terms 'inventory' and 'inventory count' are used instead of 'stock', 'stock take', and 'in stock'.
 Required setup
In order to view content or perform actions referred to in this article you need to have the appropriate permissions enabled in your security group. Go to System![]() > Setup > Security Groups and access your security group to update your permissions. The relevant security group tab and specific permissions for this article can be found here:
> Setup > Security Groups and access your security group to update your permissions. The relevant security group tab and specific permissions for this article can be found here:
 Run the Assigned Stock report
To run the report:
- Go to Reports
 > View Reports.
 - In the left column, click Stock > Assigned Stock.
- Filter results by:
- Selecting a date range under Assigned.
- Selecting the check boxes in the drop-down lists.
- Entering information under Customer, Site, Job Number, Stock Item Name or Part Number.
- The report displays all jobs with assigned stock in all stages. If you do not wish to see invoiced or archived jobs, use the Project Stage filter to only include the stages you wish to see.
- Select whether the results are grouped by No Grouping, Job Number, Part Number or Date Allocated.
- Click Search.
 Filters
You can use the following filters in the report:
| Assigned | Select a date range to view stock assigned within that date range. |
| Business Groups | Select a business group to view stock assigned to jobs belonging to that business group. |
| Cost Centre | Select a cost centre to view stock assigned to jobs with that cost centre. |
| Customer | Search for a specific customer to view stock assigned to jobs for that customer. |
| Site | Search for a specific site to view stock assigned to jobs for that site. |
| Customer Group | Select a customer group to view jobs for customers belonging to that customer group. |
| Customer Profile | Select a customer profile to view jobs for customers with that customer profile. |
| Salesperson | Select an employee to view jobs with that employee selected as a salesperson. |
| Project Manager | Select an employee to view jobs with that employee selected as a project manager. |
| Project Tags | Select a project tag to view jobs with that tag. |
| Customer Tags | Select a customer tag to view jobs for customers with that tag. |
| Project Status | Select a project status to view jobs with that status. |
| Project Stage | Select a project stage to view jobs with that stage. |
| Assigned Technician | Select an employee or contractor to view jobs with that employee / contractor as the assigned technician. |
| Zone | Select a zone to see jobs in that zone. |
| Job No. | Search for a specific job number to view that job. |
| Part No. | Search for a specific part number to view that item. |
| Item Name | Search for an item name to view that item. |
| Group Results By |
Select:
|
| Storage From | Select a storage device to view stock assigned from that storage device. |
 Columns
The following columns are displayed in the report:
| Date Assigned | The date the stock was assigned. |
| Job | The job that the stock was assigned to and the job name. Click to open the job. |
| Customer | The customer selected on the job. Click to open the customer card file. |
| Site | The site selected on the job. Click to open the site. |
| Part No. | The part number of the assigned item. |
| Name | The name of the assigned item. Click to open the catalogue item. |
| Quantity | The quantity of the item assigned to the job. |
| From Storage Device | The storage device where the stock was assigned from. Click to open the storage device and view stock levels. |
| Cost | The total cost of the assigned stock. |
 Download the report as a CSV file
You can download the information in the report as a spreadsheet in CSV format, viewable in Microsoft Excel and other spreadsheet software.
To download the report:
- Generate the report as required.
- Click the
 icon in the top right, then click CSV.
 - View, print or save the CSV, as required.
