Last Updated: December 08 2025
Overview
![]()
The Asset Labour Planning Report is specifically designed for Maintenance Planner to be able to forecast the required labour in advance and determine how much time or effort is required to test assets. This report uses labour time from pre-builds associated with service level charge rates to provide a simple breakdown of the amount of time that may be required to test the customer assets. The labour time on pre-builds used in this report can be overridden on customer contracts.
Learn about other Maintenance Planner reports in Maintenance Reports.
 Required setup
In order to view content or perform actions referred to in this article you need to have the appropriate permissions enabled in your security group. Go to System![]() > Setup > Security Groups and access your security group to update your permissions. The relevant security group tab and specific permissions for this article can be found here:
> Setup > Security Groups and access your security group to update your permissions. The relevant security group tab and specific permissions for this article can be found here:
 Run the Asset Labour Planning Report
To run the report:
- Go to Reports
 > View Reports.
 - Click Maintenance Planner > Asset Labour Planning.
- Specify the period in months and enter the starting month and year. The end date is displayed by default.
- Select the required filters under Customer / Contract, Site, Preferred Technician, Contract End Date and Asset Type.
- Click Search.
 Filters
You can use the following filters in the report:
| Customer / Contract | Search for a specific customer or contract to view assets for that customer or contract. |
| Site | Search for a specific site to view assets belonging to that site. |
| Preferred Technician | Search based on preferred technicians assigned in the asset type. |
| Asset Type | Select an asset type to view assets belonging to that type. |
| Contract End Date |
Select Include Expiring Contracts to include the forecasted labour time for the period beyond the end date of the contract. Select Exclude Once Expired to only include the forecasted labour time up to the point of the contract end date. |
 Report Results
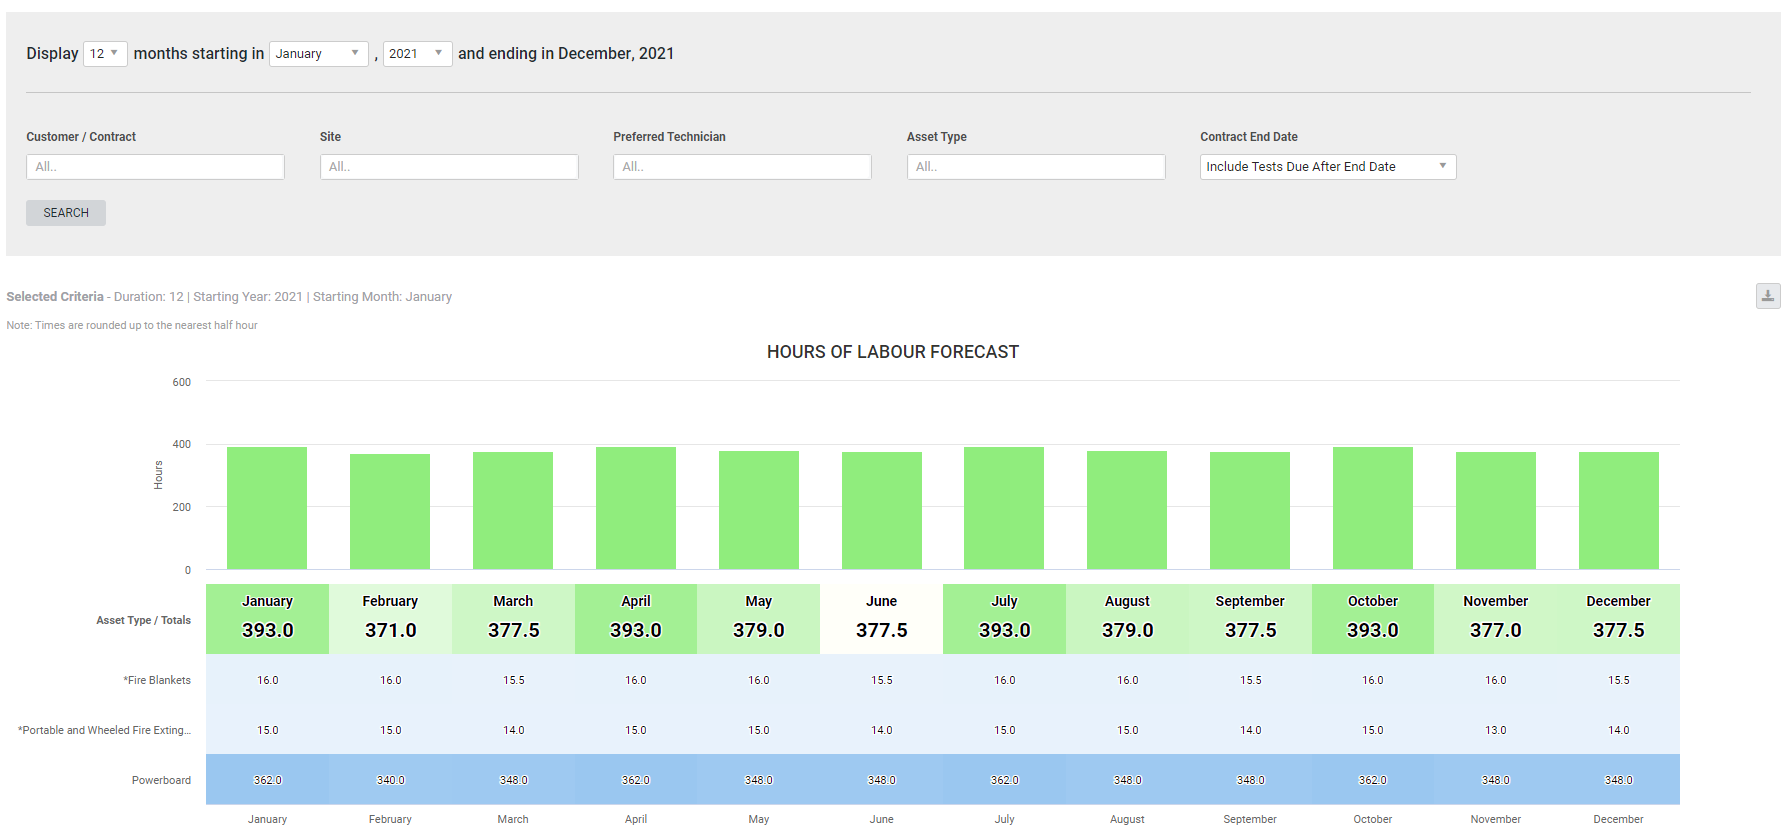
The report results are displayed as a bar graph, showing the different assets and the number of hours per asset for each month.
- The green bars are the total number of hours required to test the corresponding assets on the X-axis.
- Individual assets are displayed in blue colour-coded rows. The colour gradient helps you identify the assets that require more time to test.
- Preferred technician shows the technician assigned to that asset type.
- The data is displayed in hours and decimal points of an hour.
 Download the report
You can download the information in the report as an image in PNG format.
To download the report:
- Generate the report as required.
- Click the
 icon in the top right, then click Image.
 - Save the image file and to view it in any image-viewer application.
 Add labour time to assets
To use the Asset Labour Planning Report accurately, you must have labour hours associated with the pre-builds that are applied to the service levels on each asset.
- Go to Materials
 > Pre-Builds.
 - Locate or create a new Flat Rate Price pre-build.
- Enter a Name and all the details, as required. Learn more in Create a flat rate price pre-build.
- Under Pricing, enter or update the amount of Time it takes to service the asset.
- Adjust the Price to be charged to service the asset.
- Click Save and Finish.
Once you add the labour time to the pre-build:
- Go to System
 > Setup > Customer Assets > Assets Builder.
 - Open the required Asset Type.
- Click the Service Levels tab.
- Under Charge Rate, locate the pre-build you created for each service level.
- Click Save and Finish.
This process must be completed for all the labour times added to the customer assets to ensure correct data in the Asset Labour Planning Report.

![]()
 To assign an asset to a contract, see How to Set Up Asset Maintenance Contracts.
If you have a maintenance contract with a customer, you can override the price that you charged for the servicing of each asset. Additionally, you can also override the amount of labour time it would take to service an asset on a customer contract.
- Go to People
 > Customers and open the required customer card.
 - Click Rates > Contracts.
- Open the required contract and click Service Levels.
- To change a pre-build for a service level, click the pre-build and select a different one from the drop-down list.
- Adjust the Charge Rate, if required.
- If the service level does not apply to this particular contract, adjust the Charge Rate to zero and manually remove the pre-build when creating the job.
- In the Service Levels table, enter the Time in minutes for each service level, as required.
The time mentioned in this column overrides the time added on the pre-build. For example, you can set this for sites where it takes a longer time to test an asset or a site where technicians are familiar with the locations of the assets, so testing is quicker than it is estimated.

