Last Updated: December 12 2025
Overview
Create an order from within a job, so that the purchase order is already assigned to the job. This enables better management of your committed costs.
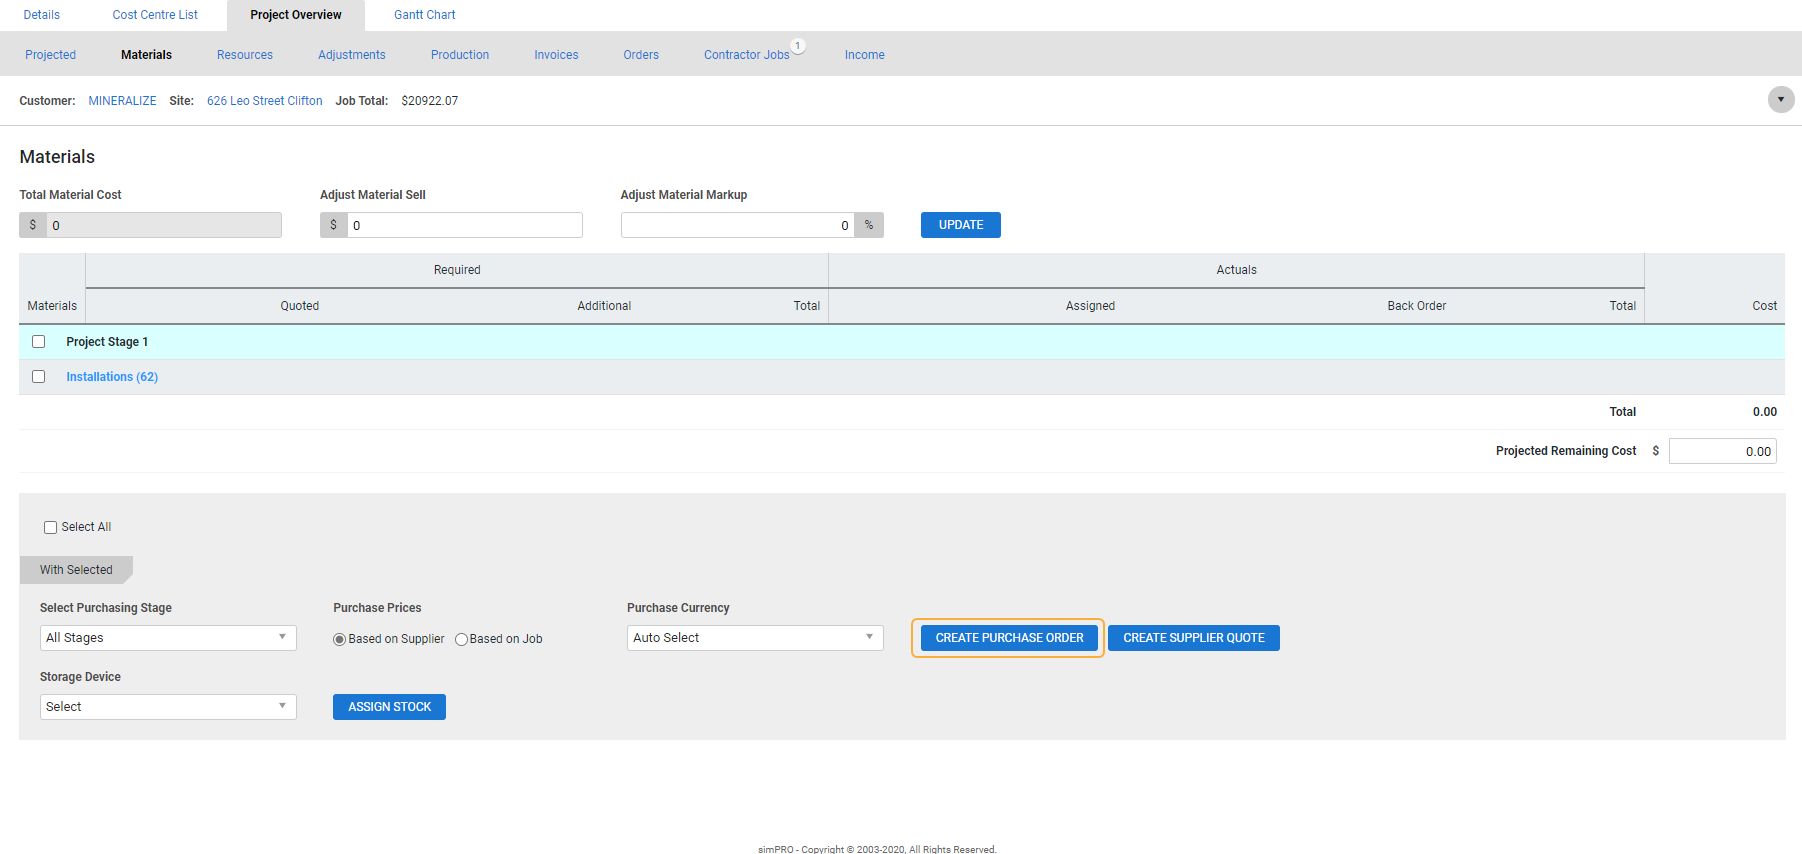
 Create a purchase order from the Project Overview tab
If you have a job with multiple cost centres, you can create a purchase order from the Project Overview tab.
To create a purchase order from the Project Overview tab:
- Open the job and click the Project Overview tab.
- If you have single cost centre jobs enabled, after opening the job click Cost Centres in the breadcrumb at the top of the page, then click the Project Overview tab.
- On the Materials page, click Create Purchase Order.
- Alternatively, select predefined items to add to the purchase order and click Create Purchase Order.
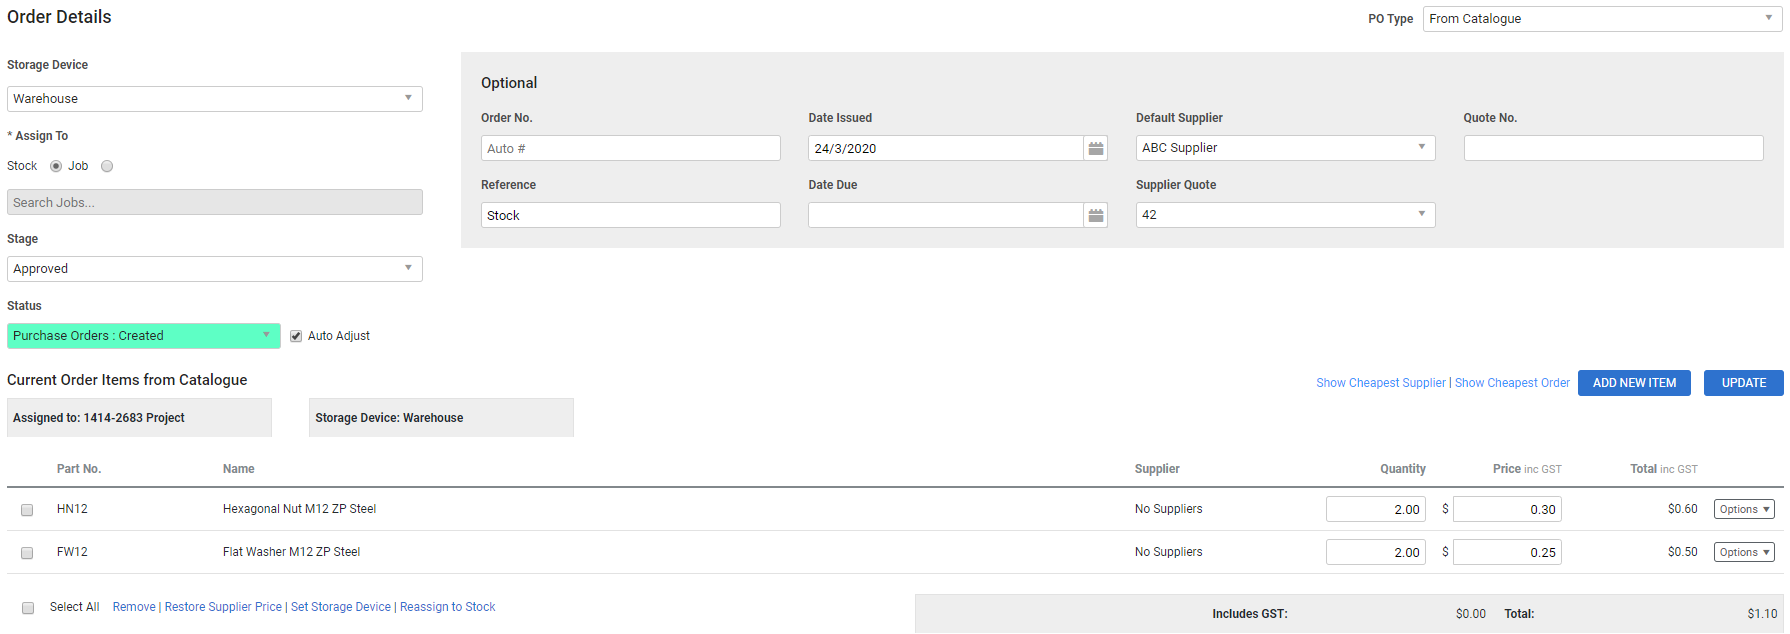
- The selected items are displayed on the Order Details page.
- The default storage device is automatically used. Select a different Storage Device if necessary.
- Under Assign To, select whether you are ordering to a Job or to Stock.
- To order to stock, enter stock into the search bar and select the required Storage Device.
- If Job is selected, search and select the job. If you have selected predefined items to add to the purchase order, you do not need to do this.
- Select a Stage from the drop-down list. You must have the correct security settings to set the purchase order stage to Approved.
- Enter any information.
- Click the Catalogue tab.
- Select or search for a group name.
- Add the number of items required and click Add Items.
- Click the Orders tab.
- To order an item that is not in the catalogue, click Add New Item and enter the item details. Part Name and Supplier are mandatory.
- Add items by part number or part name in Quick Add Items.
- Potential savings based on supplier prices are displayed. Click Apply to update to the cheapest order price.
- This may result in multiple suppliers selected, creating multiple purchase order numbers.
- Click Apply a second time to consolidate the orders and find the cheapest supplier that can provide all parts in one order.
- Go to Attachments to add attachments if required.
- Click Finish.
The Forms, Receipts, and Log tabs appear. You can then Email the purchase order.
You can select a Stage if items in the catalogue are listed under different project stages.
 Create a purchase order from a cost centre
To create a purchase order from a cost centre:
- Open the job and click the Cost Centre List tab.
- Select the cost centre.
- Click the Stock tab.
- Click the Order sub-tab.
- Under Purchase Type:
- To add items manually, select Blank. You can use this to order an item which is not defined in the job.
- To raise a purchase order based on the items already defined in the job, through assigned materials or existing purchase orders, select Stock Still Required.
- To generate a purchase order number instead of a full purchase order, select Purchase Order Number.
- Select a specific Purchasing Stage if required. Only items with this purchasing stage are added to the purchase order.
- Under Purchase Prices, select what pricing you wish to use on the purchase order:
- Based on Supplier is the default. The prices on the purchase order are the Nett Price associated with the supplier.
- If you select Based on Job, the prices on the purchase order are the price that is entered on the item on the job.
- Select a Purchase Currency.
- Click Create Purchase Order.
- Click the Catalogue tab.
- Select the PO Type.
- Select the Storage Device and Stage.
- Click or search for the relevant group name.
- Enter Optional information as required.
- Enter Supplier Notes and Private Notes to assist in delivery information.
- Alternatively, select a script from the drop-down list.
- Add the number of items required and click Add Items.
- Click the Orders tab.
- To order an item that is not in the catalogue, click Add New Item and enter the item details. Part Name and Supplier are mandatory.
- Add items by part number or part name in Quick Add Items.
- Potential savings based on supplier prices are displayed. Click Apply to update to the cheapest order price.
- This may result in multiple suppliers selected, creating multiple purchase order numbers.
- Click Apply a second time to consolidate the orders and find the cheapest supplier that can provide all parts in one order.
- Go to Attachments to add attachments if required.
- Click Save and Finish.
- Select the purchase order Form, then click View to preview, print or download the purchase order. The Forms, Receipts, and Log tabs appear. You can then Email the purchase order.
- Select a Primary Branch.
- Click Finish to complete the order and return to the job.
- Alternatively, click a purchase order number to exit the job and access the purchase order.
You can then use the Forms tab to select a purchase order form to View, Attach to the job and Send to the supplier. Click Save and Finish.
You can then receipt the order once you receive the items. See How to Receipt a Purchase Order.
Select a purchase order type
Once you have created a Blank or Stock Still Required purchase order, you need to select the appropriate PO Type to order items:
| From Catalogue |
Select catalogue items or pre-build components from the Catalogue and Pre-Build tabs. You can then return to the Order tab to select the Supplier, as well as edit the Quantity and Pricing of items. Click Show Cheapest Supplier / Show Cheapest Order if you have more than one supplier linked to an item. |
| From Description |
Select to enter a Description and purchase Amount for the required item(s). As quantities and stock names cannot be specified for the system, you cannot partially receipt the ordered items. Leave the Inventory Item check box clear to ensure the order does not impact your stock levels in Simpro Premium. |
 Raise a purchase order number in a job
You can raise a purchase order number to create an empty order that you can then update with items prior to receipting the supplier invoice.
To raise a purchase order number:
- Access the job, then go to Stock > Order.
- Under Purchase Type, select Purchase Order Number.
- Select a Purchasing Stage.
- Select whether you wish to base Purchase Prices on the supplier or job.
- Select a Purchase Currency.
- Click Create Purchase Order.
- Select the applicable Storage Device, Supplier and Stage.
- Enter Optional information as required.
- Enter Supplier Notes and Private Notes to specify delivery information.
- Alternatively, select a script from the drop-down list.
- Click Save and Finish.
- Select and email the purchase order Form to the supplier.
- Alternatively, click Finish to add items and email the order later.
Complete a purchase order in a job
To complete a purchase order number created in Simpro Premium:
- Access the job, then go to Stock > Order > Orders Assigned.
- Click the applicable Order No.
- Click the Catalogue and Pre-Builds tabs to add items as required.
- Click Forms to email the completed purchase order if required.
- Click Save and Finish.
You can also add Attachments and review the order Log. You can then receipt the order once you receive the items.


