Last Updated: December 15 2025
Overview
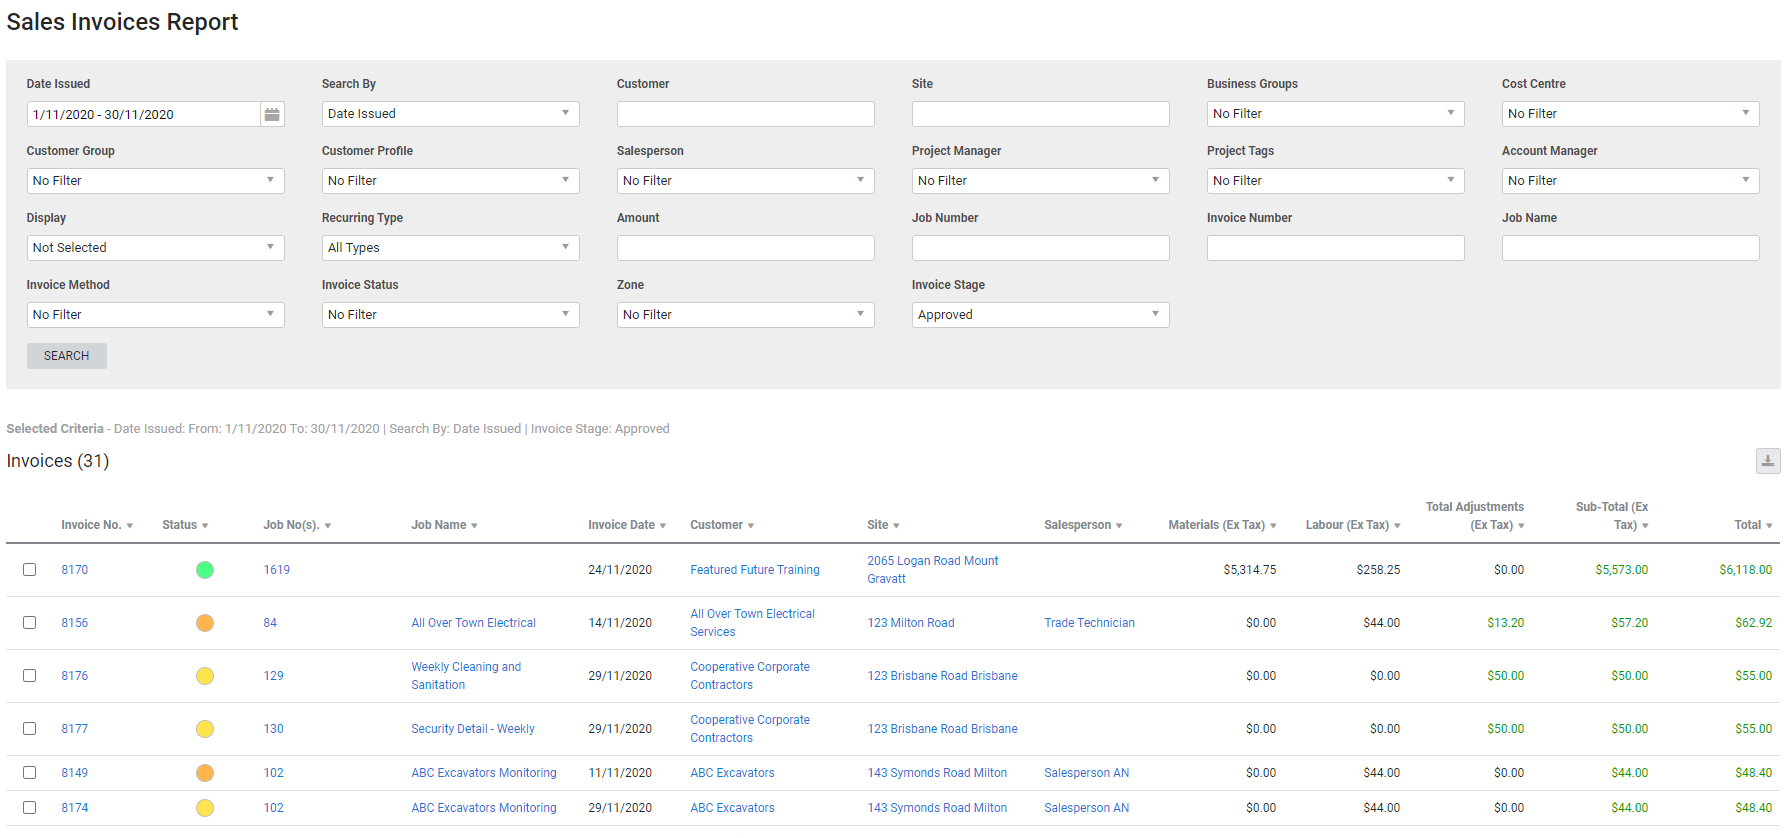
This report displays invoices created for customers, which can then be narrowed down using specific filters and batch printed or emailed to customers. This is useful for providing customers with a history of invoices for a certain period, or for end-of-month reconciliation.
Invoices can be printed in batches of up to 500 at a time.
Learn more in Invoicing Overview.
Learn about other Sales reports in Sales Reports.
 Required setup
In order to view content or perform actions referred to in this article you need to have the appropriate permissions enabled in your security group. Go to System![]() > Setup > Security Groups and access your security group to update your permissions. The relevant security group tab and specific permissions for this article can be found here:
> Setup > Security Groups and access your security group to update your permissions. The relevant security group tab and specific permissions for this article can be found here:
 Run the Sales Invoices report
To view the report:
- Go to Reports
 > View Reports > Sales > Invoices.
 - Select to Search By the Date Issued or Date Due or Date Created.
- Select the date range under Date Issued / Date Due / Date Created.
- Select from the other filter options as required. You can also enter the Customer or Site name, Amount, Job Number, Invoice Number and Request Number if required.
- Selecting No Filter displays all results, including archived. Selecting Select All displays all results excluding archived.
- Click Search.
 Filters
Filtering by Cost Centre, Salesperson, Account Manager / Project Manager includes the full value of invoices they are assigned to including consolidated invoices. If you are running multiple reports using these filters, there may be some transactions calculated multiple times.
You can use the following filters in the report:
| Date Issued / Date Due | Select a date range either for the Date Issued on the invoice or the Date Due on the invoice. |
| Search By | Select either Date Issued or Due Date or Date Created to filter by. |
| Customer | Search for a specific customer or contract to display invoices for that customer or contract. |
| Site | Search for a specific site to display invoices for that site. |
| Business Groups | Select a business group to view invoices for all cost centres belonging to that group. |
| Cost Centre | Select to filter for specific cost centres. |
| Customer Group | Select a customer group to view invoices for all customer belonging to that group. |
| Customer Profiles | Select a customer profile to view invoices for all customers with that profile. |
| Salesperson | Filter by a specific salesperson. |
| Project Manager | Filter by a specific project manager. |
| Project Tags | Filter by tags applied to the project. |
| Account Manager | Filter by a specific account manager. |
| Display | Select to either display paid invoices, unpaid invoices or credits. |
| Recurring Type | Select to show either recurring or non-recurring invoices. |
| Amount | Search for a specific amount to see invoices with that value. Using greater than (>) or less than (<) displays all invoices with totals greater or less than the number entered. For example >100 displays all invoices with a total greater than 100. |
| Job Number | Search for a specific job number to view invoices for that job. |
| Invoice Number | Search for a specific invoice number to view that invoice. |
| Job Name | Filter by the job name. |
| Invoice Method | Filter by the default invoice method selected in the customer card file. |
| Invoice Status |
Select a status to view all invoices with that status. If you select to view fully paid invoices, voided invoices are also included. |
| Zone | Select a zone to view invoices belonging to sites with that zone. |
| Invoice Stage | Select to include Approved invoices, Pending invoices, or All invoices. |
| Reconcile Xero |
Select to filter based on whether the invoices are sent to Xero. This filter is only available if the build is currently connected to Xero. This filter is intended to be used to compare invoices in Xero and those in Simpro Premium.As naming conventions are different in Xero and Simpro Premium, this filter displays invoices regardless of other filters selected in the report. Any other filters selected are ignored. |
 Columns
The report displays the following information:
| Invoice No. | The invoice number assigned in Simpro Premium. Click to open the invoice. |
| Status | The current status of the invoice. |
| Job | The job number assigned in Simpro Premium. Click to open the job. |
| Job Name | The job name added in Simpro Premium. Click to open the job. |
| Invoice Date | The date the invoice was issued. |
| Customer | The customer associated with the invoice. Click to open the customer card file. |
| Site | The site associated with the invoice. Click to open the site card file. |
| Salesperson | The salesperson assigned to the job. Click to open the employee card file. |
| Materials (Ex Tax) | The sell price of the materials for the job, excluding tax. |
| Labour (Ex Tax) | The sell price of labour for the job, excluding tax. |
| Total Adjustments (Ex Tax) | The total amount on the invoice, excluding tax, minus the sum of Materials Billed, Labour Billed, and Service Fees Billed. |
| Total (Ex Tax) | The total amount on the invoice, excluding tax. |
| Retention (Ex Tax) | The retention value of the invoice, excluding tax. |
| Total | The invoice total, including tax. |
 Email and print invoices
To print / email the invoices:
- Generate the report as required.
- Select the check boxes for the invoices you wish to print / email.
- Alternatively, click Select All.
- Under Print Options, select the invoice form.
- Toggle on Use Form Builder Templates to select invoice forms from the relevant drop-down lists.
- Based on the invoice types included in the report, the selection of Form Builder templates available may vary. Learn more in How to Use Form Builder Templates.
- Click Print / Email at the bottom of the page.
If you have emailed the invoices, a confirmation message appears before sending. Click OK to continue sending the invoice / s, or click Cancel to review the customers selected. When the invoices have been sent, another confirmation message appears with the email addresses that receive the invoices, as entered in the customer card file.
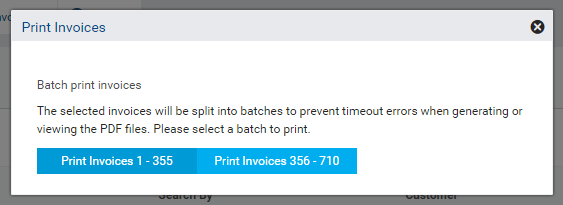
If you are printing more than 500 invoices, you are prompted to print the invoices in smaller batches. Click a batch to generate a PDF.
 Download the report as a CSV file
You can download the information in the report as a spreadsheet in CSV format, viewable in Microsoft Excel and other spreadsheet software.
To download the report:
- Generate the report as required.
- Click the
 icon in the top right, then click CSV.
 - View, print or save the CSV, as required.

