Last Updated: December 12 2025
Overview
Use Form Builder to set up the layout of all your project forms and include details based on your customer's requirements. You can use pre-built templates or create new templates in the Form Builder interface using the available fields.
To learn more, see How to Use Fields in Form Builder, How to Use Loops in Form Builder and How to Use Conditional Fields in Form Builder.
Learn more about compliance certificates for asset testing in Compliance Certificates for Asset Testing in Form Builder.
 Required setup
In order to view content or perform actions referred to in this article you need to have the appropriate permissions enabled in your security group. Go to System![]() > Setup > Security Groups and access your security group to update your permissions. The relevant security group tab and specific permissions for this article can be found here:
> Setup > Security Groups and access your security group to update your permissions. The relevant security group tab and specific permissions for this article can be found here:
 Security group permissions
You need relevant Security Group permissions in System ![]() > Setup to use Form Builder.
> Setup to use Form Builder.
To enable Form Builder:
- Go to System
 > Setup > System Setup > Security Groups.
 - Select the security group.
- Click the Setup tab.
- Select the Email/Form Setup check box in the System tab.
- Click the Actions tab, click Quotes / Jobs.
- Select the View/Edit Quotes or View/Edit Jobs and Print/Email Quotes or Print/Email Jobs check boxes.
- To enable Form Builder to permit users to edit jobs / invoices before sending in emails, go to Jobs / Invoices in the Actions tab.
- Select the Edit Job Forms or Edit Invoice Forms check box.
- Click Save and Finish.
 Manage Form Builder templates
The Form Builder templates are available for jobs, quotes, invoices, and credit notes. Use default Templates or create customised templates based on your customer requirements.
- Go to System
 > Setup > Forms Setup.
 - Click Credit Note, Invoice, Quote or Job.
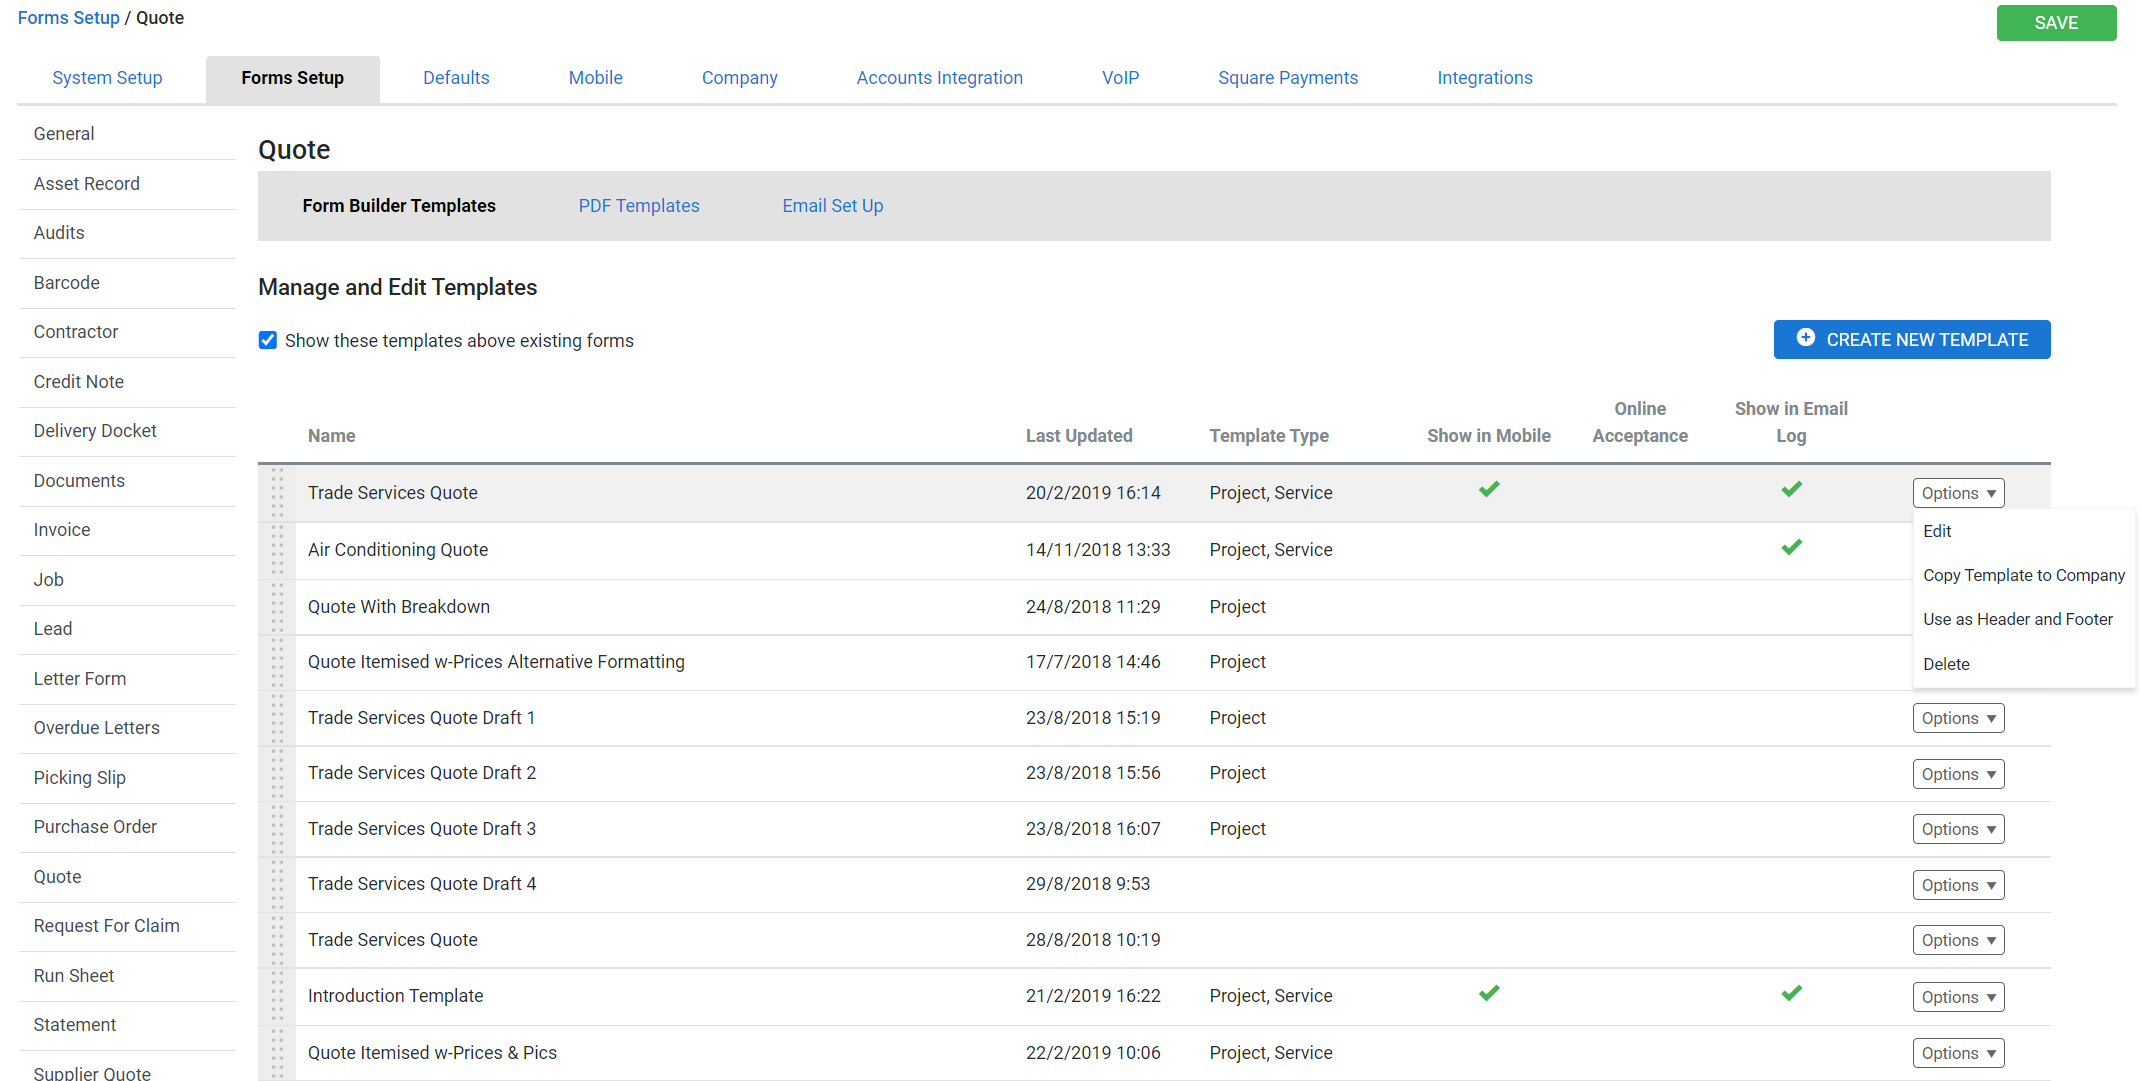
- In the Form Builder Templates tab, select the Show these templates above existing forms check box to list the Form Builder templates above the PDF Templates when you email or print a form.
- Click and drag the grey drag handle to reposition the templates. The Templates list on the Forms tab of the credit note / invoice / quote displays these templates in the same order. Learn more in How to Create a Service Quote.
- You can set a default form builder template for quotes, jobs and invoices for individual customers on their customer card. Learn more in How to Create Customers.
- Click Options and choose to Edit or Delete the corresponding template.
- If you have a multi-company build, click Copy Template to Company to copy the selected template to another company.
- Click Use as Header and Footer to apply the header and footer from this template to all existing user templates and also to any new templates created in the future.
- You can use this option to ensure a consistent header and footer across all the templates.
- You can choose to edit the header and footer for a particular template, if required, after you use this option.
The Use as Header and Footer option overrides any previously created header / footer styles in your templates. To retain an unique header and footer for any of the listed form templates, avoid using this option.
- For invoice form templates, click Use How To Pay to apply the corresponding section from the selected invoice form to all other invoices that include the How To Pay loop start and end fields.
 Create new templates
Using Form Builder, you can create a personalised form templates.
To create a customised form template:
- Go to System
 > Setup > Forms Setup.
 - Click Credit Note, Invoice, Quote or Job.
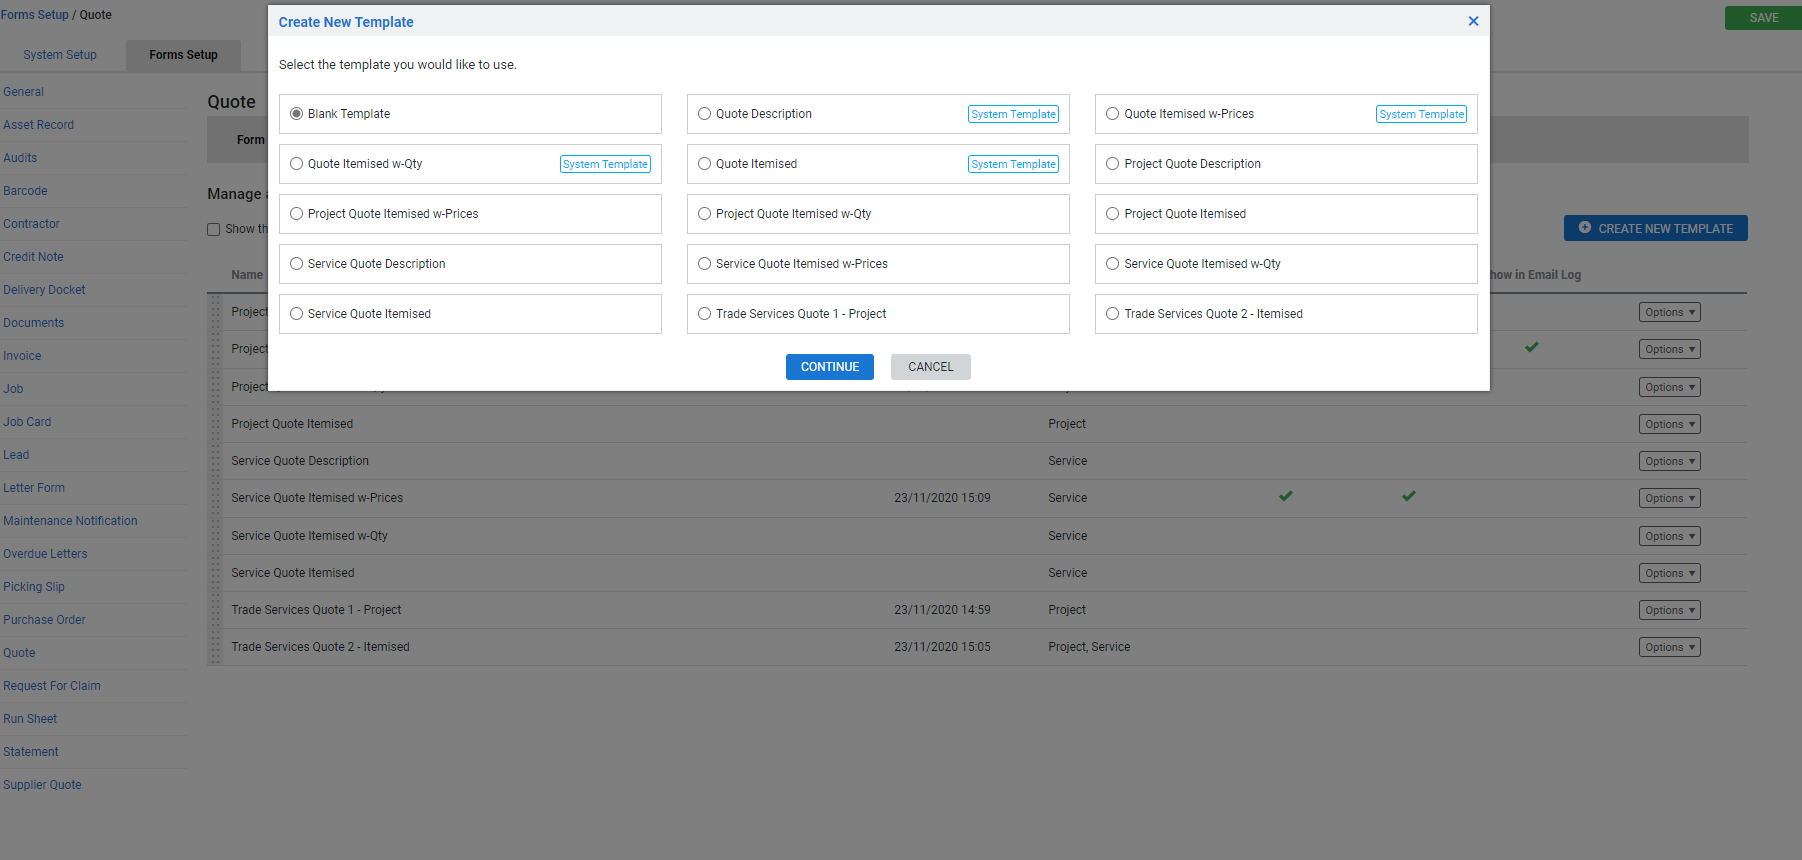
- In the Form Builder Templates tab, click Create New Template.
- Select a System Template as a base to build the new template or start with a Blank Template.
- Click Continue to open Form Builder.
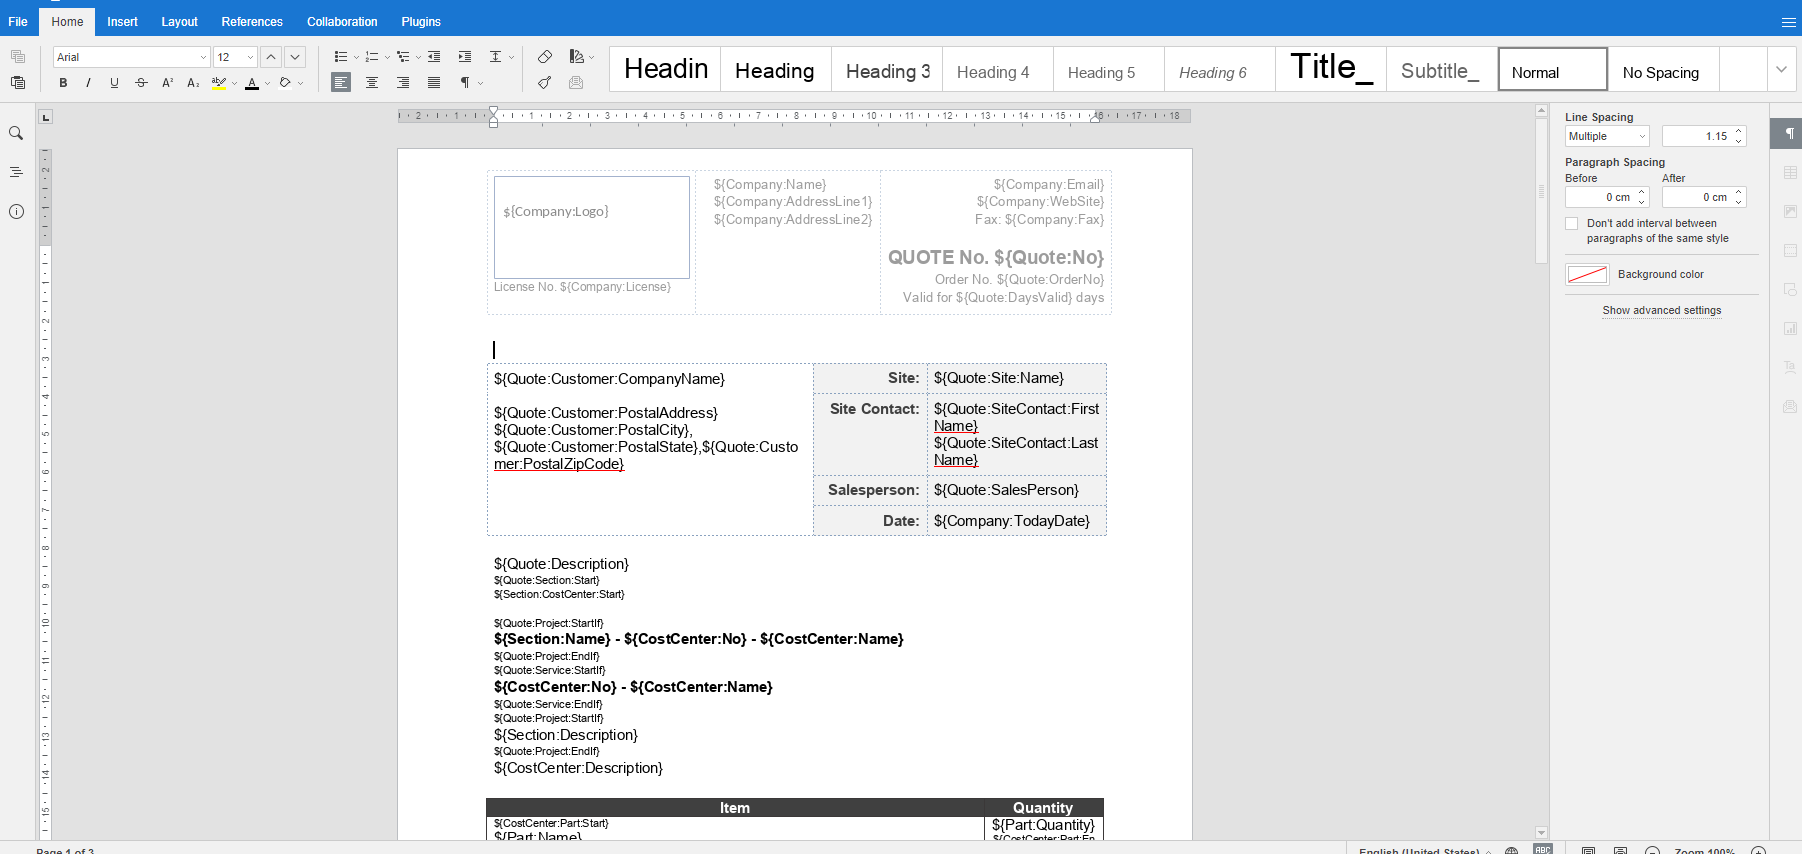
The template opens as an editable version in Form Builder.
 Customise template
The Form Builder is incorporates standard and user-friendly word processing features which you can apply to edit templates.
To edit a new or existing user-created template:
- In the top-left corner, enter a relevant Template Name.
- Enter an Email File Name, which is used when the recipient downloads the form locally.
- Select the check boxes to make the form template available for different form types.
- Project Quote and / or Service Quote if you are editing quote form templates.
- Project Job, Service Job and / or Jobcard if you are editing job form templates.
- Tax Invoice, Progress Claim, Request for Claim, and / or Deposit if you are editing invoice form templates.
- Credit Note if you are editing credit note form templates.
- When you select the form types, it makes them available to be selected from in the Sales Invoice Report when you toggle on Use Form Builder Templates. Learn more in Sales Invoices Report.
- Select the check boxes to display the form template in Mobile apps for technicians to select, allow customers to use Online Acceptance, and include the template in the Email Log when sent.
- Use the content-formatting toolbar to change font, indent or list text, and edit paragraph styles, as required.
- Use the other menu options to:
- Insert: Add tables, images, header and footer, hyperlinks, etc.
- Layout: Edit the document orientation, add margins, page breaks, etc.
- References: Add a table of contents, footnotes, and other references.
- Collaboration: Set co-editing mode for the document.
- The shortcut menu to access settings specific to different elements in the content is available on the right side of the Form Builder window.
Form Builder integrates the OnlyOffice user interface. To access the OnlyOffice online help, click File > Help. Note that some features detailed in the OnlyOffice help may not be available in Form Builder.
Spell check is available for select valid languages. Click the Set document language icon at the bottom of the Form Builder interface to select a valid language region. Note that not all languages support spell check.
- Go to Plugins > Fields. The list of fields pull data from the respective components of a Job, Quote, Invoice, or Credit Note.
The Fields are categorised into Company-related data and respective project information:- Use the Company fields to pull data, such as your company's logo, name and address, from the corresponding tab in System Setup. All the fields listed under Company point to the corresponding data available for the form in Simpro Premium. You can populate information from the logged-in employee’s card file using the relevant fields.
- The Job / Quote / Invoice / Credit Note fields are further categorised into sections for populating data, such as project settings, customer contacts, cost centres, parts and labour, etc. You can also add data from the applicable customer and site card files and other custom fields created in System Setup.
Learn more in How to Use Fields in Form Builder and How to Use Loops in Form Builder.
Learn more about adding individual test readings to a form template and compliance certificates for asset testing in Compliance Certificates for Asset Testing in Form Builder.
Use How to Use Conditional Fields in Form Builder in Form Builder to display different information for projects using the same template.
For more details on the available fields, see List of Fields in Form Builder.
 Walk Me Through
Need additional help?
Try Walk Me Through, our step-by-step guidance tool, to manage form builder templates.
In Simpro Premium, go to Help ![]() > Walk Me Through and search for 'Invoice Form Builder'.
> Walk Me Through and search for 'Invoice Form Builder'.
Learn more in How to Use Walk Me Through in Simpro Premium.


