Last Updated: December 12 2025
Overview
Some fields in the Form Builder templates point to components that typically repeat throughout a project, such as a table listing parts, different labour types, cost centres and sections. To populate these field types and repeat the sequence, create different loops in the template. A loop continues populating fields, one after another, until all items are included in the quote / invoice / credit note. This ensures that all repeating components are populated on the generated form.
To learn more about Form Builder templates and using fields, see How to Use Form Builder Templates, How to Use Fields in Form Builder and How to Use Conditional Fields in Form Builder.
 Required setup
In order to view content or perform actions referred to in this article you need to have the appropriate permissions enabled in your security group. Go to System![]() > Setup > Security Groups and access your security group to update your permissions. The relevant security group tab and specific permissions for this article can be found here:
> Setup > Security Groups and access your security group to update your permissions. The relevant security group tab and specific permissions for this article can be found here:
 Insert loops
In a Form Builder template, loops can be identified by Start and End fields separated by a line break. Access a template in Form Builder and go to Plugins > Fields. Fields listed under categories with the ![]() icon must be inserted into a loop.
icon must be inserted into a loop.
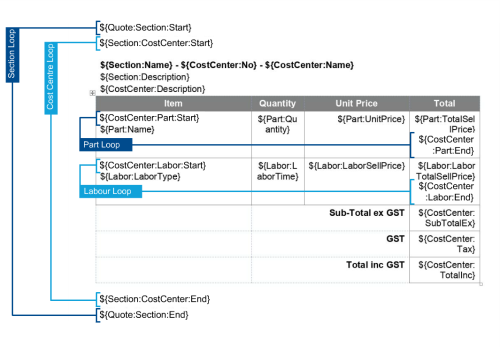
To begin with, start by creating a loop for the main component of the project that contains all other components. For instance, if you are editing a Quote template in Form Builder, first create a loop for the sections followed by a loop for cost centres. And, the materials and labour form a part of the cost centres. Note that some fields, such as section fields, are only populated if used for project quotes or invoices that are raised from a project job.
For more details on the available fields, see List of Fields in Form Builder.
When creating a template for invoices, section loops must be contained in an Invoice Job Loop. This ensures that details from all the jobs are included on the invoice form if you are raising a single invoice for multiple jobs.
Section loops are required for both service and project quotes and for invoices that are raised for service and project jobs.
For example, to structure a Quote Section loop:
- Insert a Section Start field.
- On the next line, add the Section End field. This creates a loop for the Quote Sections.
The Start and End fields should be separated by a line break.
- Insert the required Quote Section fields, such as Section Name and Section Description, between the Section Start and Section End fields.
- You only need to insert each field once into the loop.
- If your quotes have multiple section names or multiple descriptions, a loop ensures that all the section names are pulled onto the generated quote form.
- It repeats, populating one section name after another. When all sections in the quote are included, the loop is complete.
- Apply the relevant text formatting to the fields in the loop using the word processing toolbar at the top of the Form Builder.
To add cost centre fields in the quote form from above example, create a Cost Centre loop inside the Quote Section loop.
- Insert a Cost Centre Start field under the Section Start field.
- On the next line, enter the Cost Centre End field.
- Insert the other relevant fields, such as Cost Centre Name, Cost Centre Description, inside the Cost Centre Start and Cost Centre End fields.
The first time that the Quote Section loops, it populates data fields for the first cost centre, until all cost centres in the first section are complete. Then, when the Quote Section loop repeats, the Cost Centre loop is triggered again. This process repeats until the outer Quote Section loop finishes, ensuring that the generated quote form is populated with data from the various sections in the quote. - You only need to insert the Cost Centre loop once into the Quote Section loop.
- Insert the other relevant fields, such as Cost Centre Name, Cost Centre Description, inside the Cost Centre Start and Cost Centre End fields.
- Insert Part / LabourStart and End fields to create respective loops in the Cost Centre loop.
It is important to insert loops in a strict order, otherwise the required fields fail to appear on the generated quote form. For example, a Cost Centre loop must be inside in a Quote Section loop. And, Parts / Labour loops are always inside Cost Centre loops. Similarly, for Invoices Job Section loops must be created inside Invoice Job loops.
- Format the fields and enter a descriptive text to identify the field types, if required. For example, you can add a descriptive text, such as Section Sub-Total ex GST against the Section Sub-Total Ex field.
 Insert tables
For components that normally appear in tables, such as parts and labour, insert a table in the cost centre loop.
Continuing with the example from the Insert loops section, to structure data in tables:
- Use the Insert menu to add tables and organise the field data in loops in tables, as applicable.
- Select the table and click the table icon on the right menu bar to view the table formatting options.
- You can add header rows, modify border styles or colour and specify the cell size, as applicable.
- Add text to identify the fields inserted in the table.
- In this quote form template example, it is recommended to organise the Parts and Labour fields, such as Part Name, Part Quantity, Part Unit Price, Labour Type and Labour Sell Price in a table with fields separated in different columns.
- Insert the Part and Labour Start and End fields to create the respective loops in the table inside the Cost Centre loop.
- Next, insert the Part and Labour Fields, as applicable. You can also copy parts and labour tables from other form builder templates.
- Insert a tax breakdown loop for the entire quote, each cost centre or each section, if required.
- To display tax breakdown for the entire quote, create a Tax BreakDown loop outside all other loops. Click Quote Tax Breakdown in the fields list and insert Tax BreakDown Start and Tax BreakDown End fields, then insert the other tax breakdown fields.
- To display tax breakdown loop for each section, create a tax breakdown loop inside a Quote Section loop. Click Quote Section > Section Tax Breakdown in the fields list and insert Tax BreakDown Start and Tax BreakDown End fields within the section loop, then insert the other tax breakdown fields.
- To display tax breakdown loop for each cost centre, create a tax breakdown loop inside a cost centre loop. Click Quote Section > Section Cost Centres > Cost Centre Tax Breakdown in the fields list and insert Tax BreakDown Start and Tax BreakDown End fields within the cost centre loop, then insert the other tax breakdown fields.
- Click Save and Finish.
You can then view this template in Forms Setup under the Manage and Edit Templates list in the Form Builder Templates tab.
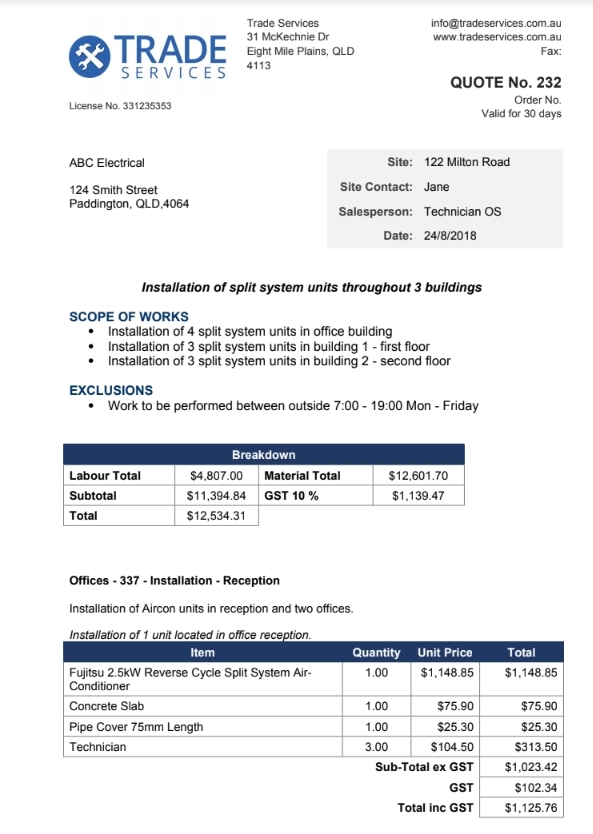
Example of a generated quote form with information populated from the Quote, Company, Customer and Site:
 Preview a form builder template
You can preview a form builder template with placeholder data to confirm whether the layout and information is displayed as intended. This saves your time and effort to create and edit form builder templates, as per your requirements.
- Go to System
 > Setup > Forms Setup.
 - Click the relevant form type, Credit Note, Invoice, Job or Quote.
- Open an existing template or create a new template. Learn more in Create new templates.
- Click Preview to generate a version of the form with data populated in a new tab.
You can verify the layout and ensure whether all loops and conditional fields from the template are populating correctly.


