Last Updated: December 12 2025
Overview
Use conditional fields in Form Builder to display information that differs for projects using the same template. Conditional fields help manipulate information on forms based on specific circumstances and reduce the amount of editing required prior to sending a form to a customer.
To learn more, see How to Use Form Builder Templates, How to Use Fields in Form Builder and How to Use Loops in Form Builder.
For more details on the available fields, see List of Fields in Form Builder.
 Required setup
In order to view content or perform actions referred to in this article you need to have the appropriate permissions enabled in your security group. Go to System![]() > Setup > Security Groups and access your security group to update your permissions. The relevant security group tab and specific permissions for this article can be found here:
> Setup > Security Groups and access your security group to update your permissions. The relevant security group tab and specific permissions for this article can be found here:
 Manage conditional fields in templates
Use conditional fields to display specific information on your forms only when relevant. For example, a customer may be either an individual or a company and the information should differ accordingly on a generated quote form.
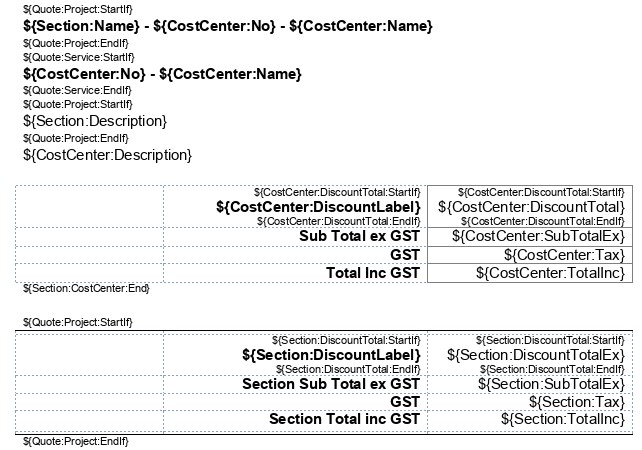
Conditional fields appear as a set of text tags and can be identified by the suffixes StartIf, EndIf or StartIfNot, EndIfNot in the field name. For instance, in the pre-made Form Builder templates for quotes:
- The conditional fields are structured in such a way that if the quote being viewed is a project quote it displays fields for Section Names, Cost Centre Number and Cost Centre Names.
- Alternatively, if the quote being viewed is a service quote, it only displays fields for the Cost Centre Number and Name.

To insert a conditional field in your form template, go to Plugins > Fields. Note that the conditional fields appear with a drop-down arrow beside the name. There are two types of conditional fields that carry out actions based on whether the condition is true or false. If the condition result is true, the If-statement is executed and, if the condition result is false, the If Not-statement is executed.
For example, to use conditional fields to create an introductory greeting for an individual or a company in the same template:
- Click Plugins > Fields.
- Expand the Quote and then Quote Customer fields' list.
- Click Customer Last Name > If this field exists to insert the conditional field in the template. This adds the corresponding StartIf and EndIf conditional tags and at the same time inserts relevant field between them.
- Next, enter text and insert additional fields between the start and end tags.
- Similarly, add conditional fields for an alternative scenario. Use the CompanyName:StartIf and CompanyName:EndIf fields and enter text and insert additional fields between the tags.
- To add text and fields to be displayed when the field is absent, use the If it doesn't field and enter the relevant text and fields between the StartIf and EndIf tags.
- Continue editing the template as normal.
The Start and End fields should be separated by a line break.
The text entered inside the conditional field tags only appears on the final forms when relevant. In the example above, the form template is formatted to address an individual or a company depending on the type of customer.
 Paid and Overdue notes
You can add fields to your Form Builder templates to indicate if the invoice is overdue or paid and the relevant text appears on the invoice form.
To add an Overdue or Paid note to a Form Builder Template:
- Go to System
 > Setup > Forms Setup > Invoice.
 - Open the relevant Form Builder Template.
- Click Plugins > Fields.
- Enter Overdue or Paid in the search field.
- Click on the form template where the overdue or paid notice should appear.
- Click Is Overdue or Is Paid to insert the field.
- Enter the text that should appear on the form if the invoice is overdue or paid between the start and end fields. Format the content, as required.
- Click Save and Finish.
To generate an Form Builder invoice form with an Overdue or Paid note:
- Go to Invoices
 > Unpaid / Paid Invoices.
 - Click the relevant invoice that is overdue or paid, as required.
- Go to the Forms tab and from the Template drop-down select a Form Builder Template that has the Is Overdue / Is Paid field added to it.
- Click View.
- The invoice form should display with the Overdue / Paid notes depending on your selection.
 Preview a form builder template
You can preview a form builder template with placeholder data to confirm whether the layout and information is displayed as intended. This saves your time and effort to create and edit form builder templates, as per your requirements.
- Go to System
 > Setup > Forms Setup.
 - Click the relevant form type, Credit Note, Invoice, Job or Quote.
- Open an existing template or create a new template. Learn more in Create new templates.
- Click Preview to generate a version of the form with data populated in a new tab.
You can verify the layout and ensure whether all loops and conditional fields from the template are populating correctly.
