Last Updated: December 15 2025
Overview
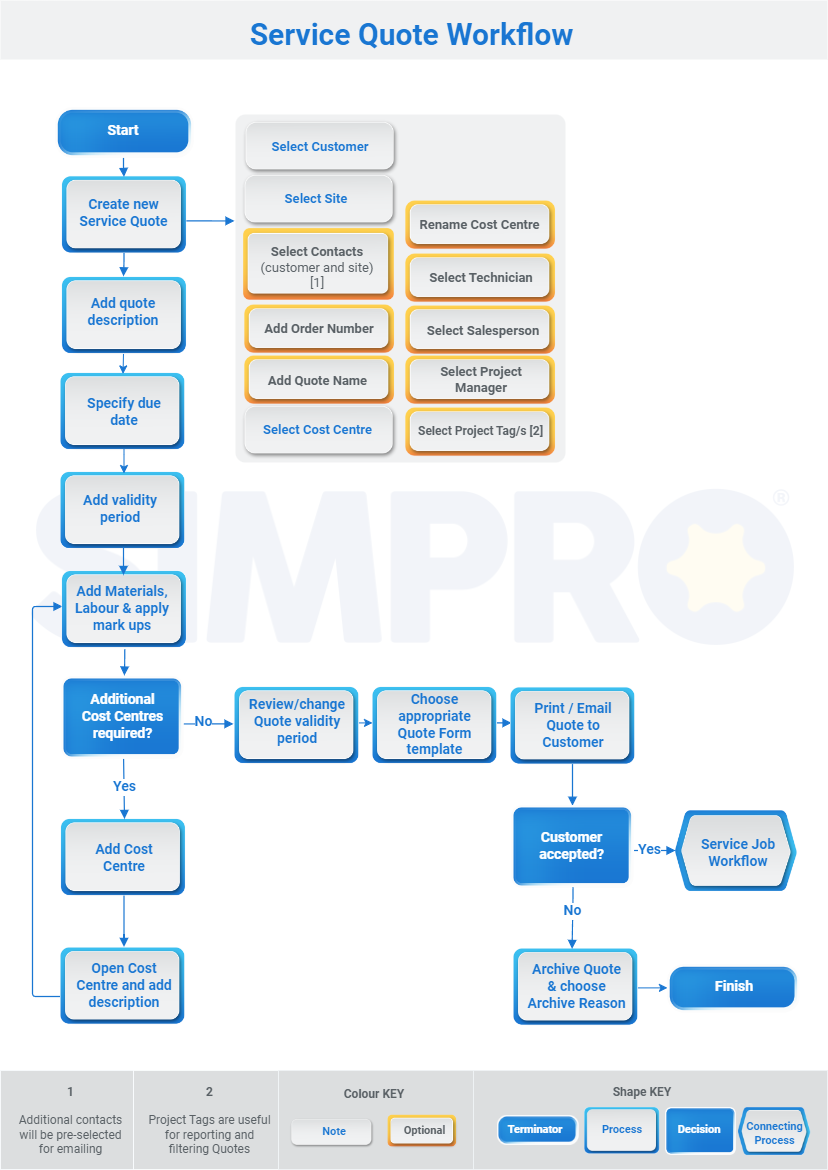
Create quotes for 'do and charge' jobs, or service quotes, in Simpro Premium. When the quote has been approved, you can then convert it to a service job. You can also archive service quotes if they are unsuccessful.
Technicians using Simpro Mobile can also create service quotes in the field.
You can also use memberships to automatically apply a discount to all quotes created against a customer within a specified duration, boosting customer loyalty and revenue. Learn more in About Memberships.
To create quotes in bulk, see How to Bulk Import Quotes. Also, to export quotes in bulk, see How to Export a Quote.
In Simpro Premium, quotes must be approved before they can be sent to the customer. You can choose to either approve all quotes automatically, or set up a quote approval workflow. Learn more in How to Approve a Quote. Required setup
In order to view content or perform actions referred to in this article you need to have the appropriate permissions enabled in your security group. Go to System![]() > Setup > Security Groups and access your security group to update your permissions. The relevant security group tab and specific permissions for this article can be found here:
> Setup > Security Groups and access your security group to update your permissions. The relevant security group tab and specific permissions for this article can be found here:
Before performing the steps detailed below, ensure that this part of your build is set up correctly. The relevant steps to set up the features and workflows detailed in this article can be found here:
 Create a service quote
You can create a service quote from the Quotes ![]() menu, from the schedule Day View / Week View, or from within the customer / site card file.
menu, from the schedule Day View / Week View, or from within the customer / site card file.
To create a service quote from the Quotes ![]() menu:
menu:
- Go to Quotes
 > Create New Service Quote.
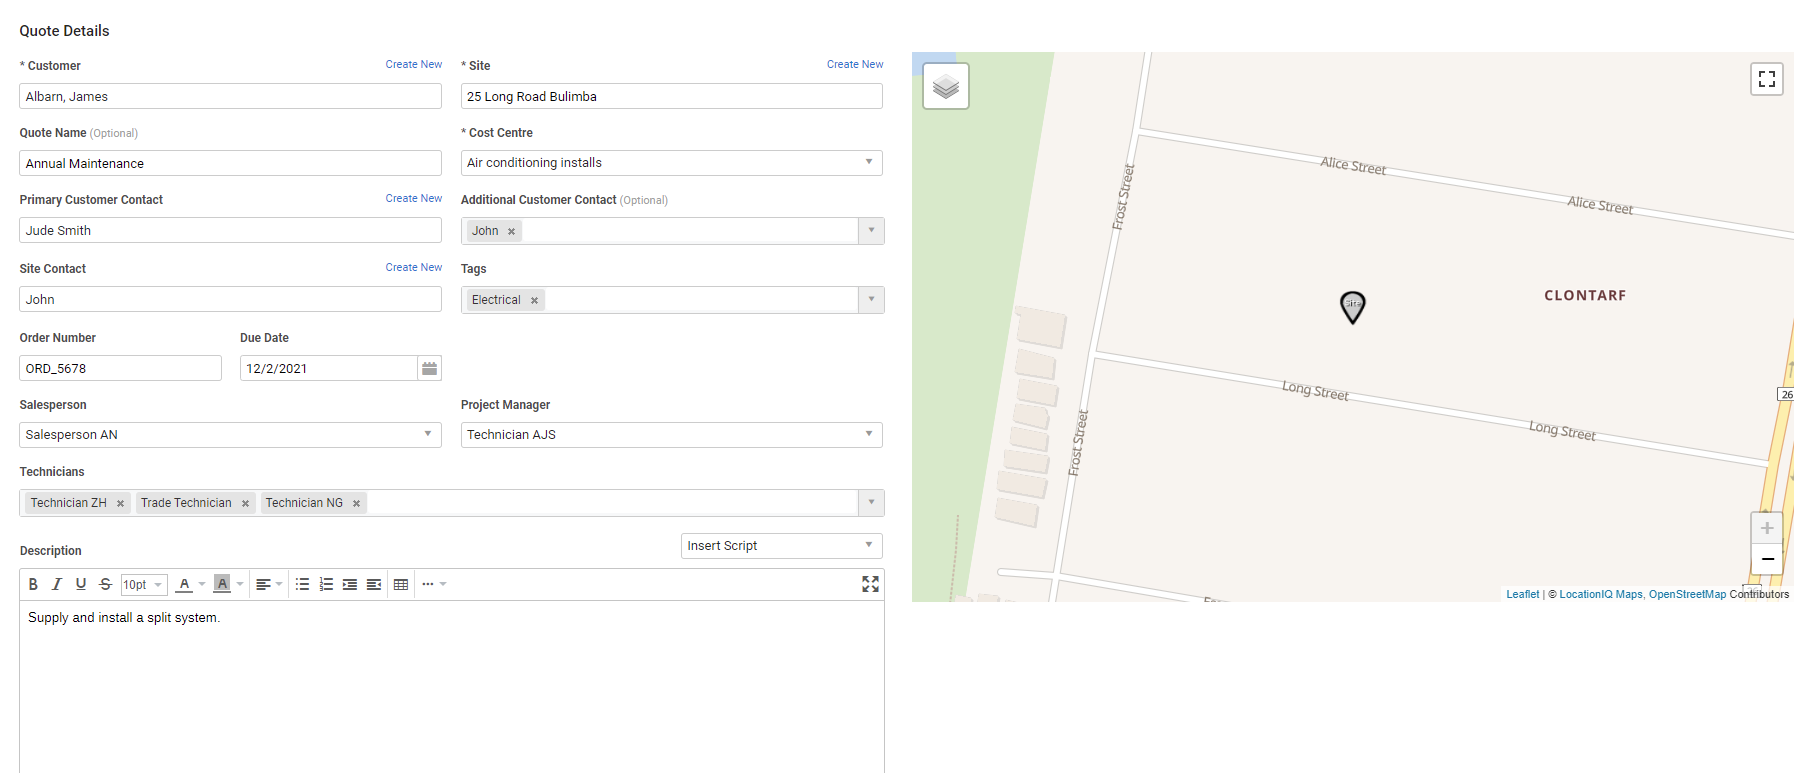
 - Search and select a Customer and Site from the drop-down lists.
- Alternatively, click Create New to create a new customer and / or site.
- If the customer has an active membership, it appears in the header. Learn more in How to Use Memberships in Workflows.
- Selecting an existing customer may display a warning message if the customer has invoices that are outstanding. The message indicates if the invoice is more than 30 or 90 days overdue. Click View Statement in the warning message box to open the customer statement and email it, if required. Learn more in View and email the customer statement.
- Select a Customer Contact and Site Contact, or click Create New to create new contacts.
- Click All to select contacts from all customers, sites and suppliers. Note that if you use a contact from a different customer, site or supplier, it is not linked to the site or customer used on the quote.
- The contact phone numbers and email are then available in Simpro Mobile. The Site Contact may be a store manager, building manager etc.
- Enter a Quote Name, if required.
- Select the Cost Centre
 US: Cost Center. A method for separating operational costs of the business for reporting and financial management..
- Cost centres separate operational costs and services within your business to assist in reporting.
- Enter a new Cost Centre Name if required to provide more detail on what is involved in the cost centre.
- This name then appears in the quote breadcrumbs when you click Next. See Rename a cost centre in a quote, job, recurring job, or recurring invoice for information on where else this new name appears.
- Enter the quote Description to appear on the quote card, in Simpro Mobile, and in the converted job if the quote is successful.
- Alternatively, select a script from the Insert Script drop-down list. You can then adjust the description as required using the text formatting options.
- Assign a Salesperson and / or Project Manager and enter a Due Date if required.
- You need to mark employees as Salesperson / Project Manager in their card files to select them.
- If the customer has a response time assigned to their customer card, the Response Time field replaces the Due Date field when creating the quote. To set a due date, click Next and go to the Quote Settings tab.
- If the employee creating the job is marked as a Salesperson / Project Manager they are automatically selected as the Salesperson / Project Manager. If not, the customer’s selected account manager is assigned as the Salesperson / Project Manager provided they are marked appropriately in their employee card files.
- Under Technicians, you can select multiple employees / contractors to assign to this quote.
- Select Tags to categorise the quote.
- Optionally, Adjust default quote rates and settings in the Optional tab.
- Click Finish.
- Alternatively, click Next to continue building the quote.
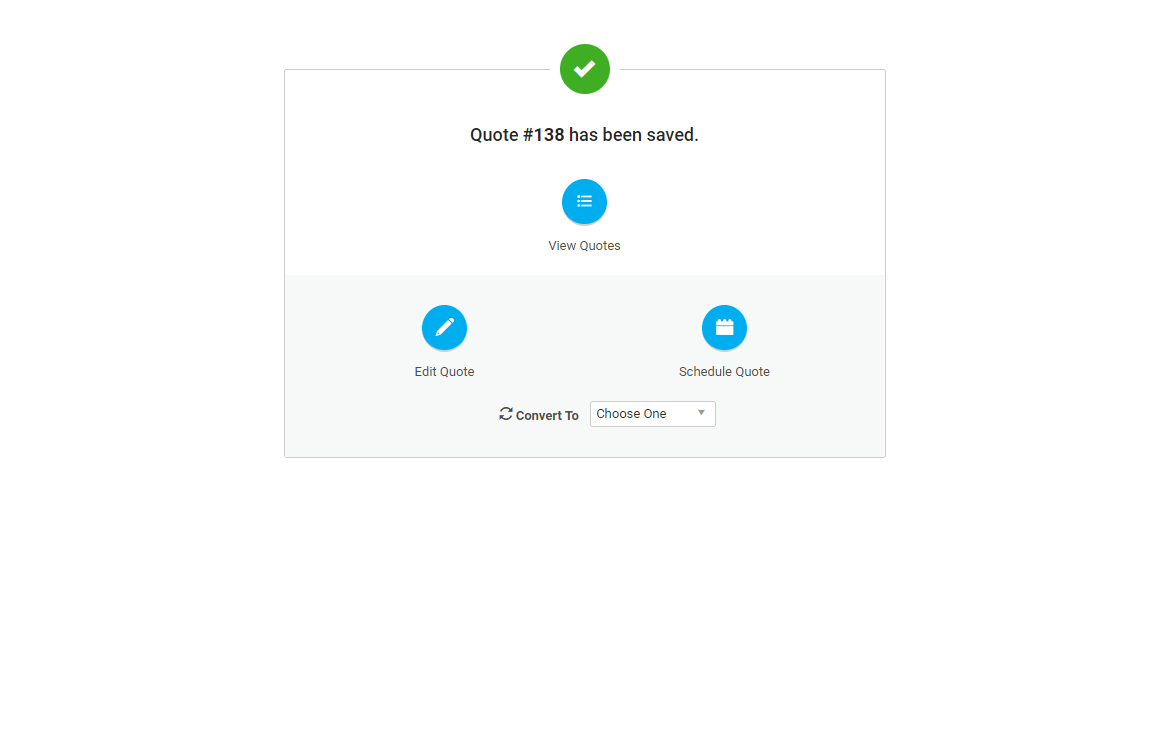
When you click Save and Finish on a service quote, the Quote saved pop-up appears where you can choose to:
| View Quotes | View all quotes in the Open / Progress Quotes table, depending on how you have set up your automatic triggers in System |
| Convert To | Convert the quote to a Job, Recurring Job, or Recurring Invoice. |
| Edit Quote | Go to the Summary tab to continue building the quote. |
| Schedule Quote | Schedule a technician to a quote in the Day View / Week View, depending on your settings in System |
You can return to the Quote Setup page to make changes by accessing the quote, then going to Details > Settings > Quote Setup.
 Adjust default quote rates and settings
Click Optional in the Quote Setup page to adjust default material markups and / or pricing tiers, labour rates, tax codes, and discounts and fees, as well as STC / VEEC eligibility and values (AU only) for users in Australia.
If the scope of the quote becomes much larger than originally expected go to the Settings > Quote Setup > Optional to change the Quote Type from Service to Project.
If your business operates in the United States, this is particularly important for selecting different parts and labour tax codes to apply to the entire quote.
You can also remove and re-apply the customer's membership discount. Learn more in How to Use Memberships in Workflows.
Click Custom Fields to enter information in fields set up in System ![]() > Setup > System Setup > Custom Fields > Leads, Quotes, Jobs & Recurring.
> Setup > System Setup > Custom Fields > Leads, Quotes, Jobs & Recurring.
You can set the completion progress for a cost centre in the cost centre settings for jobs. Additionally, the Start Date and End Date recorded on a project quote or job cost centre can be automatically updated based on the Start Date and End Date specified on the tasks assigned to the cost centre.
- Open the required quote or job.
- Access the Cost Centre List and open the required cost centre.
- Go to Settings.
- For jobs, enter the percentage completed in the Progress field.
- For quotes you can update the cost centre progress from the Gantt Chart.
- The cost centre Progress field is not impacted by the Progress field available for tasks.
- Select the Auto adjust based on tasks check box.
- All new project quotes and jobs have this option selected by default.
- This feature is only available for quotes and jobs that have multiple cost centres.
- Click Save and Finish > Save.
 View the quote summary
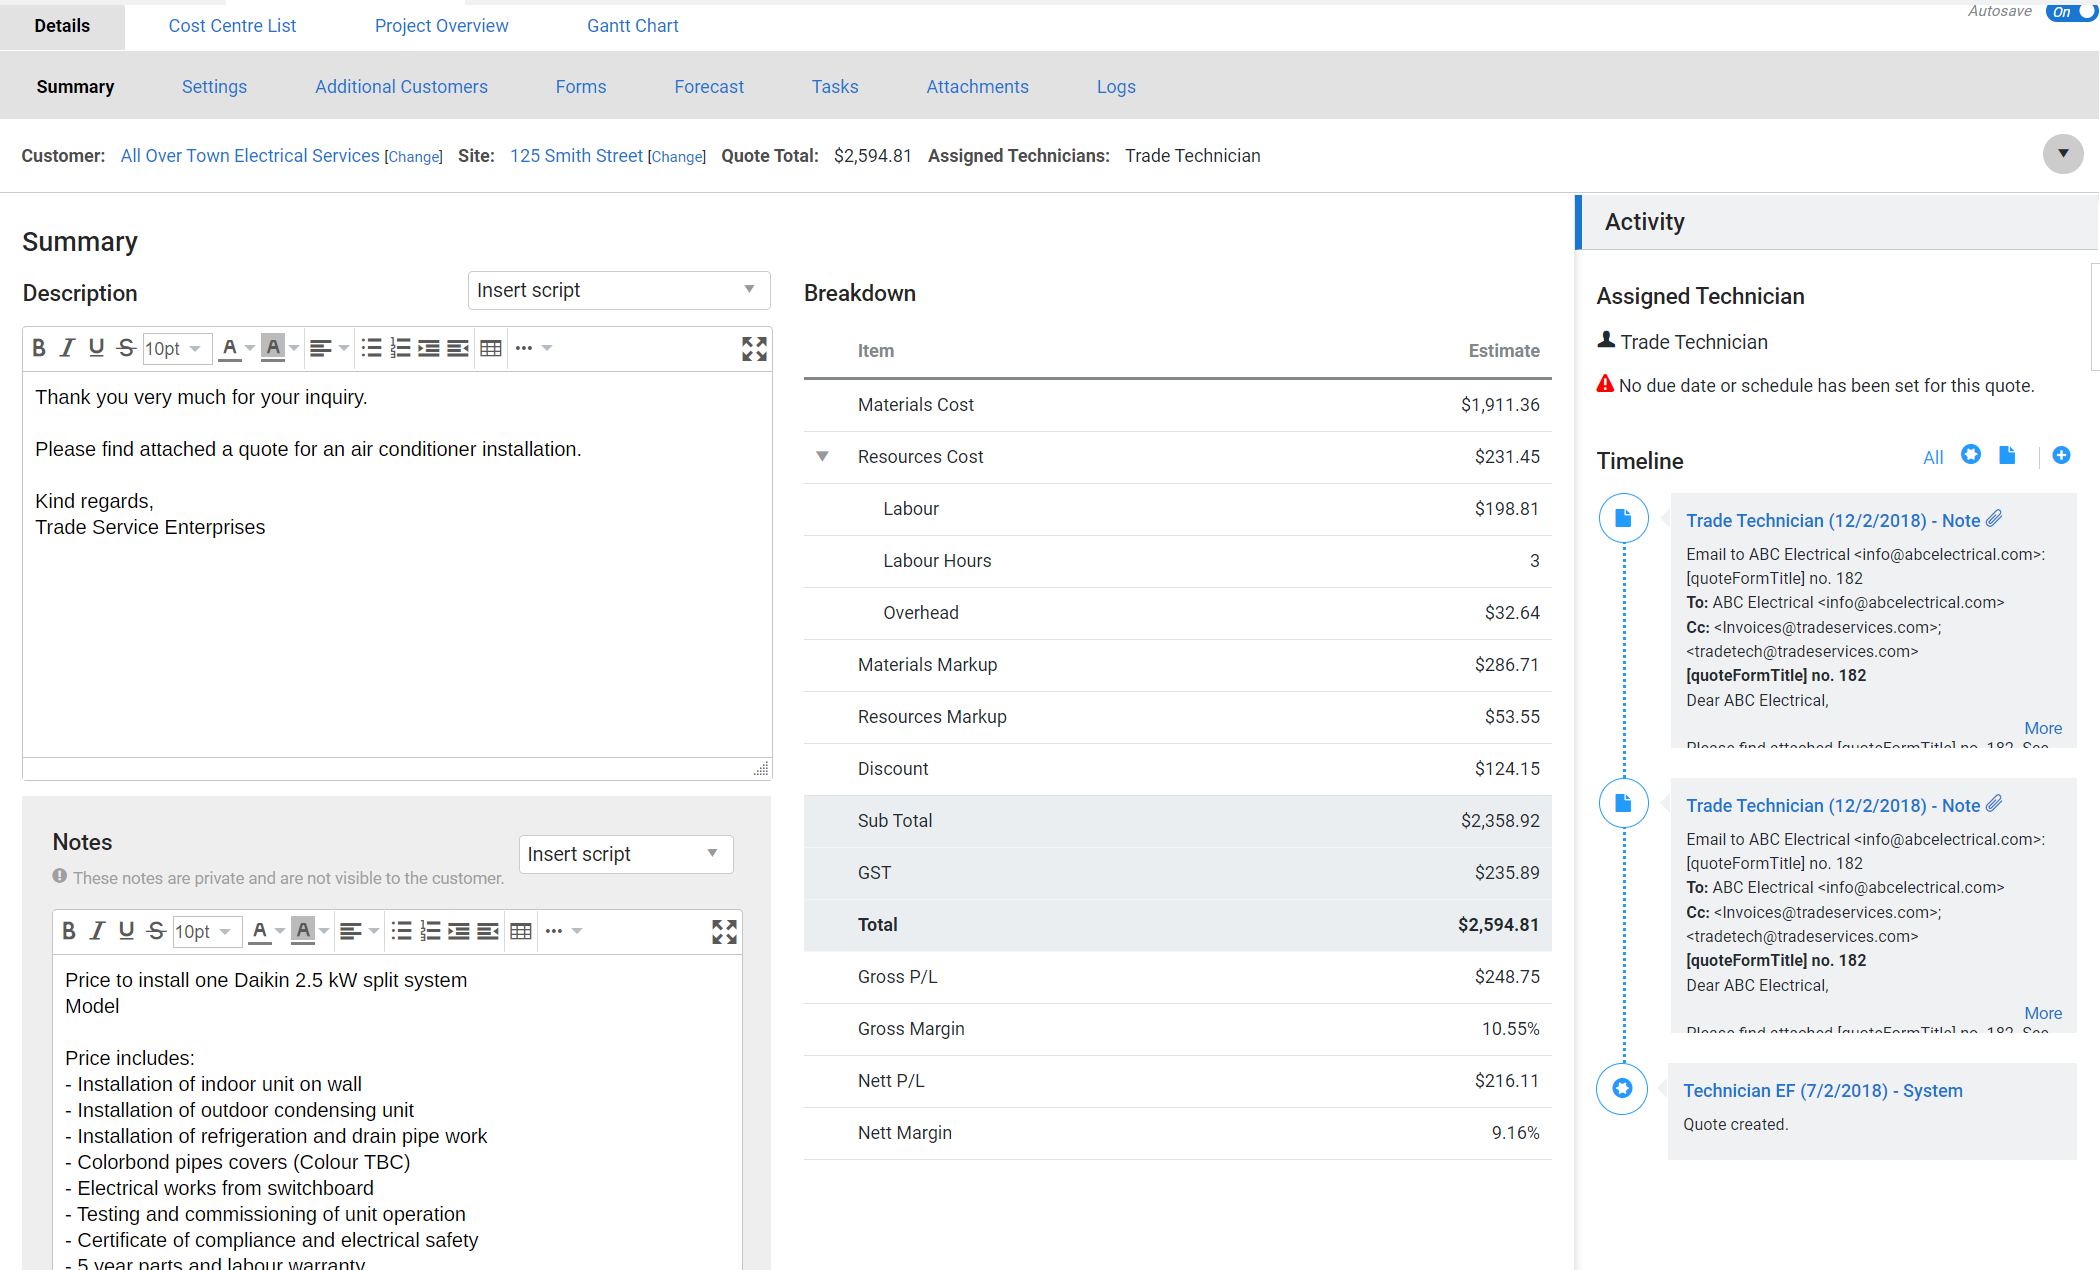
Go to Details > Summary in a service quote to adjust the quote description, enter private notes visible in Simpro Mobile but not visible to the customer, review estimated costs and margins, and view a timeline of all quote activity in Simpro Premium. Learn more in How to Use the Breakdown Table in Quotes.
In the remaining Details sub-tabs, you can Adjust quote settings, upload quote attachments (see How to Use Attachments) and View the quote log. You can also Create service quote tasks.
Within each sub-tab, click the black drop-down arrow in the top right to view customer and site details, the quote total, the assigned technician if applicable and the cost centre description.
 Adjust quote settings
Go to Details > Settings in a service quote to adjust the overall settings for the quote. In addition to being able to Enable retention and enter information in custom fields set up in System ![]() > Setup > System Setup > Custom Fields > Leads, Quotes, Jobs & Recurring, you can also access the following options:
> Setup > System Setup > Custom Fields > Leads, Quotes, Jobs & Recurring, you can also access the following options:
| SMS Quote | If you have registered for and set up SMS in Simpro Premium, you can send SMS to mobile devices directly from the quote. |
| Copy Quote | Create an identical copy of the service quote with a different quote number and creation date. |
| Quote Setup | Return to the Quote Setup to change the customer and / or site. This is the first page you access when you Create a service quote. |
You can also enter a Quote Name supplied by the customer to add additional reference information to the quote, as well as an Order No. if required by the customer.
Adjust the date the quote was Created if required, as well as the Due Date and Validity period for the quote to receive system alerts. You can set a default Validity period or select to base the validity on the quote Created Date or Approved Date. Learn more in Quotes.
You can also assign a Salesperson and Project Manager if the relevant employees have been designated in their employee card files.
To manually move the quote to a different Stage or change the Status, select as applicable from the drop-down list. Alternatively, select Auto Adjust to use automatic triggers.
You can manually select the Date Approved or when the quote Stage is updated to Approved, the corresponding date is auto populated in this field.
Search and select to apply project Tags to the quote, select a different Cost Centre if required, and enter or update the Cost Centre Name. If you select a different cost centre after entering a Cost Centre Name, it is overridden by the new cost centre's original name defined in System Setup.
US only: If you use Simpro Premium in the United States, the term 'retainage' is used instead of 'retention'.
 Manage parts and labour in a service quote
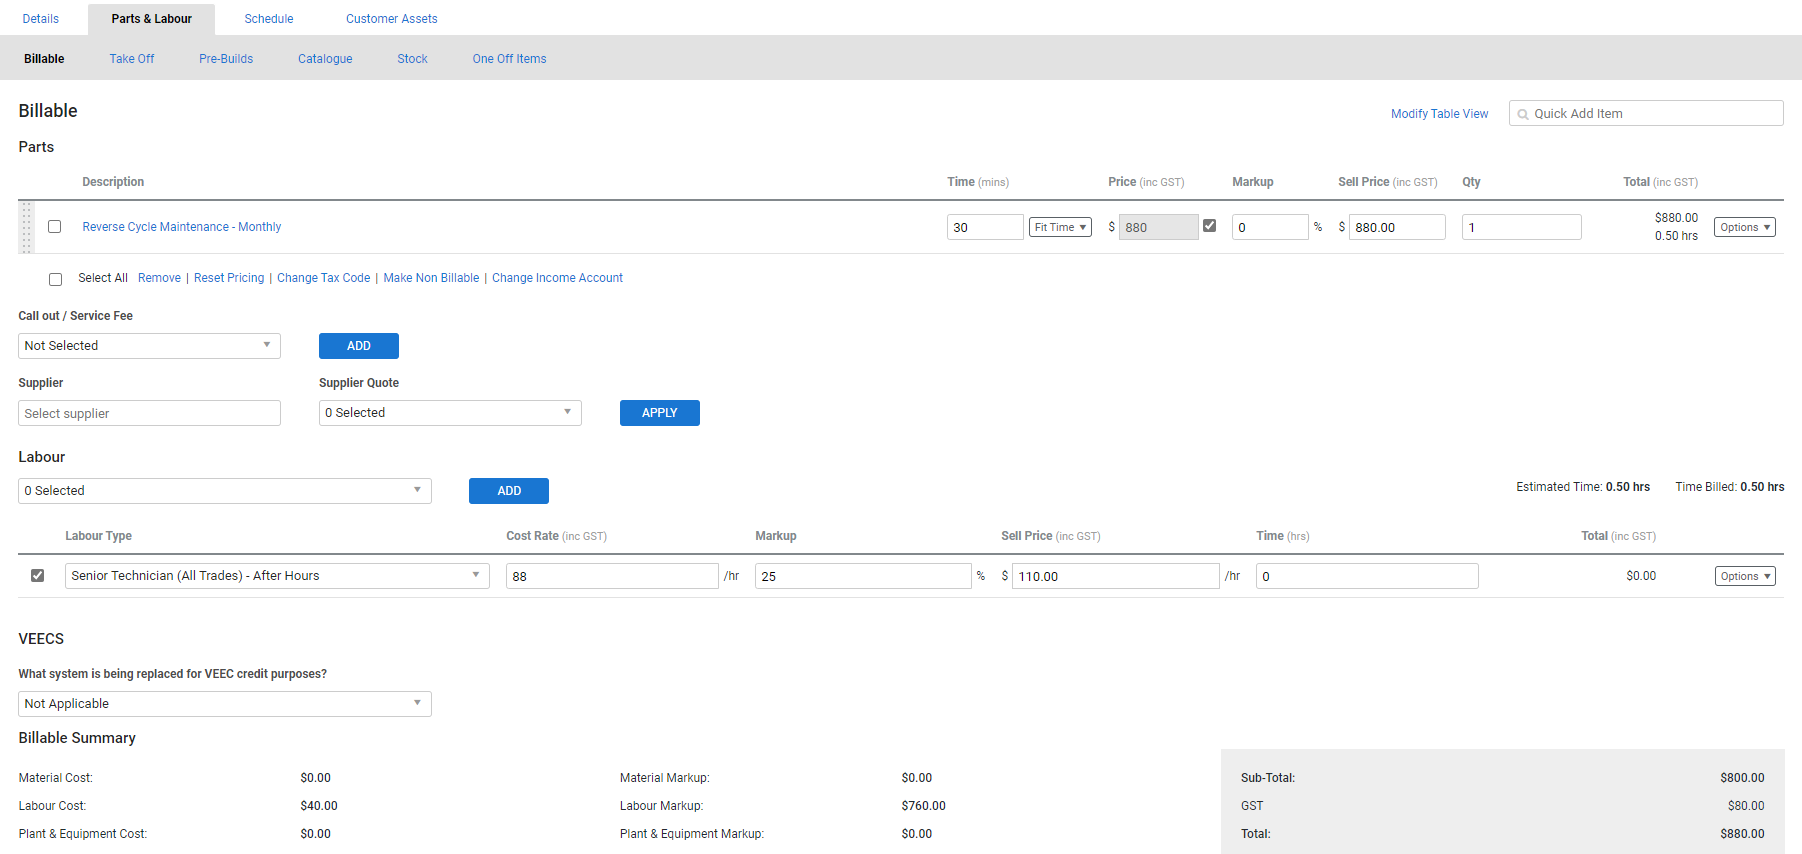
Go to Parts & Labour > Billable to manage all billable and non-billable parts and labour in a service quote. You can Add catalogue items, pre-builds and take off templates, Create and add one off items, and Manage labour in a service quote.
Use the Add a Part search field in the Billable tab to quickly add items to the job.
You can link a supplier quote by selecting a Supplier and Supplier Quote, then clicking Apply.
In the Parts table, you can adjust the estimated Time for an item, and select a Fit Time multiplier. When adjusting Time for items, remember this affects the Estimated Time and Time Billed in the Labour table.
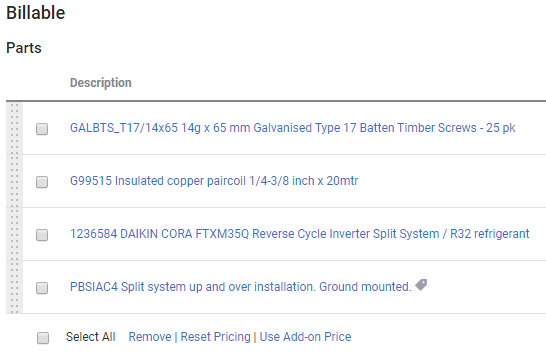
In addition to the Time, you can adjust the Price, Markup, Sell Price and Qty of items. To reset the Price, select the check box or click Options > Reset Pricing. Clicking Options also allows you to open and edit an item, remove it, change the tax code or make it non-billable. You can also use the footer options to update items in bulk as billable and non-billable.
You can choose to include or exclude non-billable items in the estimated costs. Select the required items and click Exclude Costs to exclude the items, or click Include Costs to include items.
Click Modify Table View to add Discount and Sell Price (Inc discount) values on the individual line items in the Billable table.
You can also go to Parts & Labour > Stock to view the current available stock items you may wish to include in your quote. Adding stock items at the quote level does not affect your stock levels.
US only: If you use Simpro Premium in the United States, the terms 'inventory' and 'inventory count' are used instead of 'stock', 'stock take', and 'in stock'.
US only: If you use Simpro Premium in the United States, the term 'vendor' is used instead of 'supplier'.
 Add catalogue items, pre-builds and take off templates
If a catalogue item record is for a large quantity of a specific material, you can update it so that it can be added to a quote in smaller quantities. For example, a cable is purchased from the supplier in 100 metre coils and sold to customers in 1 metre lengths. Learn more in How to Estimate Pack Items.
To quickly add catalogue items, pre-builds, and take off templates to your project:
- In the Parts & Labour > Billable tab, click in the Add a Part search field.
- Note that this field is not visible if the cost centre is locked for items and prices
- Filter by Catalogue items, Pre-Builds or Take Off templates. You can also add a one off item.
- Search for the required catalogue item, pre-build or take off template by part number or name.
- Click the item in the search results to add it to the Parts table.
Alternatively to add catalogue items, pre-builds, and take off templates from the different groups and subgroups:
- Access the quote.
- Go to Parts & Labour > Catalogue / Pre-Builds / Take Off.
- Locate the items in their applicable Groups and / or Subgroups.
- Within each group / subgroup, enter the quantity per item, then click Add Items. If you have set images to be visible on the Catalogue or Pre-Build, under Materials
 > Catalogue / Pre-Builds you can Modify table View to verify the corresponding images in the table.
- In the Catalogue tab when you navigate to a group, click the drop-down arrow beside Create Subgroup and select Create Item to create a new item in the selected group.
- Similarly, in the Pre-Builds tab click the drop-down arrow beside the ADD ITEMS and select Create Pre-build to create a new pre-build.
- Note that if there are no items in the group or subgroup only the Create Item or Create Pre-build buttons are displayed.
- Click Billable.
- Manage parts and labour in a service quote as normal.
- If you are adding a pre-build, click Options > Edit Pre-Build On Quote to adjust the materials in the pre-build only in that quote. The original pre-build quantity is not affected.
- Click Save and Finish.
 Use add-on pricing
If any items added in the Parts & Labour tab have add-on pricing enabled, all items use regular pricing by default. Learn more in Create a pre-build and Enable add-on pricing.
To use add-on pricing:
- In the Parts table, click Options > Use Add-on Price.
- Alternatively, select the check boxes for multiple items, then click Use Add-on Price in the footer options.
- A
 icon appears next to the item name, and the Markup and Sell Price columns update.
 - Click Save and Finish > Save.
To change the item back to regular pricing, click Options > Use Regular Price.
 Create and add one off items
Create one off items to assign non-catalogue expenses that are not processed through Simpro Premium, for example, parking, government charges, and custom-engineered tools.
To create a one off item in a service quote:
- Access the quote, then go to Parts & Labour > Billable.
- Click Add a Part.
- Click One Off Item.
- Select Billable to add the item to the customer invoice.
- Select Inventory Item to order the item and track in the Stock tab of the converted job.
- Enter a detailed item Description.
- Enter the Estimated Cost and Markup % / Sell Price.
- If the item has associated labour, enter an Estimated Time in minutes.
- Enter Discount % for the item to show customers the discounted percentage / amount. The Sell Price (inc disc) field will be auto populated based on the Discount %.
- Alternatively, enter the Sell Price (inc disc) value to auto populate the Discount % field.
- Enter the Quantity of items required.
- Select a Sales Tax Code.
- Click Save and Finish.
- Click Billable.
- Manage parts and labour in a service quote as normal.
- Click Save and Finish.
 Manage labour in a service quote
A labour rate that has been marked as default in the customer card file is automatically selected in the Labour table when the quote is created. To add a labour rate, select as required from the Labour drop-down list, then click Add. You can then adjust the Markup, Sell Price and Time.
Click Options on a labour rate to remove it or change the tax code if required.
To add labour rates to a quote, you need to assign them in the customer card file. If the default labour type for the quote has been automatically selected and the check box is selected, any estimated time associated with catalogue items or pre-builds automatically adds to the billable hours.
In the Parts & Labour tab the labour type that is selected inherits all cost and price changes made to the rate on the customer card. The cost centre must be unlocked and there must be zero hours entered for the labour rate to inherit changes. Alternatively, click the check box next to the labour type to remove the hours and force the labour rate to inherit any changes.
 Send quote forms
All correspondence about the quote is sent from the Forms tab. To learn how to send a quote using a form builder template, see How to Send Form Builder Templates. You can also send quote acceptance forms for customers to accept online. Learn more in How to Use Quote Acceptance Forms.
You can learn more about how to send quote forms from the Forms tab in How to Send Quote Forms.
 Schedule a service quote
There are several ways to schedule service quotes to specific technicians in Simpro Premium, for example, if you need to perform an onsite visit to complete the quote:
- In the Schedule tab of a service quote.
- In the schedule Day View / Week View / Manual View.
Before you begin scheduling service quotes to resources such as employees, contractors and teams, you may wish to use a number of Simpro Premium scheduling tools to increase scheduling accuracy and efficiency.
 Schedule a service quote from the Schedule tab
Go to Schedule in a created service quote to schedule technicians and teams to the quote.
To schedule a quote in the Schedule tab:
- Access the quote, then go to Schedule.
- Under Available Resources, click the
 icon next to the employee, or the contractor or team you wish to schedule.
- Click an employee / contractor / team to view their available hours over the next five days.
- In the top left of the schedule view, select the schedule rate.
- Click the time block to add a schedule block.
- Click and drag to move the schedule block to a different day or hour.
- Use the white arrows to lengthen or shorten the schedule block.
- When you have finished scheduling, click the
 icon in the top right.
 - Click Save and Finish > Save.
Alternatively, click Help me decide to schedule a quote using Filter Options, including the duration of the quote, the Zone, and Travel Distance to the site.
The cost displayed on the Schedule tab represents the actual direct cost of the scheduled hours. If the Schedule Rate scheduled has Overheads Included turned on, this is the sum of the employee's Pay Rate and Employment Costs with any schedule rate multipliers applied. If the schedule rate has Overheads Included turned off, this only includes the employee’s Pay Rate with any multipliers applied. Learn more in How to Create Schedule Rates.
 View the quote log
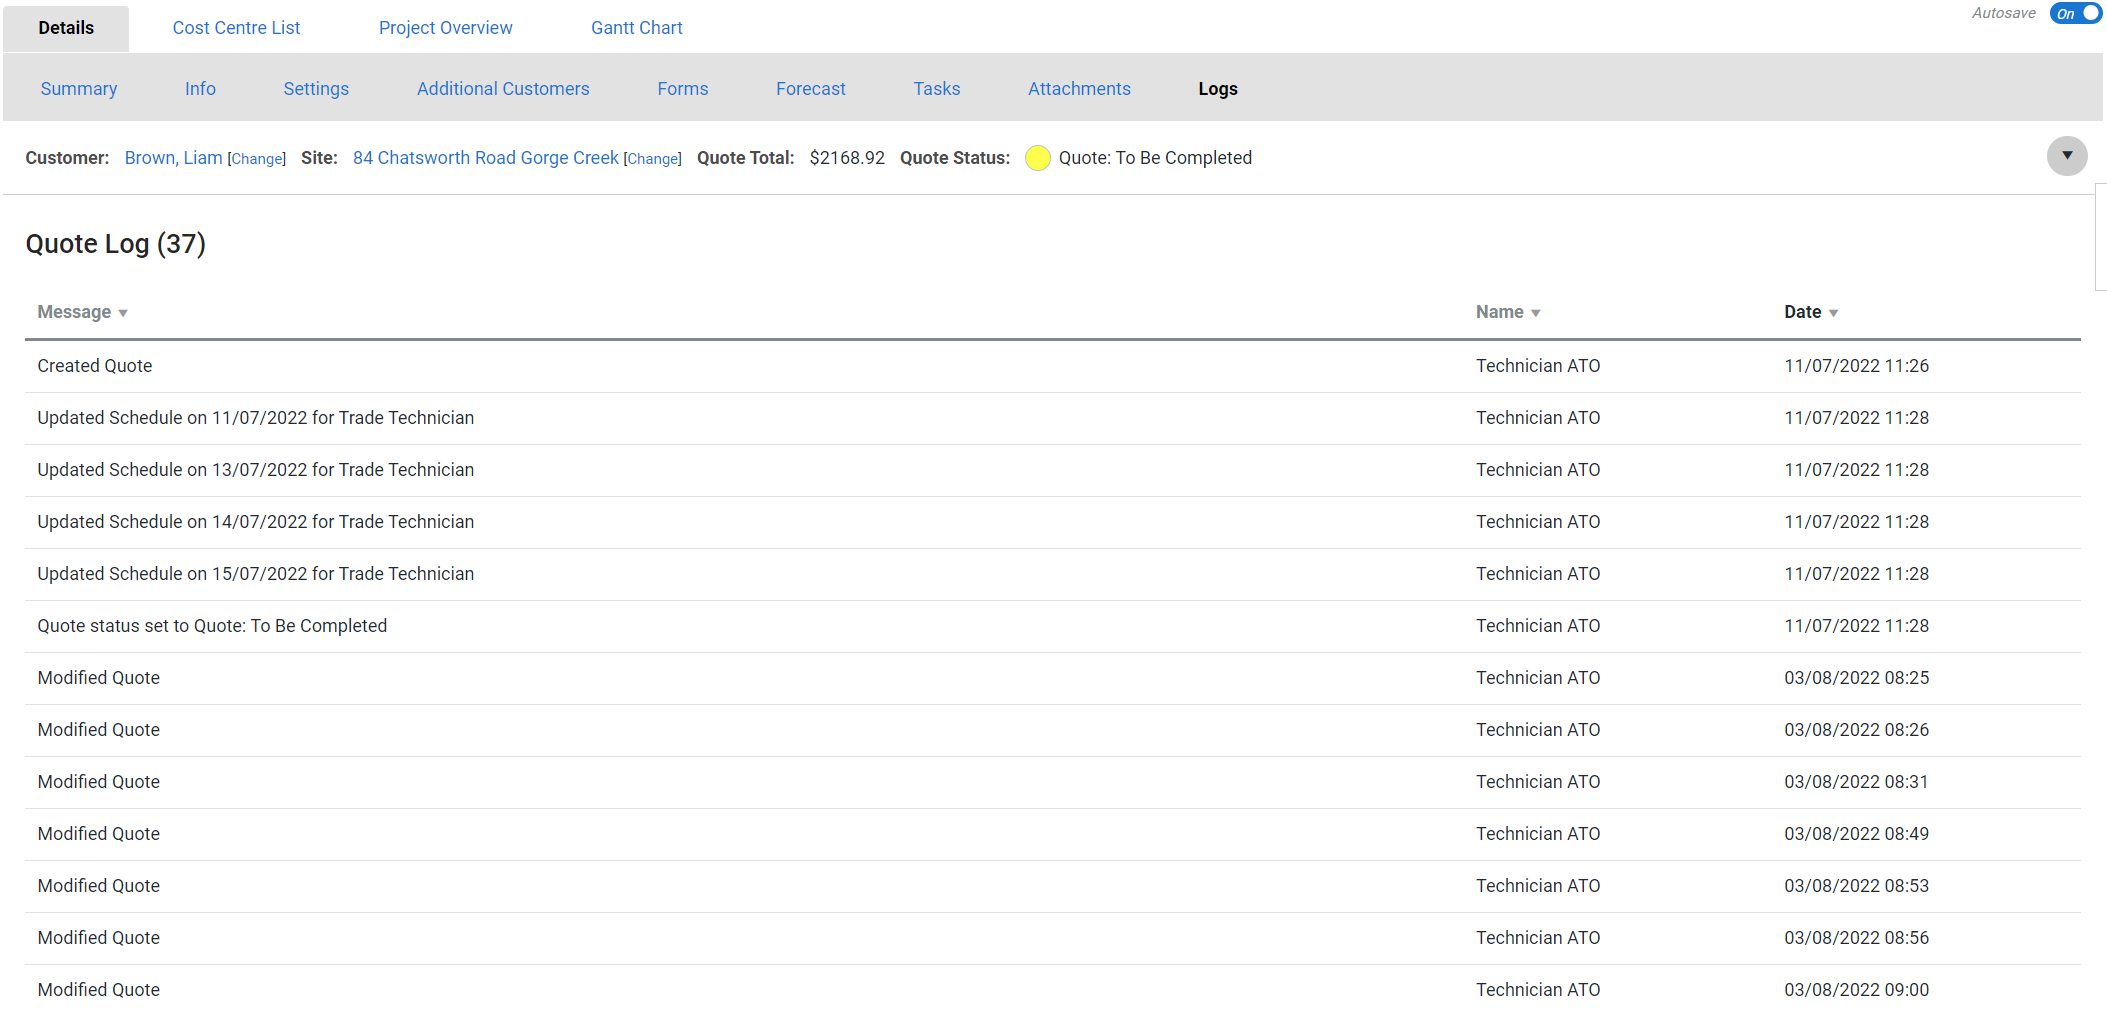
Go to Details > Logs to view a history of actions in that quote, along with the logged-in employee who performed them and the date and time.
Actions logged in the Message column of the log can include:
- Quote creation and modifications
- Status and stage updates
- Schedule updates
- Information submitted from Simpro Mobile
- Printing and emailing forms
- Quote conversion.
When you email from within the quote in the Forms tab and click Save, a log entry is created with a ![]() icon. When you hover over the icon, the email text appears.
icon. When you hover over the icon, the email text appears.
When you click the icon, a pop-up containing the email text appears. If you emailed a quote form, it is available to view as a PDF under Attachments.
 Advanced
 Create a service quote with multiple cost centres
You can create service quotes with multiple cost centres if the converted job would require works performed by different areas in your business. This process depends on whether you have single cost centre quotes enabled in your system default settings in System ![]() > Setup > Defaults > System > General > Service Jobs and Quotes.
> Setup > Defaults > System > General > Service Jobs and Quotes.
This is also useful for selling the customer a membership so they can have discount on all new quotes and jobs raised against them, as well as recurring job or invoice templates if applicable. Learn more in How to Sell Memberships.
You can also add optional cost centres to a quote to offer customers a choice of options or additional options as an upselling technique. Learn more in How to Manage Optional Quotes.
To create a service quote with multiple cost centres when you do not have single cost centre quotes enabled:
- Create a service quote as normal.
- Click Next.
- In Cost Centre List > Primary, select the Cost Centres from the drop-down box, enter a new Cost Centre Name if required, then click Add. Learn more in Rename a cost centre in a quote, job, recurring job, or recurring invoice.
- Click Save and Finish.
Click Options on a cost centre to duplicate, copy, edit, delete, or mark it as optional / billable.
Navigate between cost centres
There are several buttons you can use to save a quote, as well as navigate between multiple cost centres added to a quote.
When you access and update an individual cost centre within a quote, you can click the following buttons to save and navigate between cost centres:
| Continue | Exit the cost centre and return to the Cost Centre List. Your changes within the individual cost centre do not update to the quote unless they are saved, either within the cost centre, or at the Cost Centre List level. |
| Save and Finish | Save your changes to the individual cost centre and the entire quote, and exit the quote. To save your changes to the individual cost centre and the entire quote, and remain in the cost centre, click the arrow and click Save. |
When you access and update a quote at the Cost Centre List level, you can click the following buttons to save and navigate:
| Cancel | Exit the quote without saving. |
| Save and Finish | Save your changes to the entire quote, and exit the quote. To save your changes to the entire quote, and remain in the quote, click the arrow and click Save. |
If you make changes to an individual cost centre, click Continue to return to the Cost Centre List, and then click Cancel, your changes will not save at all.
 Create service quote tasks
Create tasks within service quotes to keep an interactive to-do list for the quote. Learn more in Create a task from within a quote, job, or customer card file. Then when a task is due or has been updated, the assigned technician(s) as well as any other nominated stakeholders, such as customers or employees, receive email notifications and Simpro Premium alerts.
You can also add task templates created in your System ![]() > Setup > System Setup > Tasks > Task Templates to add sets of tasks frequently carried out for certain types of quotes.
> Setup > System Setup > Tasks > Task Templates to add sets of tasks frequently carried out for certain types of quotes.
The number of open tasks also appears in brackets in the Details > Tasks sub-tab. Learn more in View an open task count in a quote or job.
 Enable retention
Retention is the percentage of payment held by the customer to ensure the job is completed to specific standards and to safeguard against defects in workmanship.
You may wish to Set up retention for a project for a service quote that you plan to merge into a project job. This is useful for calculating the amounts to be withheld to assist in invoicing.
US only: If you use Simpro Premium in the United States, the term 'retainage' is used instead of 'retention'.
 Learn more in the Learning Toolbox
For additional training, complete an interactive material in the Simpro's Learning Toolbox. Learn more in About Simpro's Learning Toolbox.
 Get a demo
Interested in Simpro and want to learn how its features can benefit your business? Visit the Simpro website to discover more and request a demo today.
