Last Updated: December 12 2025
Overview
Create and manage catalogue items in Simpro Premium. You can specify an item's unit of measurement, estimated installation time, pricing, and minimum pack quantity, as well as add suppliers to assist in price comparisons. You can also enter custom information, apply pricing tiers, and link catalogue items.
Alternatively, you can import generic or supplier-specific catalogues. Learn more in How to Import Generic Supplier Catalogues and How to Import Specific Catalogues.
US only: If you use Simpro Premium in the United States, the term 'vendor' is used instead of 'supplier'.
 Required setup
In order to view content or perform actions referred to in this article you need to have the appropriate permissions enabled in your security group. Go to System![]() > Setup > Security Groups and access your security group to update your permissions. The relevant security group tab and specific permissions for this article can be found here:
> Setup > Security Groups and access your security group to update your permissions. The relevant security group tab and specific permissions for this article can be found here:
Before performing the steps detailed below, ensure that this part of your build is set up correctly. The relevant steps to set up the features and workflows detailed in this article can be found here:
 Create a catalogue item
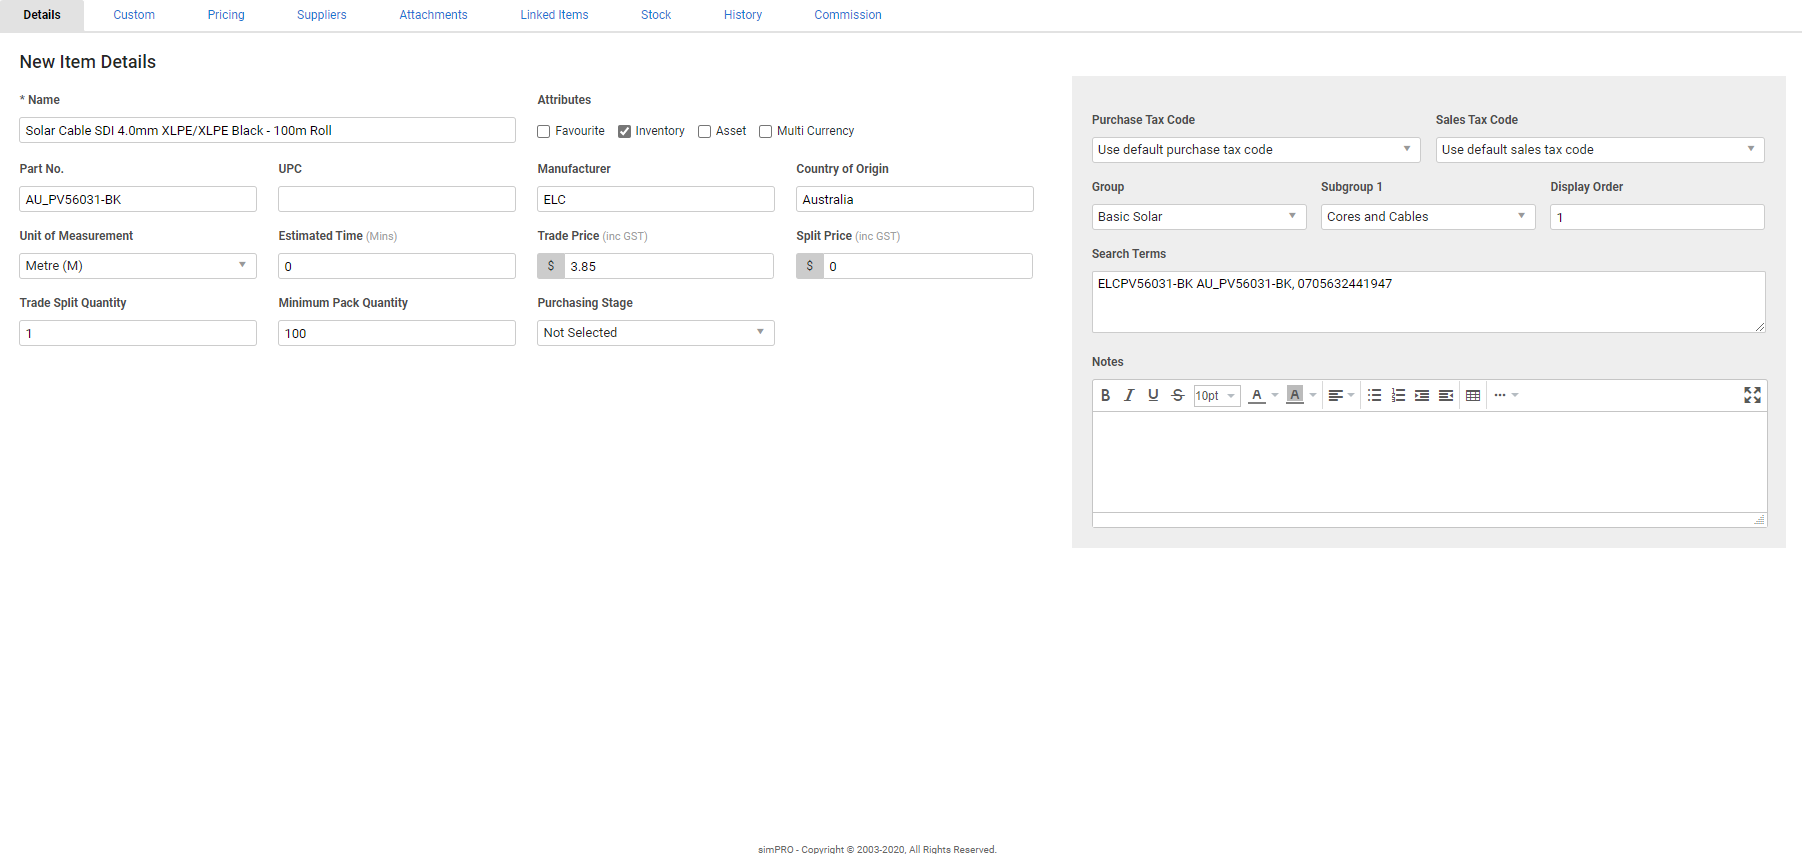
When you create or open a catalogue item, you are taken to the Details tab, where you can enter or update the item description, part number, pricing, tax codes, search terms and purchasing quantities.
To create a catalogue item:
- Go to Materials
 > Catalogue.
 - Locate and click the applicable group / subgroups you wish to allocate the item to.
- Alternatively, create a new group / subgroups.
- Click Create Item.
- Alternatively, click the drop-down next to Create Group and click Create Item.
- Enter New Item Details as specified below.
- Click Save and Finish.
Enter item details
When you create or update a catalogue item, you can enter the following details:
| Item Name | Enter a name for the item to appear on itemised quotes, jobs and invoices, and to search for in the catalogue local search. This is a mandatory field and populates the Description column in the Catalogue group / subgroup table view. |
| Attributes |
Select Favourite if the item is commonly-used and you wish to allocate it to the Favourites group for quick access. Select Inventory to include the item as stock when purchasing. Leave the check box clear to exclude the item from stock. Select Asset to create this item as a customer asset when added to a job via stock or purchase order. Click the Asset tab to identify the Asset Type. Note that any mandatory custom fields for the selected asset type must be completed before you save the item. Learn more in How to Create Asset Types. Select Multi Currency to enter Trade and Split Prices for an item in multiple currencies if applicable. |
| Part No. |
Enter the part number for the item to appear on itemised quotes, jobs and invoices, and to help locate the item in the catalogue when using a local search. If there is no Supplier Part No. this Part No. is used to match items when updating your catalogue in a manual import. |
| UPC | Enter the Universal Product Code. |
| Manufacturer | Enter the manufacturer of the item to use as a search term for performing a local search. |
| Country of Origin | Enter the country the item was manufactured in. |
| Unit of Measurement | Select the unit the item is sold in as created in System |
| Estimated Time | Enter the estimated installation time to assist in calculating labour in pre-builds, quotes, and jobs if required. |
| Trade Price |
Enter the non-discounted price per unit. The discounted price, or Nett / Net Price associated with specific suppliers can be entered in the Suppliers tab. This price is used to calculate estimate costs if there is no default supplier associated in the Suppliers tab. Learn more in How to Use the Breakdown Table in Quotes and How to Use the Breakdown Table in Jobs. See Catalogue Item Quantities and Pricing to learn how to update catalogue item pricing and quantities to streamline ordering. |
| Split Price |
Enter the trade price you pay per unit when purchasing below the Trade Split Quantity. See Catalogue Item Quantities and Pricing to learn how to update catalogue item pricing and quantities to streamline ordering. |
| Trade Split Quantity |
Enter the required quantity you need to purchase to pay the Nett / Net Price as negotiated with the supplier. When you purchase below this quantity, you pay the Split Price. See Catalogue Item Quantities and Pricing to learn how to update catalogue item pricing and quantities to streamline ordering. |
| Minimum Pack Quantity |
Enter the minimum quantity of the item that can be purchased from the supplier. This is useful if you can only purchase the item from the supplier in specific quantities, for example, in boxes of 12 units, or one hundred metres of cable sold in individual rolls. Alternatively, you can set a minimum pack quantity specific to your business. You may wish to instead set restock quantities for this purpose. See Catalogue Item Quantities and Pricing to learn how to update catalogue item pricing and quantities to streamline ordering. All newly-created items have a minimum pack quantity of zero by default, meaning it is possible to order items in halves or other fractions. |
| Purchasing Stage | Select as defined in System |
| Purchase Tax Code |
Select as required if the item is purchased using a different tax code to the default specified in the supplier card file or in System Select Use default purchase tax code to apply the tax code marked as Purchase Default in System Alternatively, select a specific tax code. Learn more in How to Use Tax Codes. |
| Sales Tax Code |
Select as required if the item is sold using a different tax code to the default specified in System Select Use default sales tax code to apply the tax code marked as Part Income Default in System Alternatively, select a specific tax code. Learn more in How to Use Tax Codes. |
| Group | Select if required to change which group the item is located in within the catalogue. You can also do this at the group and subgroup level using the Move option. |
| Subgroup 1, Subgroup 2, Subgroup 3 | Select if required to change which subgroup the item is located in within the catalogue. You can also do this from the catalogue table using the Move option. |
| Display Order | Enter a number to designate in what order the item is arranged within its group / subgroups. |
| Search Terms |
Enter alternative part numbers, names, and extra descriptions to help locate items faster when performing a local catalogue search or scanning a barcode. Search terms can also be used to bring together items with different descriptions but similar use, for example, a powerpoint can also be referred to as a GPO or outlet. |
| Notes | Enter additional details about an item for reference only. |
When creating search terms, keep in mind that the local search looks for individual words. If you search 'black cable', the results show all items containing the word 'black' and all items containing the word 'cable'.
US only: If you use Simpro Premium in the United States, the terms 'inventory' and 'inventory count' are used instead of 'stock', 'stock take', and 'in stock'.
 Add suppliers
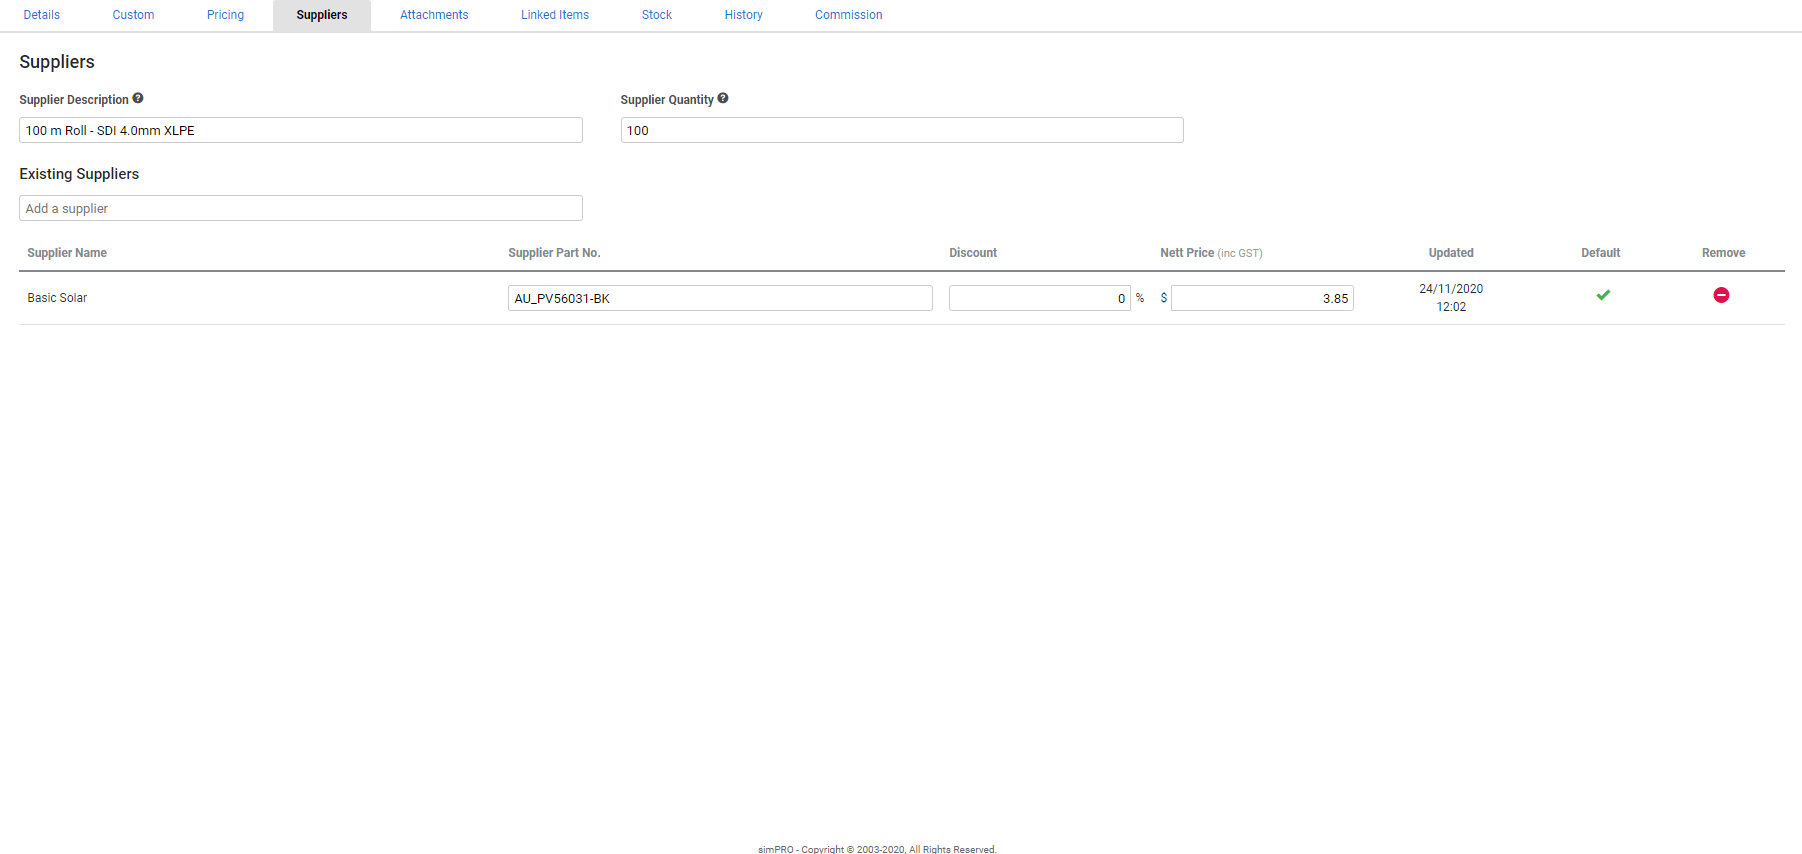
Enter a supplier description and quantity for a catalogue item. This then changes how the item appears on your purchase orders to ensure your order is correct. See Catalogue Item Quantities and Pricing to learn how to update catalogue item pricing and quantities to streamline ordering.
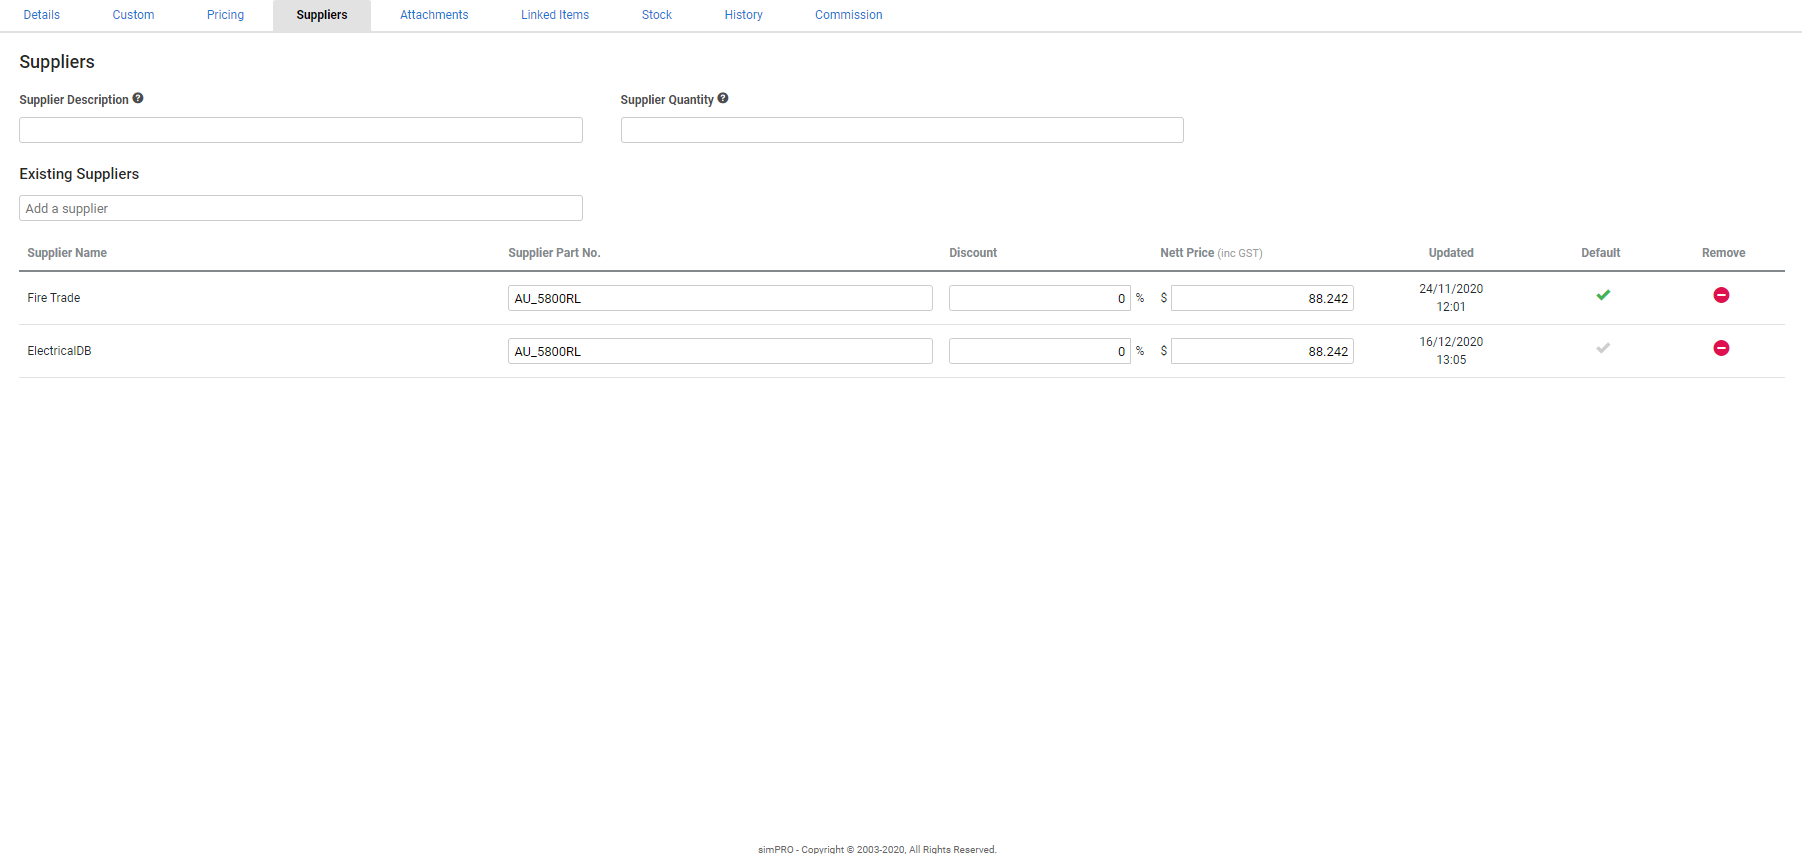
You can then add suppliers to view nett / net price and discount comparisons for an item, which is useful when creating purchase orders. The Nett / Net Price, also known as the cost or buy price, is the trade price of an item with the supplier discount applied. The Nett / Net Price of the default supplier is also used to calculate estimate material costs. Learn more in How to Use the Breakdown Table in Quotes and How to Use the Breakdown Table in Jobs.
To add a supplier to an item:
- Access the item, then go to Suppliers > Existing Suppliers.
- Search and select the supplier.
- Enter a Supplier Part No. if applicable.
- If this field is left blank the Part No. from the Details tab is populated in this field.
- This number is used to match items when updating from a manual or automatic catalogue import.
- This appears on purchase orders for the item associated with this supplier.
- If the supplier offers a discounted Trade and / or Split price for the item, enter the Discount as applicable.
- Alternatively, enter the Trade Nett and / or Split Nett Price for the item to automatically calculate the Discount.
- Click the tick icon to nominate the supplier as the default supplier of this item.
- Click Save and Finish.
To remove a supplier from an item, click the ![]() icon.
icon.
Check the Updated column to view when the supplier pricing was last updated, either manually or from a catalogue import.
You can only enter a Split Discount or Split Nett / Net Price if the Split Price in the Details tab is more than zero.
Learn more in How to Create Suppliers.
Enter a supplier description and quantity
Go to the Suppliers tab in a catalogue item to enter a Supplier Description and Supplier Quantity to assist in creating accurate purchase orders for suppliers. This is useful if you can only purchase items from suppliers in specific quantities or if suppliers refer to an item by a different name.
See Catalogue Item Quantities and Pricing to learn how to update catalogue item pricing and quantities to streamline ordering.
Enter nett / net prices in multiple currencies
If you have set up multiple currencies for overseas suppliers who require invoices in their own currency, and you have added such a supplier to an item, you can enter trade and split nett prices in their specific currency.
You can enter the price in the foreign currency, or alternatively, enter the value in your default currency to convert it to the foreign currency.
To select suppliers that use a foreign currency, make sure that the Multi Currency check box is selected and the supplier's specific currency is added to the item.
 Enter custom information
Click Custom to enter custom field information for catalogue items as defined in System ![]() > Setup > System Setup > Custom Fields > Stock Items. If these have not been set up, the Custom tab does not appear in the catalogue item.
> Setup > System Setup > Custom Fields > Stock Items. If these have not been set up, the Custom tab does not appear in the catalogue item.
To enter custom information for a catalogue item:
- Create or access the item as normal.
- Click the Custom tab.
- Enter information or select options as required.
- Click Save and Finish.
US only: If you use Simpro Premium in the United States, the terms 'inventory' and 'inventory count' are used instead of 'stock', 'stock take', and 'in stock'.
 Apply pricing tiers
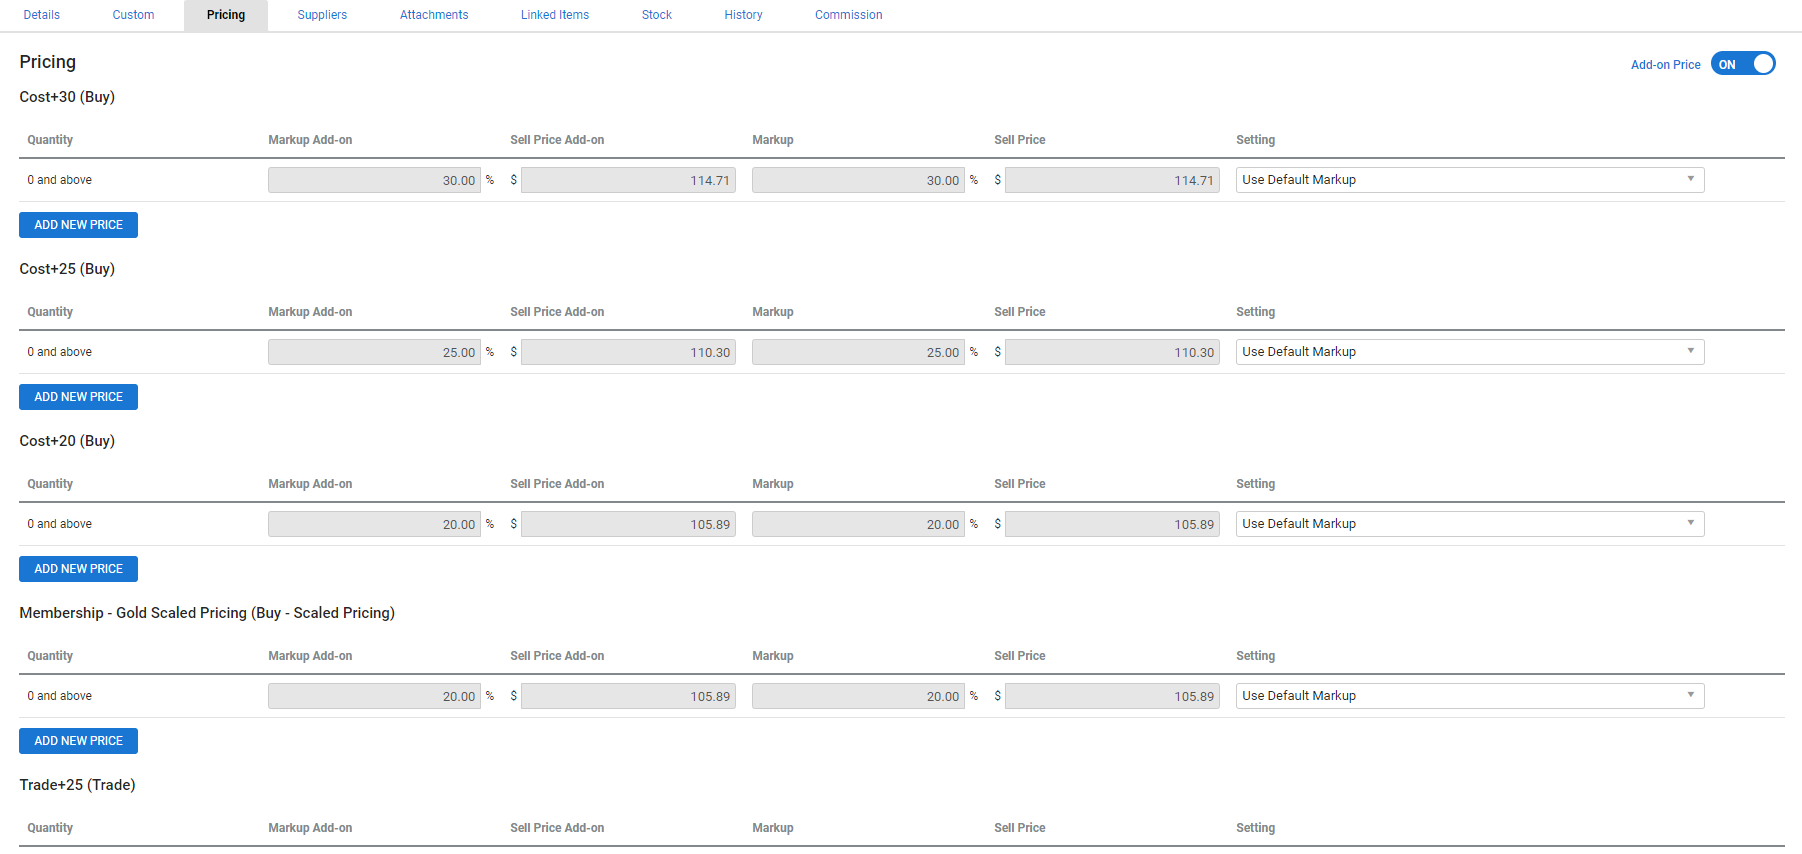
Apply pricing tiers to a catalogue item in the Pricing tab to define the markup and sell price for specific quantities of the item.
To adjust pricing tiers on an item:
- Go to the Pricing tab.
- To override the pricing tier default, under Setting select Fixed Markup to change the markup, or select Fixed Sell Price to change the sell price.
- Enter the markup or sell price.
- To add levels to the pricing tier and click Add New Price.
- Enter the Quantity.
- Select the Setting and then enter the markup or sell price that is applied when that quantity is reached.
- Click Save.
To offer reduced pricing when items are added after a job is in progress, Enable add-on pricing.
 Add item attachments
Click the Attachments tab to attach files to a catalogue item card file, such as item assembly information, a brochure, or a user manual. You can also attach an image to display as a thumbnail in the catalogue. These attachments are for internal reference only, and are not available in other areas of Simpro Premium unless you have a customised build.
 Link catalogue items
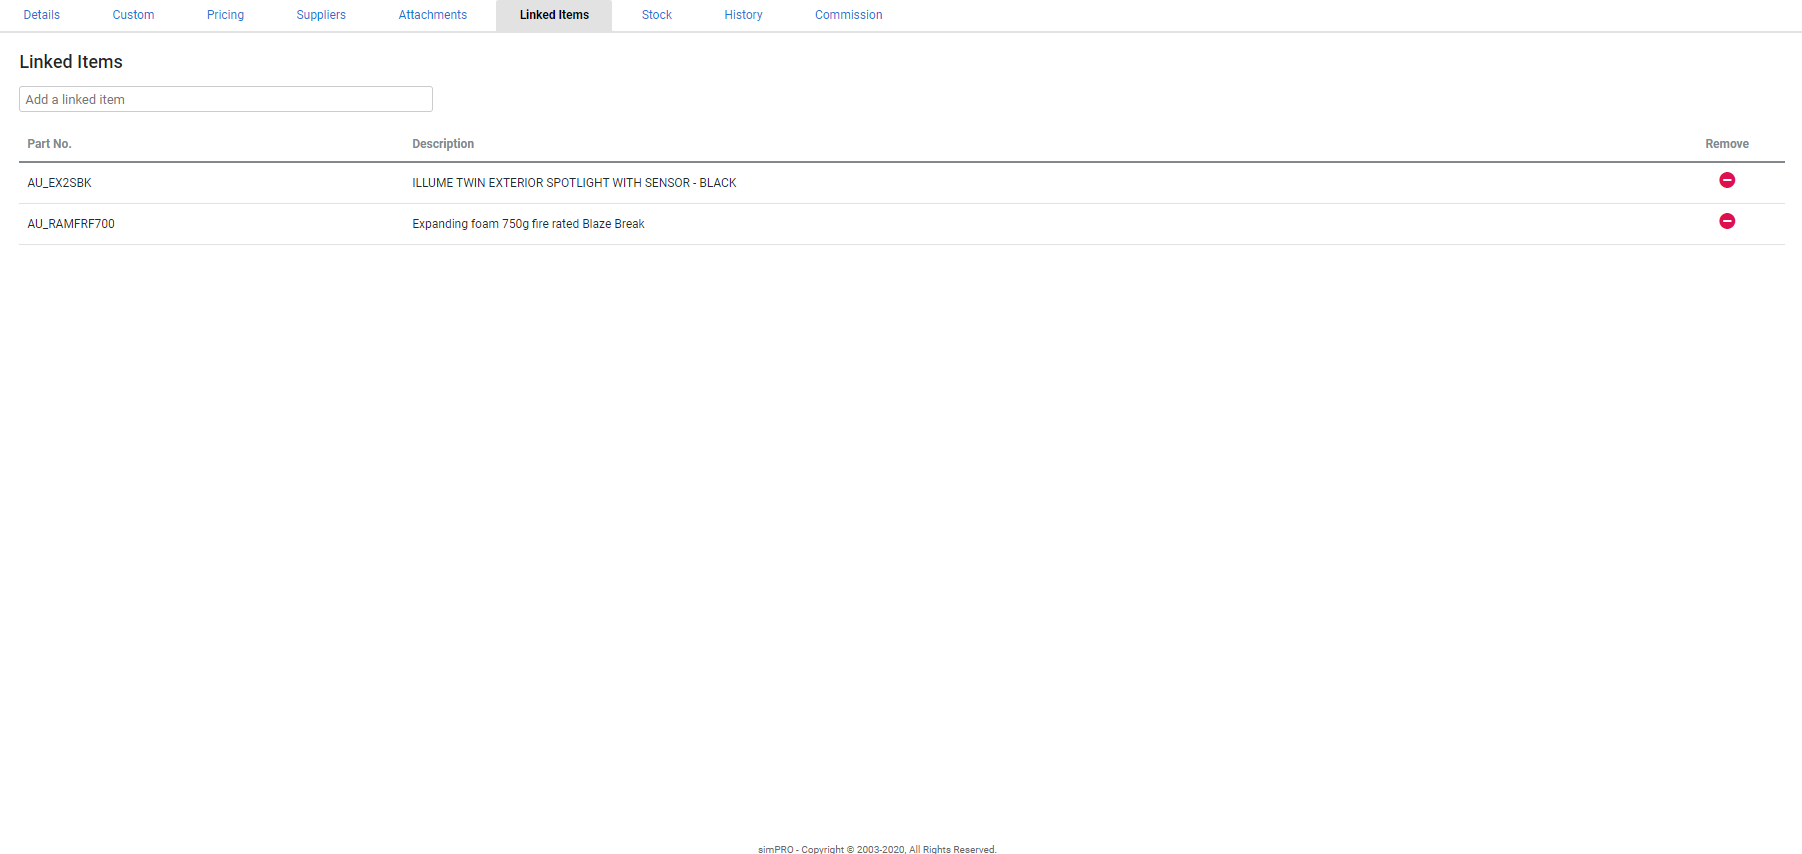
Use the Linked Items tab to link an item with another item it is frequently used with. Then when you add an item with a linked item to a quote, job or order, an alert informs you of the linked items.
Note that you are only notified when a linked item is added from the catalogue, not from stock, as you would be notified already when the stock is ordered.
Click Show Linked Items to view and add linked items, or click Cancel to proceed without adding linked items.
To link a catalogue item to another item:
- Create or access the catalogue item.
- Click Linked Items.
- Search and select the item you wish to link in the Add a linked item field.
- Click Save and Finish.
Click the ![]() icon to delete a linked item from a catalogue item.
icon to delete a linked item from a catalogue item.
Items are only linked one way. If you wish to link items both ways, you need to link them from within each item.
 Manage stock from the catalogue
You can manage storage locations and stock levels for specific items from within the catalogue.
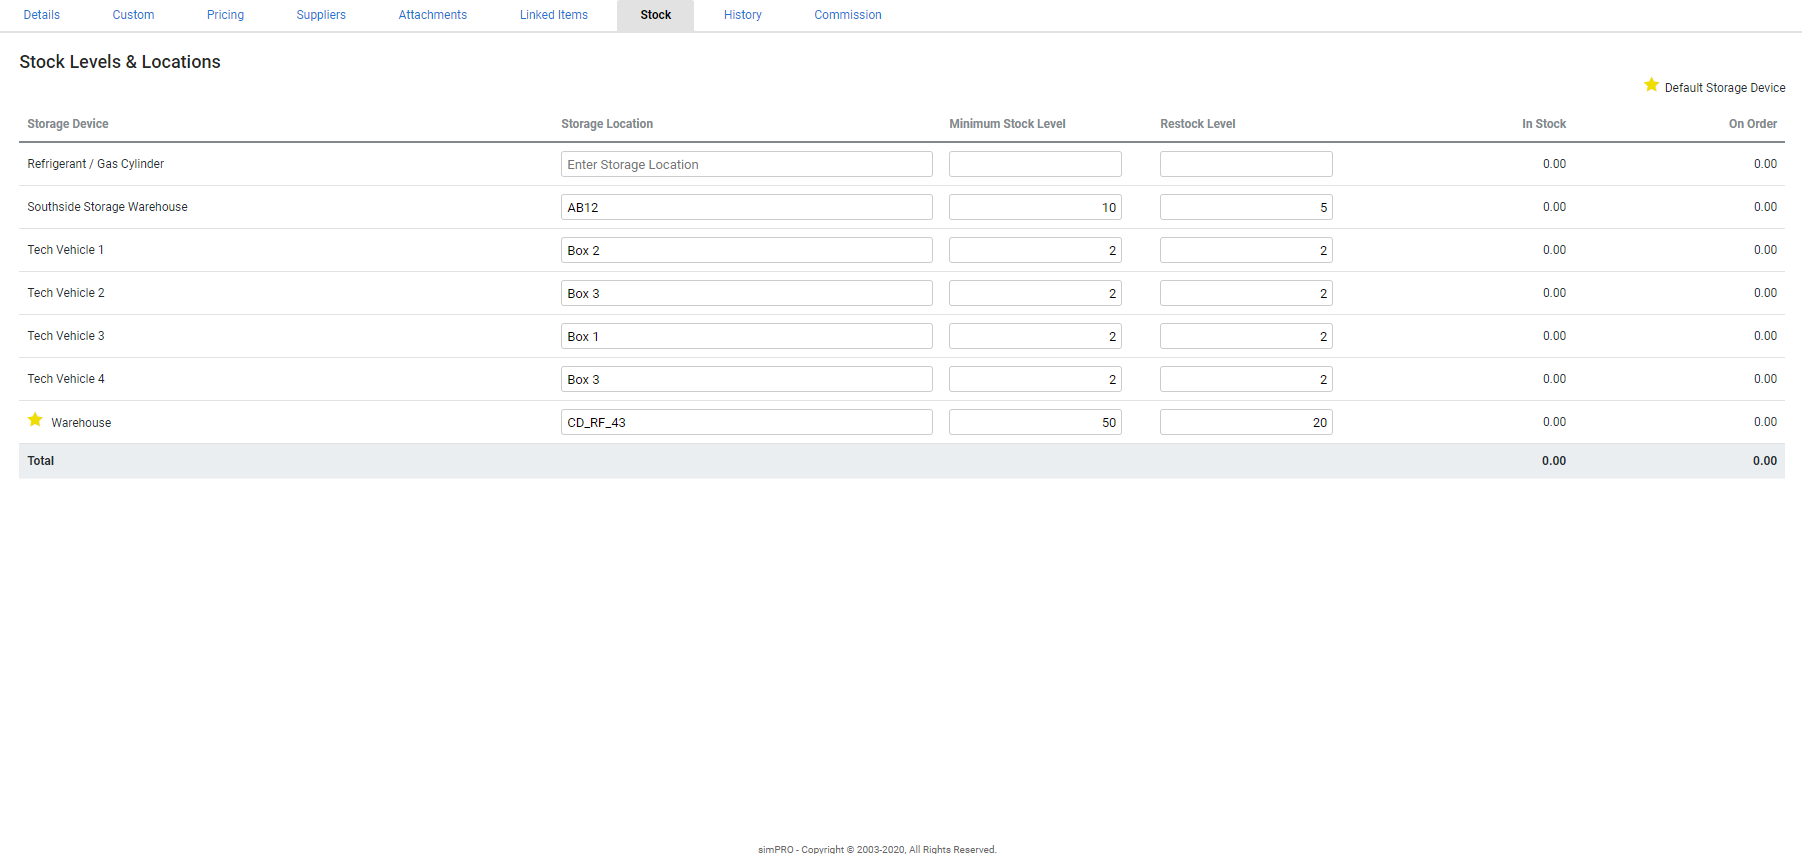
- Open the relevant catalogue item and click the Stock tab.
- All your storage devices, including the default storage device are displayed under Stock Levels & Locations. Note that the default storage device is indicated with a star icon.
- The current quantity of the item in stock is displayed in the In Stock column.
- The quantity that is waiting to be received into the stock is displayed in the On Order column.
- Enter the Storage Location of the selected item within the storage device. This helps easily locate the item on the stock take and picking slip forms.
- Set the Minimum Stock Level to receive an alert when the In Stock quantity decreases below this value.
- If the minimum stock level is previously set for the selected item, the corresponding value is auto-populated.
- Set the Restock Level to populate your restock order with the required quantity.
- If the restock level is previously set for the selected item, the corresponding value is auto-populated.
- Click Save and Finish.
Learn more in How to Create a Catalogue Item, How to Set Minimum and Restock Levels, and How to Restock a Storage Device.
 View the item history
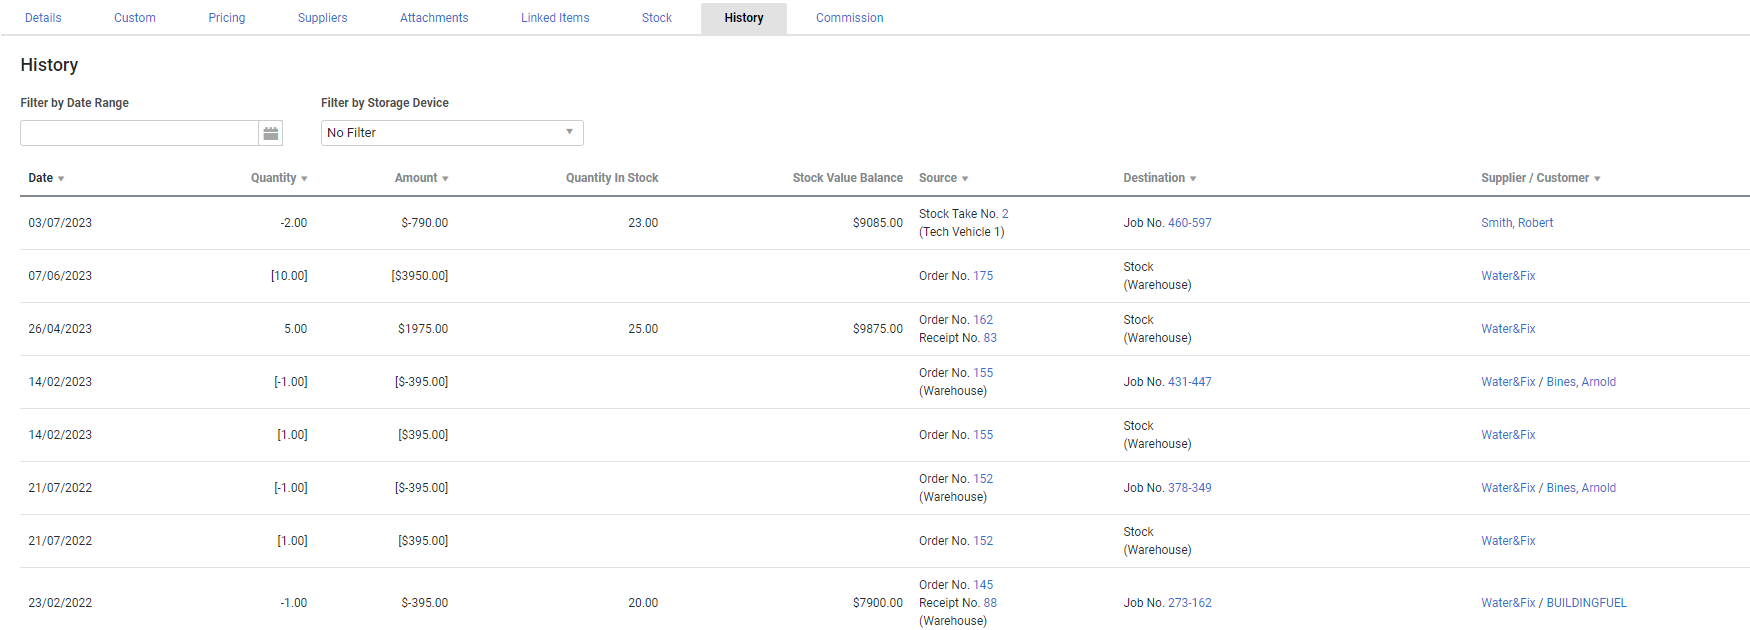
Click the History tab to view a breakdown of an item's history, such as when it was purchased or when a stock take was performed. You can also select a Date Range to view all activity within a specified time or Filter by Storage Device.
The History tab does not log any events that do not alter Quantity in Stock. For example, credits for the price of an item, that do not change the quantity of the stock are not logged.
The columns displayed are:
| Date | Displays the date each action took place. |
| Quantity | Displays the quantity of stock added or removed. Stock removed is marked with a minus sign. |
| Amount | Displays the value of stock added or removed. The value of stock removed is marked with a minus sign. |
| Quantity In Stock | Displays the total item quantity available in stock. |
| Stock Value Balance | Displays the value of stock available. |
| Source | Displays the type of action performed, such as receipt of a purchase order. |
| Destination | Displays where the item was assigned to, such as a job. |
| Supplier / Customer | Displays the item's site and / or the customer the item was used for. |
To generate a CSV file of item history, click the ![]() icon in the top right corner above the table.
icon in the top right corner above the table.
Note that when reviewing the history of stock quantities and value, Simpro Premium uses first in first out accounting. This means that the oldest items are removed first at the value that they were purchased.
US only: If you use Simpro Premium in the United States, the terms 'inventory' and 'inventory count' are used instead of 'stock', 'stock take', and 'in stock'.
 Advanced
 Enable add-on pricing
You can enable add-on pricing and when you add this item to a quote or job, you have the option to use regular pricing or add-on pricing. Learn more in Use add-on pricing for quotes and Use add-on pricing for jobs.
 Enable add-on pricing
To enable add-on pricing in catalogue items:
- In the Pricing tab, click the Add-on Price switch.
- If you have selected:
- Fixed Markup as the Setting, enter the Markup Add-on percentage.
- Fixed Sell Price as the Setting, enter the Sell Price Add-on.
- Click Save and Finish.
 Enter accurate split pricing and quantities
If you have negotiated a discounted price with a supplier that only applies when you purchase a specified quantity of an item, you need to enter the accurate Trade Split Quantity and Split Price.
See Catalogue Item Quantities and Pricing to learn how to update catalogue item pricing and quantities to streamline ordering.
 Enter trade, split, and nett prices in multiple currencies
If you have set up multiple currencies for overseas suppliers who require purchase orders in their own currency, you can enter trade, split, and nett prices accordingly.
To enter trade and split prices in multiple currencies for an item:
- Create or access the item.
- Go to Details > Attributes and select Multi Currency.
- Under Currencies, search and select the foreign currency in the Add a currency field.
- Enter a Trade Price / Split Price in the currency.
- Alternatively, enter a value in your default currency to convert it to the foreign currency.
- Click the tick icon to select the currency as the Default.
- If the Default is a foreign currency and your pricing tier is based on Trade Price, your pricing is calculated from the default currency value.
- Click the Suppliers tab.
- Add suppliers that have the foreign currency set as the default in their card file. Learn more in Adjust supplier settings.
- If the supplier offers a discounted trade or split price for the item, enter the Discount as applicable.
- Alternatively, enter the Trade Nett and / or Split Nett Price for the item and to automatically calculate the Discount.
- Click Save and Finish.
Click the ![]() icon to remove an assigned currency.
icon to remove an assigned currency.
Remember to regularly refresh your exchange rates in System ![]() > Setup > Currencies to maintain accuracy.
> Setup > Currencies to maintain accuracy.
 Walk Me Through
Need additional help?
Try Walk Me Through, our step-by-step guidance tool, to create catalogue items.
In Simpro Premium, go to Help ![]() > Walk Me Through and search Catalogue Item or Catalog Item.
> Walk Me Through and search Catalogue Item or Catalog Item.
Learn more in How to Use Walk Me Through in Simpro Premium.
 Learn more in the Learning Toolbox
For additional training, complete an interactive material in the Simpro's Learning Toolbox. Learn more in About Simpro's Learning Toolbox.
