Last Updated: December 12 2025
Overview
Asset types are useful for understanding what qualifies as an asset for your business. For example, a single asset may be an entire security system, or one individual component in the system such as a camera.
You can create asset types to categorise the customer assets you maintain, and define the information captured for each asset created from that type.
You can then add service levels to asset types and specify the flat rate or standard pre-build charge rate, failure points and recommendations, and test readings for each service level.
Flat price pre-builds are also referred to as set price pre-builds in some industries.
If you manage a large number of assets with multiple service levels, purchase and enable Maintenance Planner![]() An add-on that tracks customer assets and alerts you when they are due to be serviced. to streamline your preventative maintenance. Learn more in About Maintenance Planner.
An add-on that tracks customer assets and alerts you when they are due to be serviced. to streamline your preventative maintenance. Learn more in About Maintenance Planner.
Learn more in How to Create Assets.
 Required setup
In order to view content or perform actions referred to in this article you need to have the appropriate permissions enabled in your security group. Go to System![]() > Setup > Security Groups and access your security group to update your permissions. The relevant security group tab and specific permissions for this article can be found here:
> Setup > Security Groups and access your security group to update your permissions. The relevant security group tab and specific permissions for this article can be found here:
 Create an asset type
To create an asset type:
- Go to System
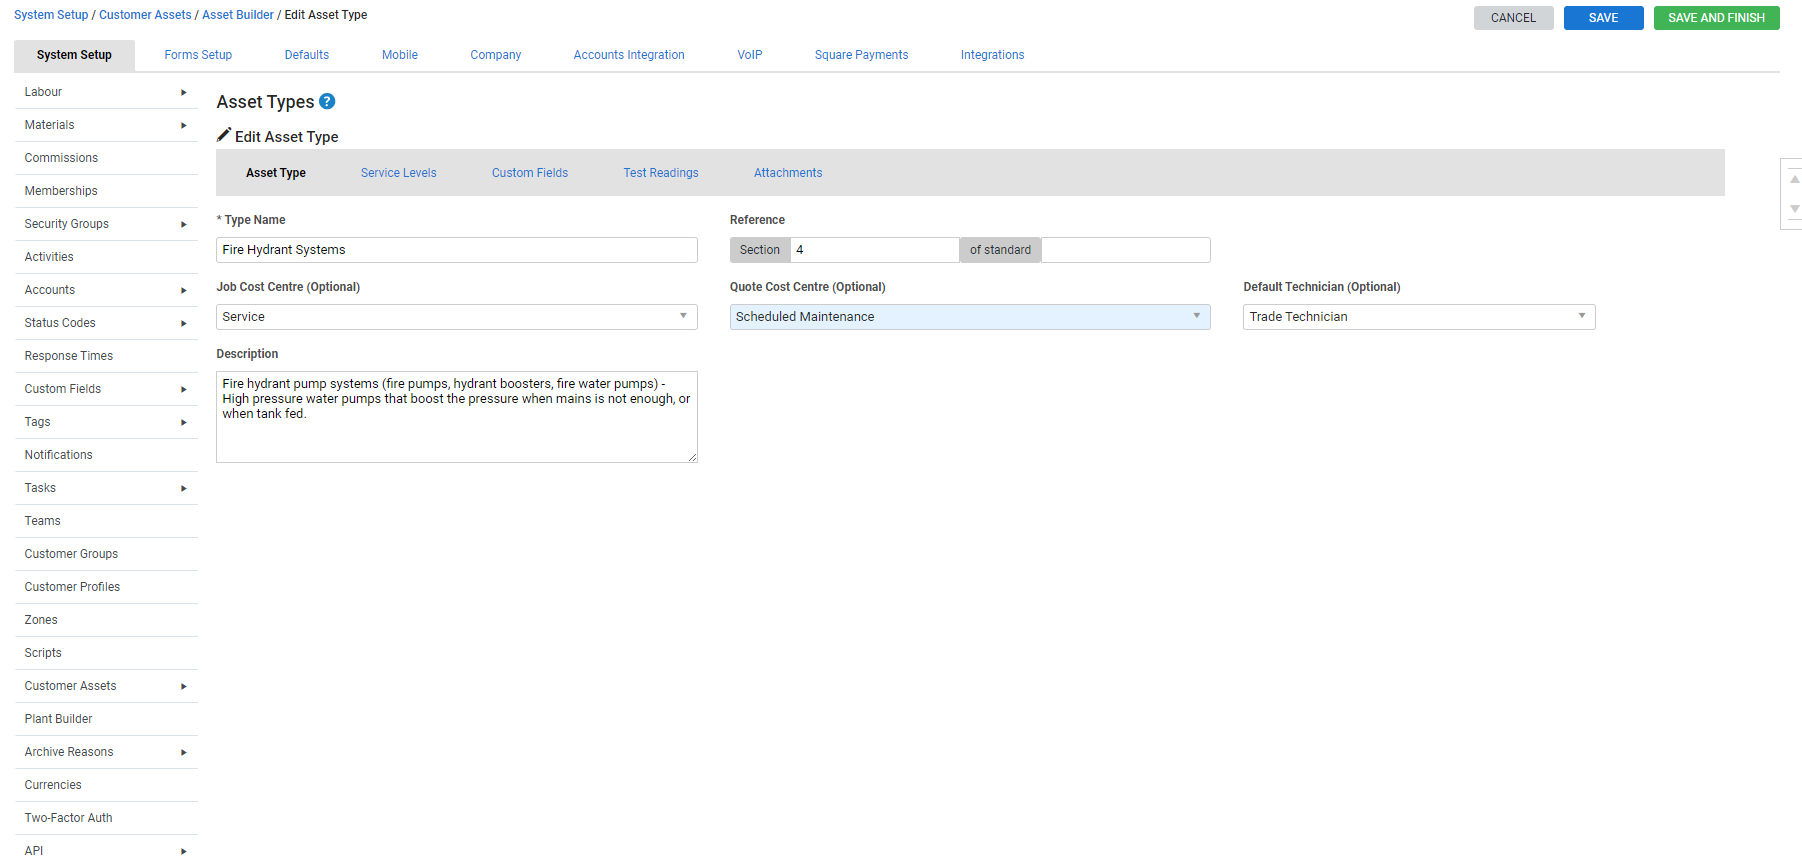
 > Setup > System Setup > Customer Assets > Asset Builder. Click Create New Asset Type.
 - Enter the Type Name.
- Enter a Reference if the asset adheres to a national or international standard, as well as the Asset Reg Type.
- Select a Job Cost Centre to be automatically selected when a preventative maintenance job is created.
- Select Not Selected to choose the cost centre at the time of job creation.
- Select a Quote Cost Centre to be automatically selected when a rectification quote is created.
- Select a Default Technician to be automatically assigned to all jobs raised against an asset type.
- Enter a Description of the asset if required.
- Add service levels as required.
- You can also Add failure points and recommendations for each service level.
- Create custom fields as required.
- Create test readings as required.
- Add attachments as required.
- Click Save or Finish.
To edit an asset type, go to System![]() > Setup > System Setup > Customer Assets > Asset Builder, then click the asset type, or alternatively, click Options > Edit Asset Type.
> Setup > System Setup > Customer Assets > Asset Builder, then click the asset type, or alternatively, click Options > Edit Asset Type.

Add service levels to an asset type to define the service and testing frequency for all customer assets created from it.
You can also select pre-builds to specify the Charge Rate to bill to customers for each service level, as well as add failure points and specify recommendations for rectifying asset failures. Learn more in What are Maintenance Pre-Builds.
To add an existing service level to an asset type:
- Go to System
 > Setup > System Setup > Customer Assets > Asset Builder.
 - Click the asset type, then click Service Levels.
- Select a service level from the Service Level Name drop-down list and click Add.
- Search and select the pre-build to apply a Charge Rate to the service level.
- This charge rate appears as a billable item in any jobs raised for that asset type and service level through Maintenance Planner, and appears on itemised invoices.
- Click Options > Edit Failure Points on the service level to Add failure points and recommendations.
- If you want this service level to be added automatically when you create a new customer asset of this type, select the Add by Default check box.
- Click Save or Finish.
Alternatively, click Create New Service Level to add a new service level to the asset type.
Learn more in How to Create Service Levels.

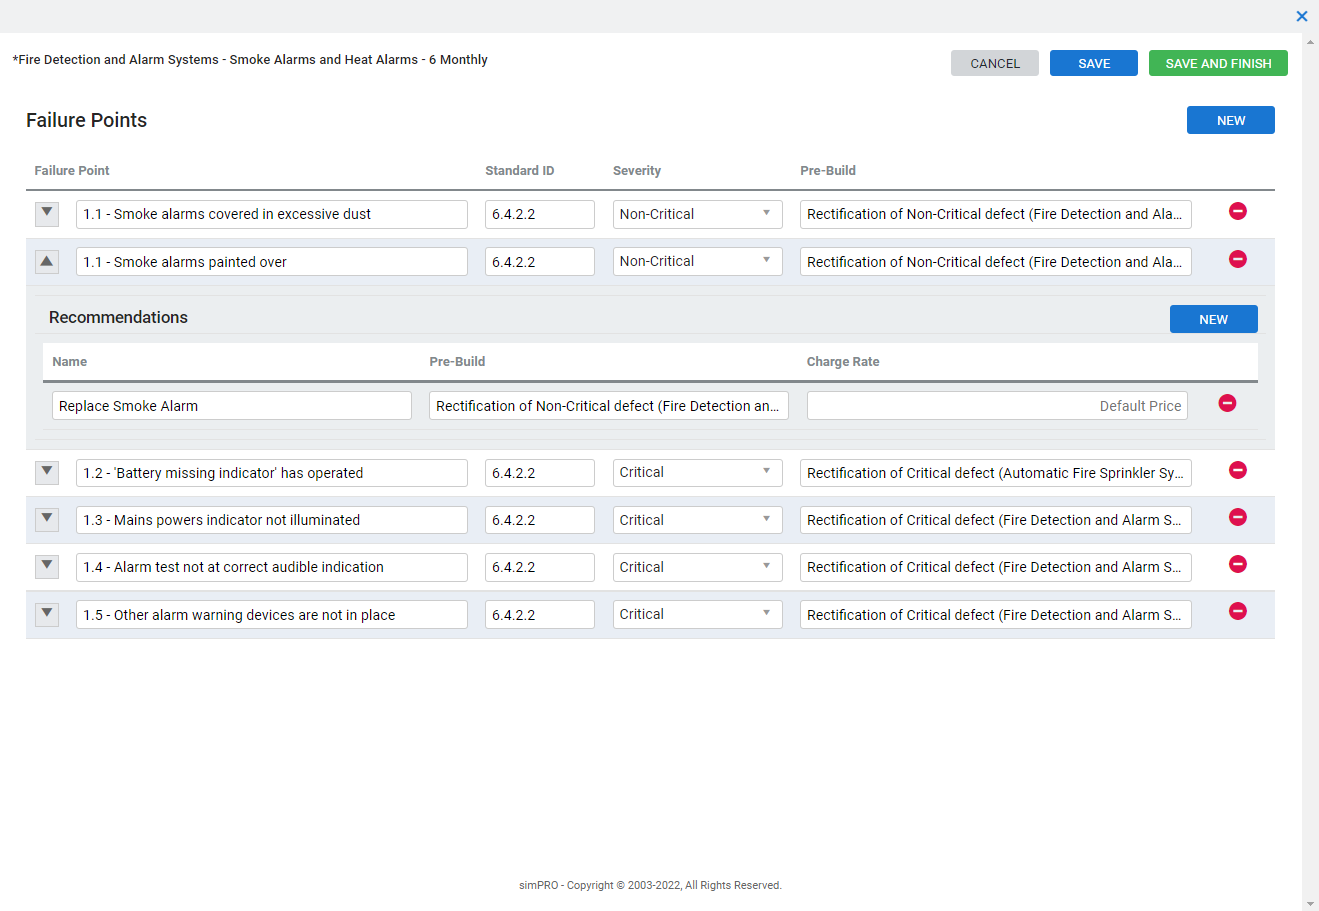
Use failure points as specific test points for each service level when performing maintenance on customer assets. You can also add recommendations so that you can choose what to do next if an asset fails a test.
To add failure points:
- Go to System
 > Setup > System Setup > Customer Assets > Asset Builder. Click the asset.
 - Click Service Levels.
- Click Options > Edit Failure Points on the service level.
- Click New.
- Enter the name and Standard ID of the failure point.
- Standard ID refers to national / regulatory standards that may be applicable in the asset testing.
- For example, (AS1670) is the Standard ID for Automatic fire detection and alarm systems in Australia.
- Under Severity, select the level of defect.
- This creates a more prominent alert if the failure point is selected for an asset.
- Select Technician Chooses to allow a technician to select the severity level in Simpro Mobile when testing the asset.
- Select a flat rate or standard Pre-Build.
- If this failure point is selected when the asset is failed and you create a rectification quote, this pre-build is automatically added and appears on itemised invoices.
- To add a recommendation, click the grey drop-down arrow in the Failure Point column, then click New.
- Enter the recommendation Name.
- Select a Pre-Build that is automatically added to the quote if the technician selects this recommendation.
- Enter the Charge Rate. Alternatively, leave this blank to use the default price.
- Continue adding failure points / recommendations as required.
- Technicians can select a recommendation after an asset fails testing.
- Click Finish.
If an asset fails a test, you receive an alert. You can then view the failure points that were selected and decide how to proceed.
 Create custom fields
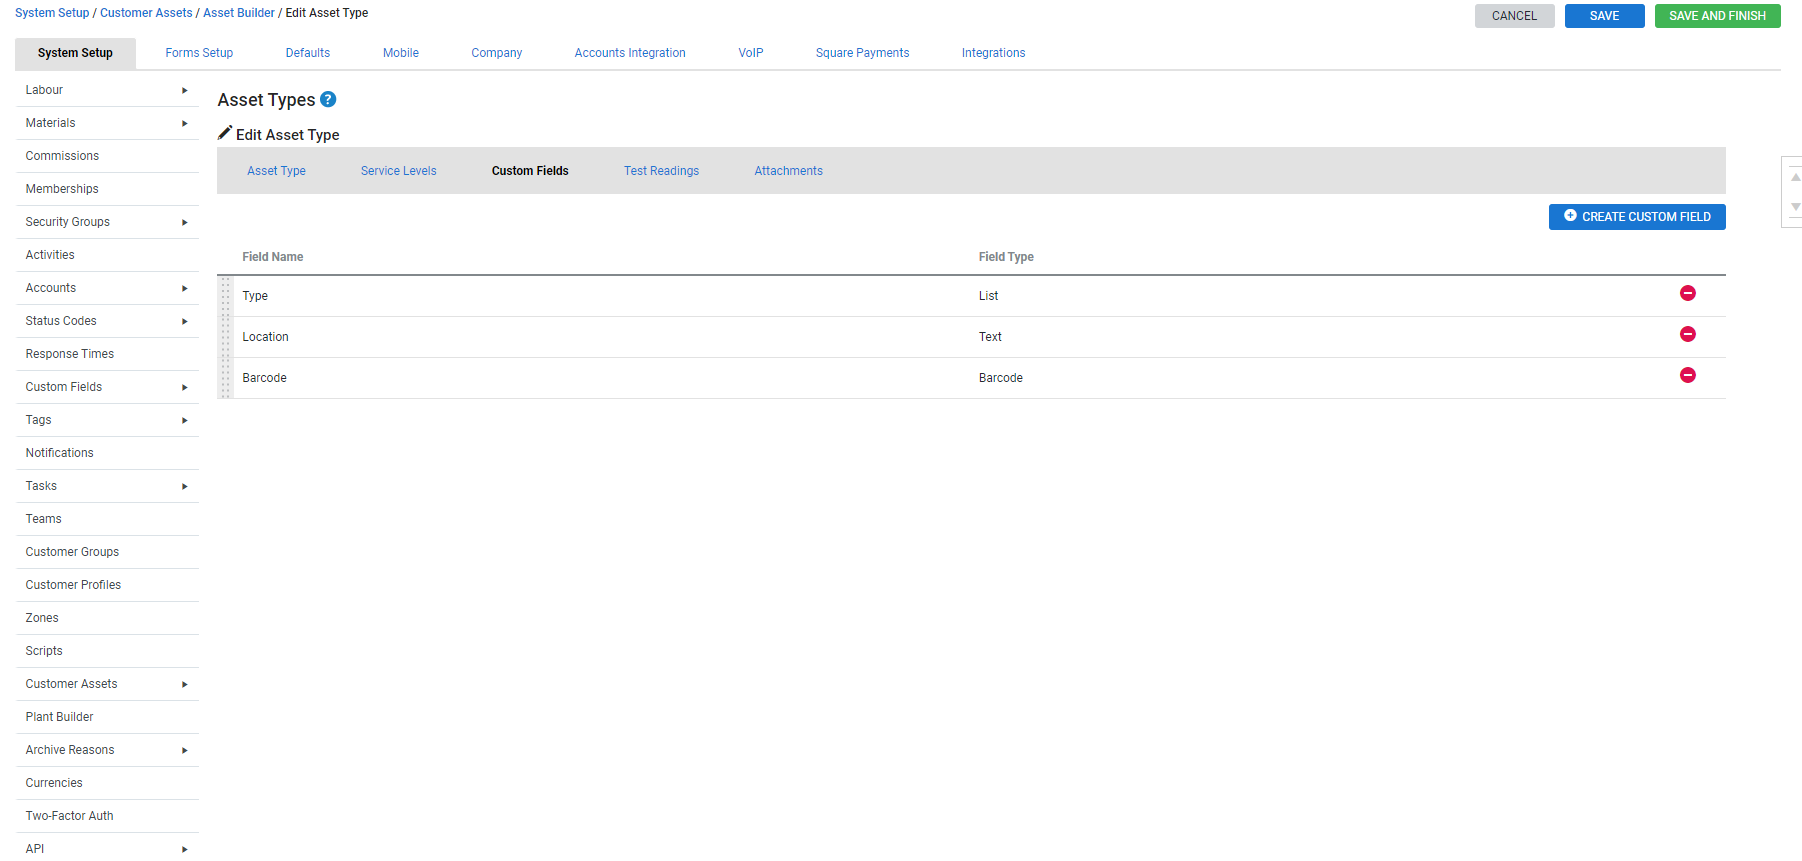
Create custom fields in an asset type to define what information is collected for an asset, for example, serial numbers, asset IDs, makes, models, installation and warranty dates, or locations on site.
You can create four types of fields for asset types:
| Text | Enter a small amount of text. |
| Date | Select a date from a date picker. |
| List | Choose from a drop-down list of options. |
| Barcode | Scan or enter a barcode. |
| Numeric | Enter numerical values only. |
To create a custom field for an asset type:
- Go to System
 > Setup > System Setup.
 - In the left column, hover over Customer Assets, then click Asset Builder.
- Click the asset type you wish to create a custom field for, then click the Custom Fields sub-tab.
- Click Create Custom Field.
- Enter a Field Name.
- Select Mandatory / Required to make the custom field mandatory to complete.
- Select a Field Type.
- For the List Field Type, click the
 icon to add more options to the list.
- For the List Field Type, click the
- Click Create.
When adding multiple fields to any given asset type, save regularly to prevent data loss.
 Create test readings
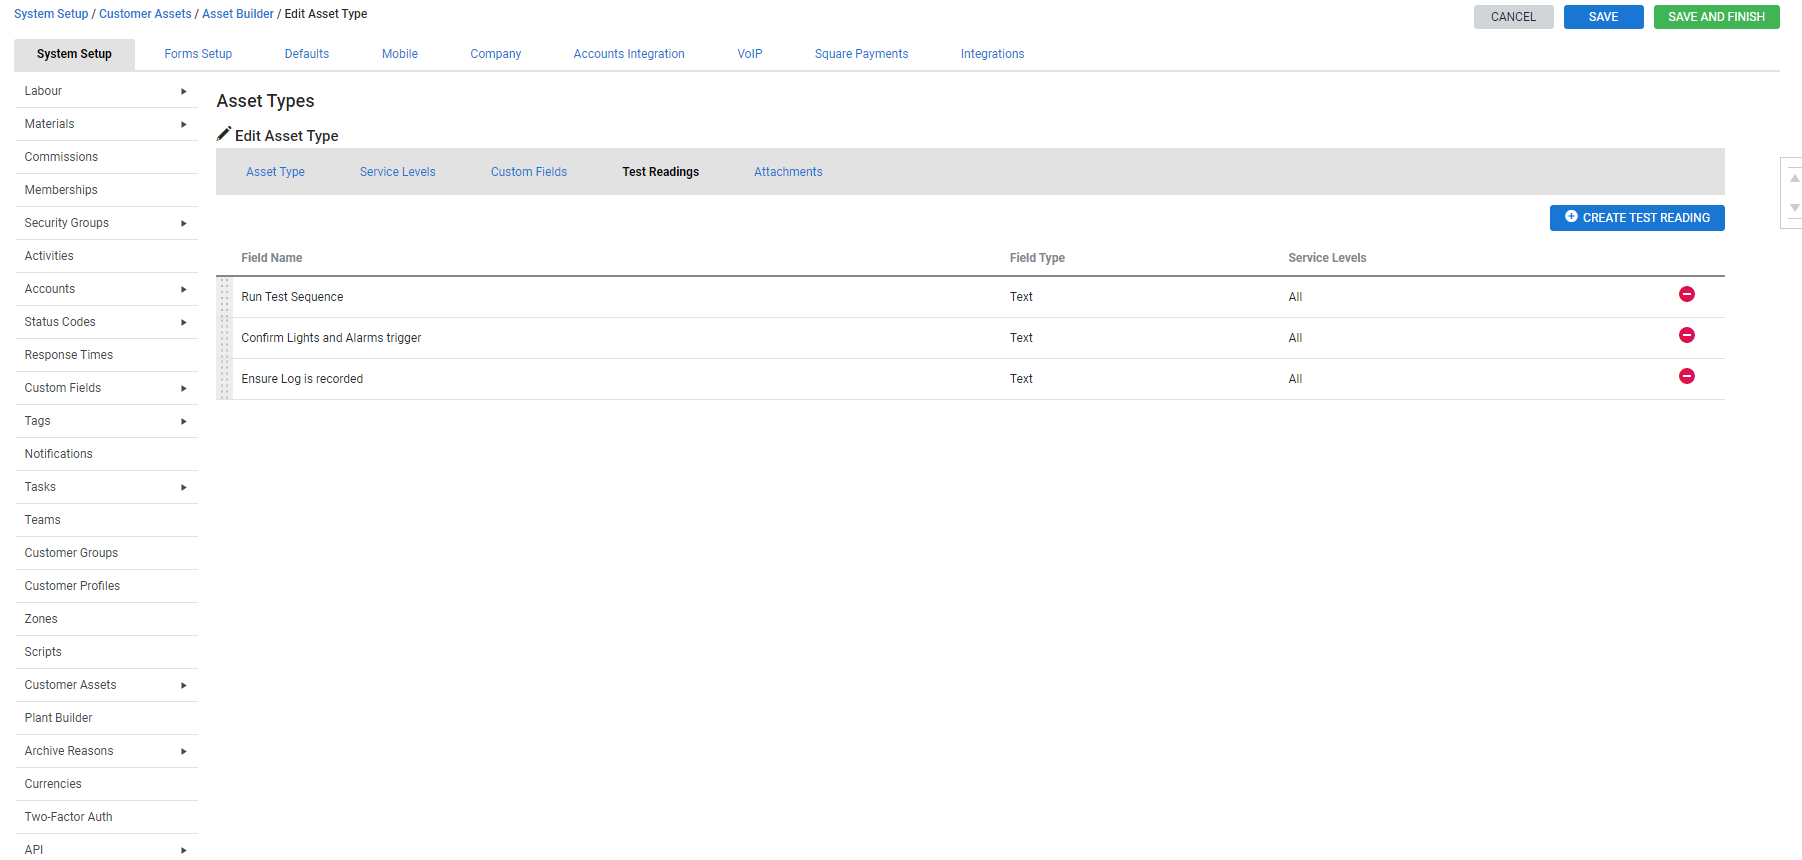
To enable technicians to record an asset's test results, for example, electrical readings, pressure readings, temperatures etc, accurately in the job card or in Simpro Mobile, you need to create test readings in the asset type in Simpro Premium.Test readings are then recorded as part of the asset history.
You can also assign test readings to specific service levels so that only necessary test readings appear for a particular service.
There are four types of fields you can apply to a test reading for technicians to complete:
| Text | Enter a small amount of text. |
| Date | Select a date from a date picker. |
| List | Choose from a drop-down list of options. |
| Numeric | Enter numeric-only text. You can also enter decimal places and plus and minus signs. |
To create a test reading:
- Go to System
 > Setup > System Setup > Customer Assets > Asset Builder.
 - Click the asset type, then click Test Readings.
- Click Create Test Reading.
- Under Field Name, enter the name of the test reading.
- Select Mandatory / Required if you wish for the test reading to be mandatory to complete when testing the asset in the field.
- Select a Field Type.
- For the List Field Type, click the
 icon to add more options to the list.
- For the List Field Type, click the
- Under Service Levels:
- Select All to apply the test reading to all service levels.
- Select Manual to apply the test reading to the service levels assigned to the asset type, then select the service levels from the drop-down list.
- Click Create.
If you have not assigned service levels to an asset type, test readings that have been assigned to All will appear in the job card in Simpro Mobile and Simpro Premium.
US only: If you use Simpro Premium in the United States, the term 'work order' is used instead of 'job card'.
 Edit a test reading
To edit a test reading:
- Go to System
 > Setup > System Setup > Customer Assets > Asset Builder.
 - Click the asset type that contains the test reading, then click the Test Readings sub-tab.
- Click the test reading and make changes as required.
- Click Save.
 Add attachments
You can add attachments to an asset type for your own reference.
 Copy an asset type
To copy an asset type, including all service levels, custom fields, test readings, and attachments:
- Go to System
 > Setup > System Setup > Customer Assets > Asset Builder.
 - Click Options > Copy Asset Type on the asset type.
- Enter a New Asset Type Name.
- The name defaults to '[original name] - Copy'.
- Click Copy.
You can then click the new asset type copy to adjust it.
 Delete an asset type
To delete an asset type, go to System![]() > Setup > System Setup > Customer Assets > Asset Builder, then click Options > Delete Asset Type on the asset type.
> Setup > System Setup > Customer Assets > Asset Builder, then click Options > Delete Asset Type on the asset type.
You are then no longer able to create or import assets for that asset type. Any assets created from the type still exists in the site card file, but you are not able to search them according to asset type in the card file or in Utilities![]() > Assets.
> Assets.
 What's next?
When you have finished creating your asset types, you can then create your assets and update their service and start dates in a number of ways:
Alternatively, you can create customer contracts for preventative maintenance, then create the assets, and assign them to the contract as required. Learn more in How to Set Up Asset Maintenance Contracts.


