Last Updated: December 15 2025
Overview
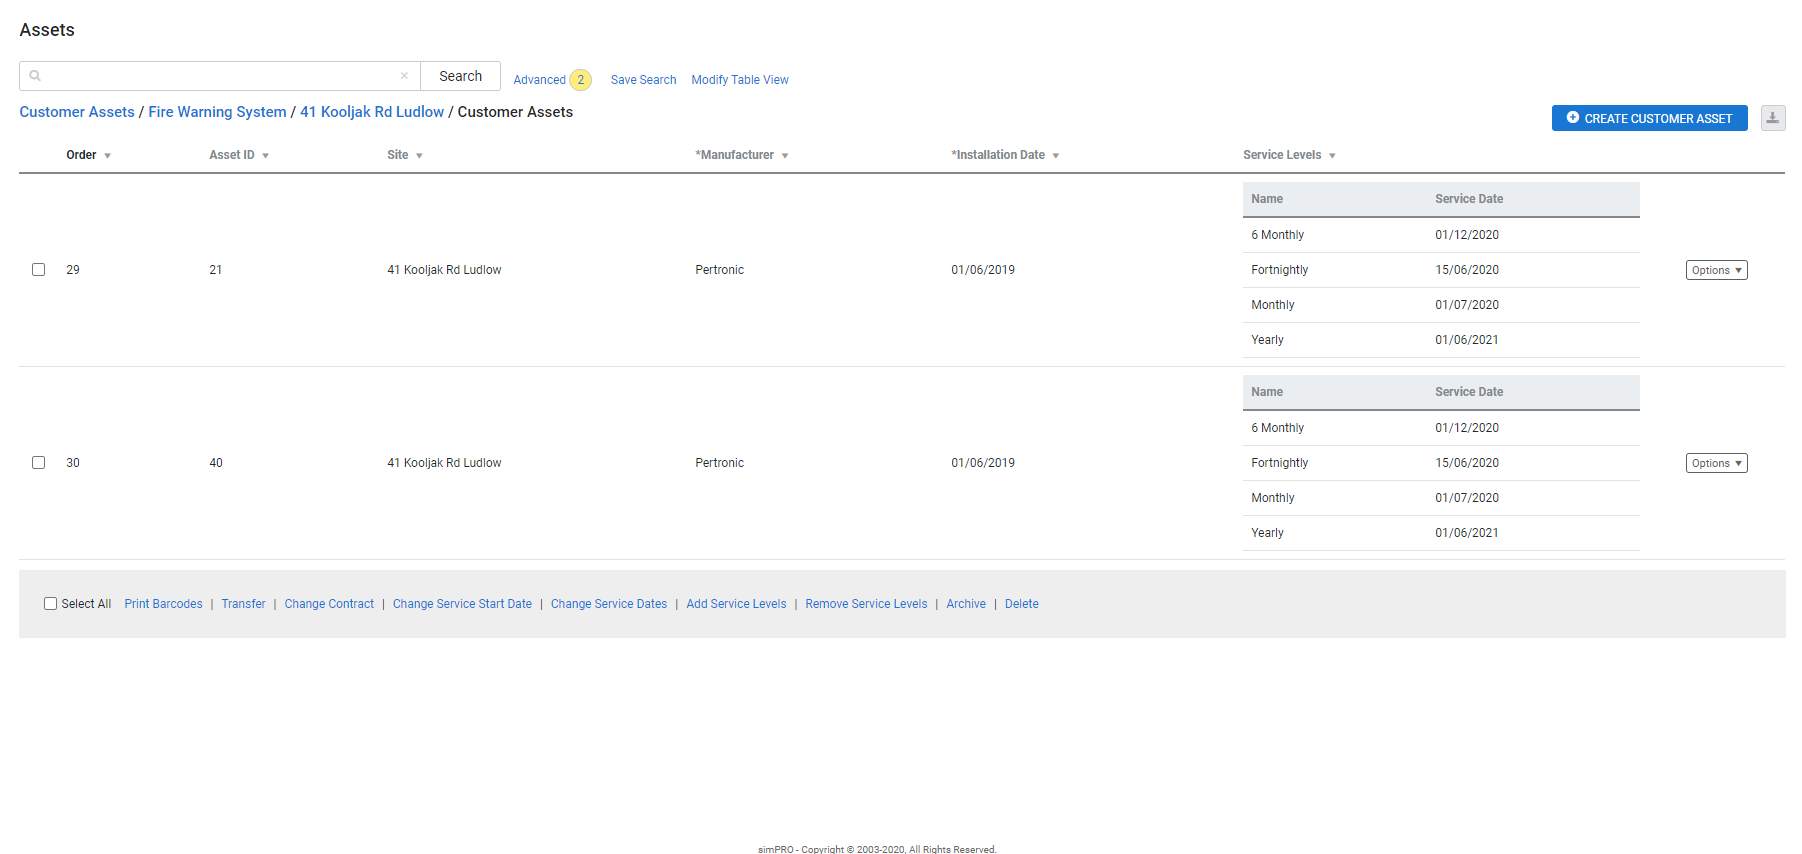
Once you have created your asset types, you can manually create individual assets in Utilities ![]() > Customer Assets or within the site card file. Alternatively, you can import an asset list.
> Customer Assets or within the site card file. Alternatively, you can import an asset list.
You can also create assets in Simpro Mobile. However, if you have purchased and enabled Maintenance Planner![]() An add-on that tracks customer assets and alerts you when they are due to be serviced., you cannot associate an asset with a customer contract in the field. You need to access Simpro Premium after the asset has been created to add a customer contract and amend service levels as required.
An add-on that tracks customer assets and alerts you when they are due to be serviced., you cannot associate an asset with a customer contract in the field. You need to access Simpro Premium after the asset has been created to add a customer contract and amend service levels as required.
To create asset types if you are maintaining assets using Maintenance Planner, see How to Create Asset Types.
Assets are always directly associated with the site where they are located. If a site is transferred to another customer, any assets on the site are also transferred.
 Required setup
In order to view content or perform actions referred to in this article you need to have the appropriate permissions enabled in your security group. Go to System![]() > Setup > Security Groups and access your security group to update your permissions. The relevant security group tab and specific permissions for this article can be found here:
> Setup > Security Groups and access your security group to update your permissions. The relevant security group tab and specific permissions for this article can be found here:
Before performing the steps detailed below, ensure that this part of your build is set up correctly. The relevant steps to set up the features and workflows detailed in this article can be found here:
 Create a customer asset
To create a customer asset:
- Go to Utilities
 > Customer Assets, then click the asset type.
- Alternatively, go to People
 > Sites.
- Alternatively, go to People
- Click the site.
- If you are in a site card file, click the Customer Assets tab.
- Click Create Customer Asset.
- Select the Customer Asset Type.
- Enter the Display Order number to sort where the asset is located in the table.
- Select the associated customer Contract if applicable.
 The Start Date defined in the contract is also the Start Date defined in the Service Levels tab of the asset. Learn more in Specify service dates.
- Enter Custom Fields information as required.
- Click Save and Finish.
You can then add attachments, view the asset history, link related assets, and Specify service dates ![]() .
.

![]()
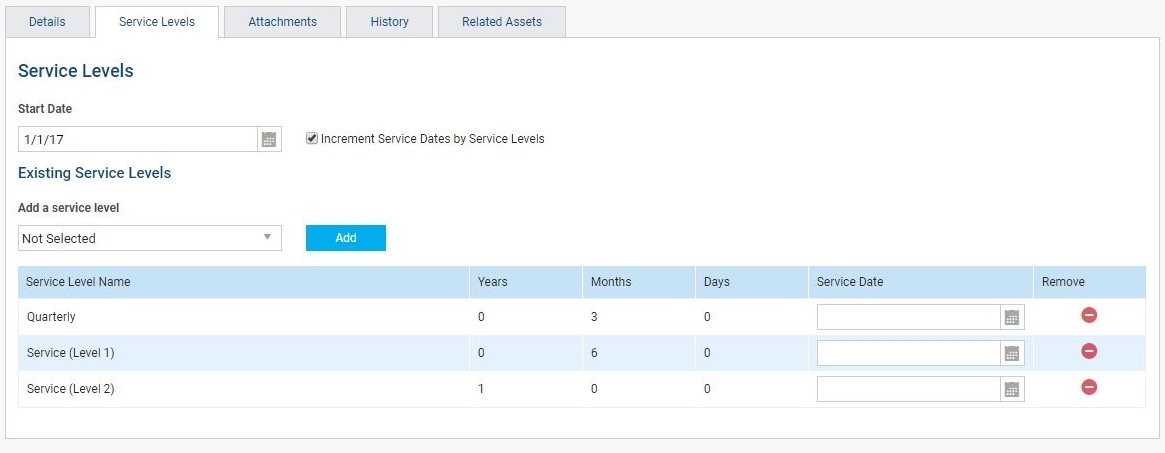
Asset service levels are defined by the asset type. You can then specify the exact dates for each service level within an individual asset. Learn more in How to Create Service Levels.
The Start Date defaults to today's date. You may wish to adjust the Start Date to reflect the date the asset was last serviced. Alternatively, if the asset has been assigned to a Contract in the Details tab, the Start Date is set to the same Start Date defined in the customer contract.
It is recommended to select the same Service Date for all service levels in an asset, so that if two service levels are triggered on the same date, such as an annual service and a quarterly service, Maintenance Planner selects the more important service level (the annual service). The less important service (the quarterly service) is then skipped for that period.
Select or clear the Increment Service Dates by Service Levels check box, then click Save to automatically define the Service Date for each service level using the following settings:
| Selected |
Set the next Service Date to be the number of days, months, or years after the Start Date according to the frequency of the service level. For example, select the Increment Service Dates by Service Levels check box and click Save. |
| Cleared |
Set the next Service Date to be the same as the Start Date. The service dates then automatically populate and the Increment Service Dates by Service Levels check box disappears. Alternatively, you can manually select a Service Date for each service level. |
To add a new service level to an asset, select as required from the Add a service level drop-down list, and click Add. To remove a service level from an asset, click the ![]() icon.
icon.
You can also add and remove service levels in bulk using the footer options. If you add a service level to an asset that already has the service level, the service level is not added.
When you clear or select the Increment Service Dates by Service Levels check box and click Save, the option is removed and you need to update each Service Date manually.
 Add attachments
Click Attachments in an asset to add and manage attachments such as servicing guidelines and certificates. Learn more in How to Use Attachments.
 View asset history
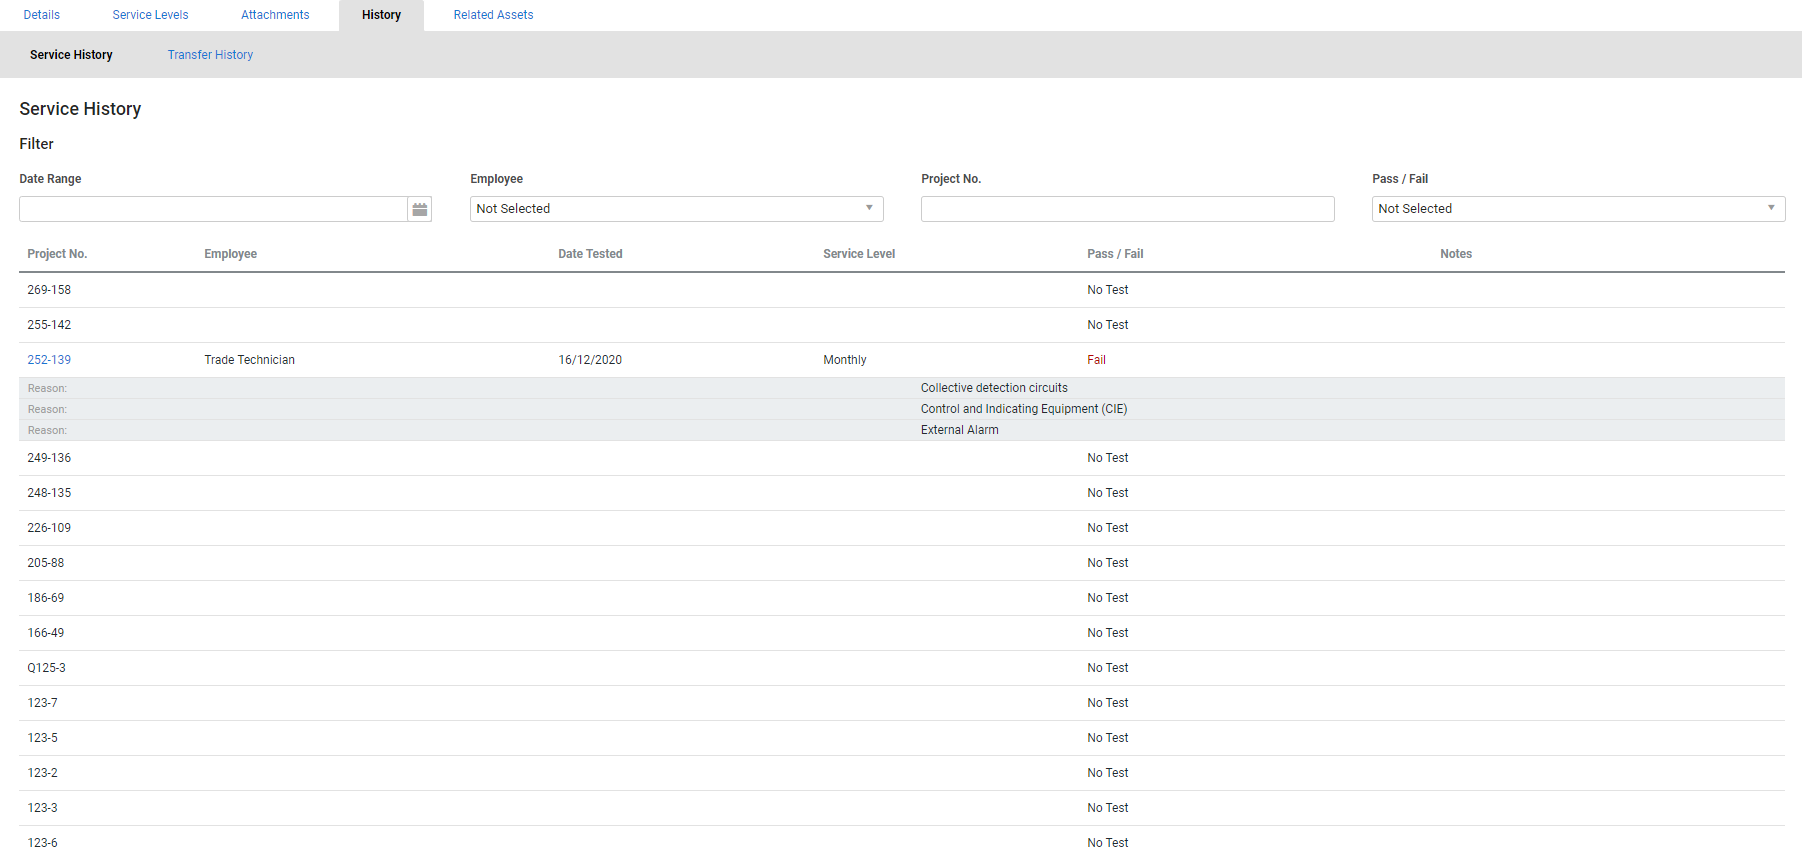
Click History to view the testing history of an asset, including the associated Project No., the Employee who performed the test, the Date Tested, whether the asset passed or failed, Notes, and the relevant Service Level ![]() .
.
You can also filter the testing history by Date Range, Employee, Project No., and Pass / Fail.
 View asset transfer history
In the History tab, click the Transfer History sub-tab to view a list of all sites that this asset has previously belonged to, and the date when the asset was transferred from that site. Learn more in How to Manage Customer Assets.
 Add related assets
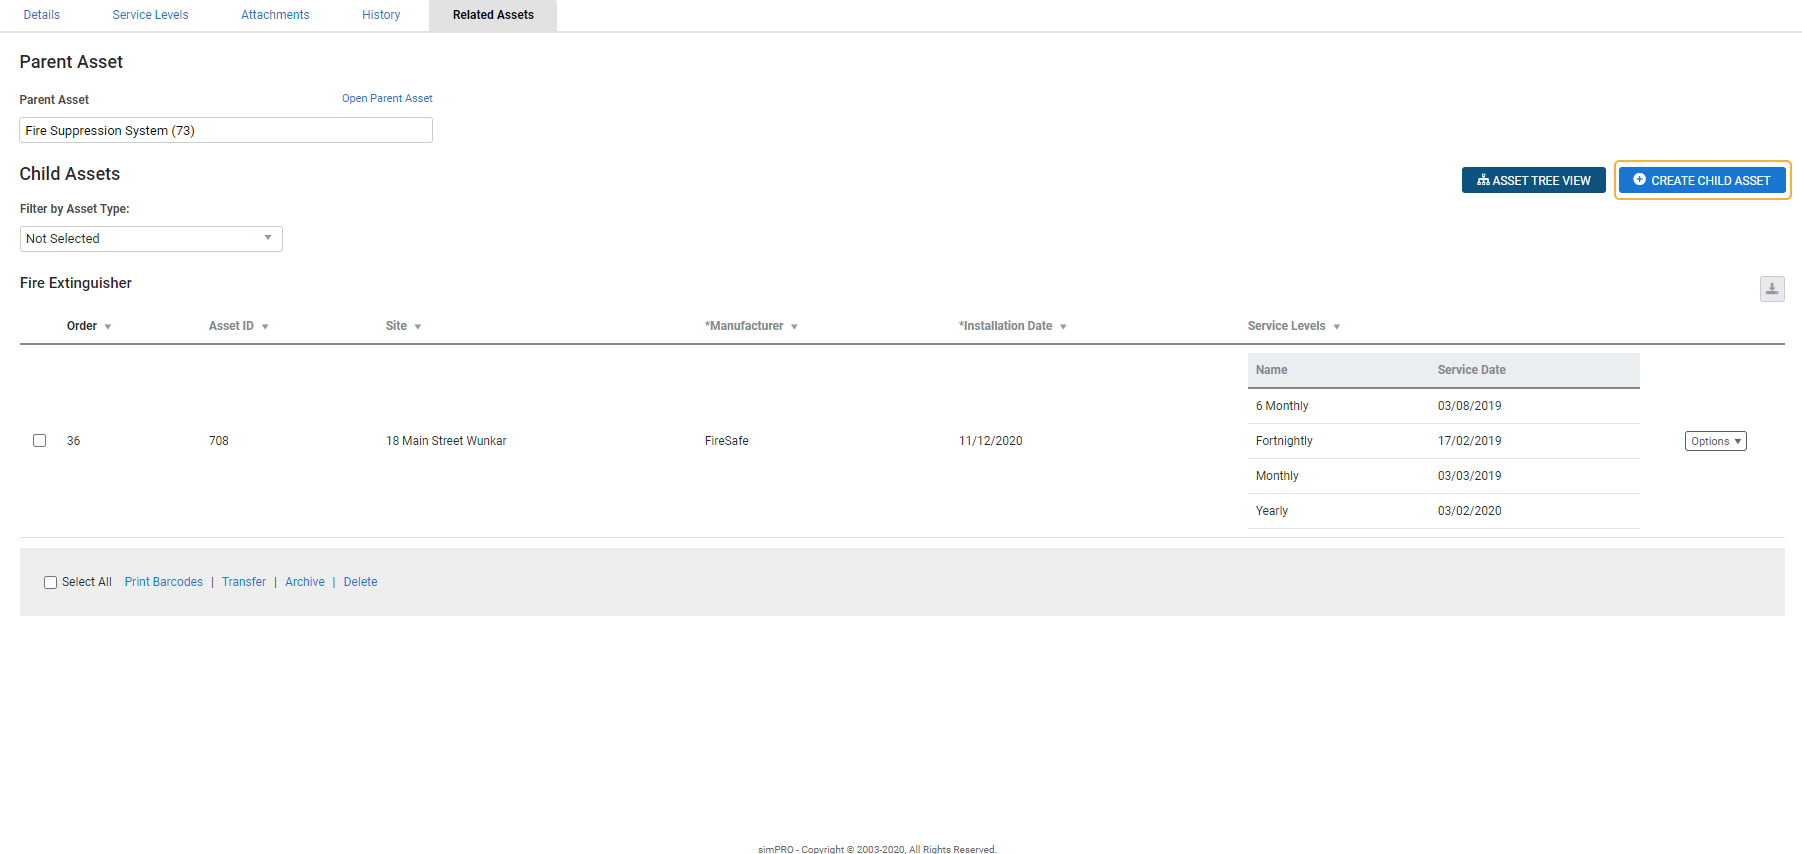
Click Related Assets to link an asset to a parent or child asset.
To link an asset to a parent asset, search and select the Parent Asset.
To link to and create a child asset:
- Access the parent asset as normal.
- Go to Related Assets.
- Click Create Child Asset.
- Create the asset as normal.
- Click Save and Finish.
To link an asset to an existing child asset, you need to access the child asset, then search and select the parent asset as applicable.
Learn more in How to Manage Customer Assets.
 Walk Me Through
Need additional help?
Try Walk Me Through, our step-by-step guidance tool, to create a service job.
In Simpro Premium, go to Help ![]() > Walk Me Through and search Create an Asset.
> Walk Me Through and search Create an Asset.
Learn more in How to Use Walk Me Through in Simpro Premium.


