Last Updated: December 12 2025
Overview
In Simpro Premium, a customer asset is a piece of equipment installed at a customer site that you maintain on behalf of the customer. You can create and manage customer assets in the applicable site card file, or alternatively, manage all customer assets in Utilities ![]() > Customer Assets.
> Customer Assets.
To create an asset in Simpro Premium, you need to set up asset types as templates to capture different types of information for different assets, including basic details, custom fields, test readings, and attachments, as well as service levels ![]() .
.
You can also add and create customer assets in a quote or job workflow, and transfer assets between sites.
Customer assets, which you maintain on behalf of customers, are different to plant items, which are equipment that your company owns, uses on jobs, and keeps track of for job costing and maintenance.
 Required setup
In order to view content or perform actions referred to in this article you need to have the appropriate permissions enabled in your security group. Go to System![]() > Setup > Security Groups and access your security group to update your permissions. The relevant security group tab and specific permissions for this article can be found here:
> Setup > Security Groups and access your security group to update your permissions. The relevant security group tab and specific permissions for this article can be found here:
 Manage customer assets
There are two approaches to job creation and workflows for asset maintenance in Simpro Premium:
- Recurring jobs
- Maintenance Planner
If you provide standardised services for a small to moderate number of customer assets, you may wish to create recurring job templates for each customer asset and their related service periods. The system alerts you when jobs are due to be created based on the recurring job frequency setup on your job template. Learn more in How to Create Recurring Jobs.
If you have assets that have multiple service levels requiring a variety of different duties and services, you may instead wish to purchase and enable Maintenance Planner![]() An add-on that tracks customer assets and alerts you when they are due to be serviced. so you can create and assign service levels to specify the servicing and testing frequency for each customer asset. Learn more in How to Set Up Maintenance Planner.
An add-on that tracks customer assets and alerts you when they are due to be serviced. so you can create and assign service levels to specify the servicing and testing frequency for each customer asset. Learn more in How to Set Up Maintenance Planner.
You can then view which assets are due to be serviced and create the required jobs in Maintenance Planner.
If you currently manage customer assets using recurring job templates, you can transfer and manage your existing asset data in Maintenance Planner.
 View customer assets
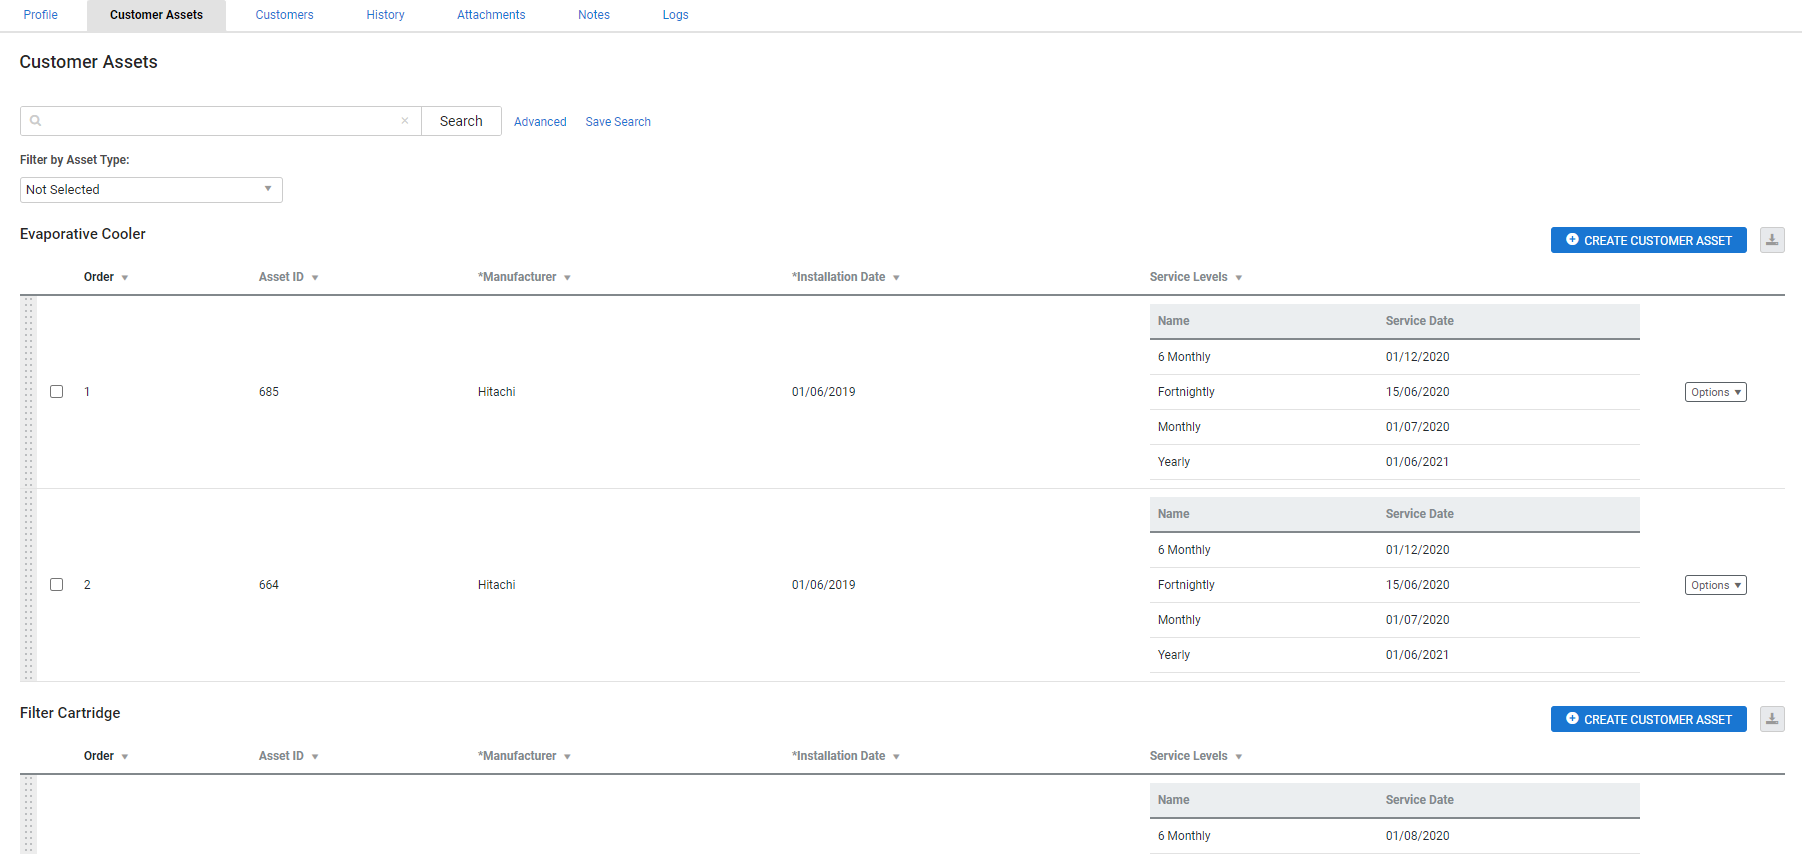
To view all customer assets, hover over Utilities ![]() , then click Customer Assets.
, then click Customer Assets.
Assets are organised according to asset type, then by customer site. You can manually locate an asset by clicking the applicable asset type and site, or alternatively, perform a local search using information entered in the asset's custom fields.
Click Advanced to filter customer assets according to Customer Asset Status, the Period during which they were created for a job, or the Customer Asset Type. When searching within an asset type, you can also filter assets by Site.
 Access customer asset options
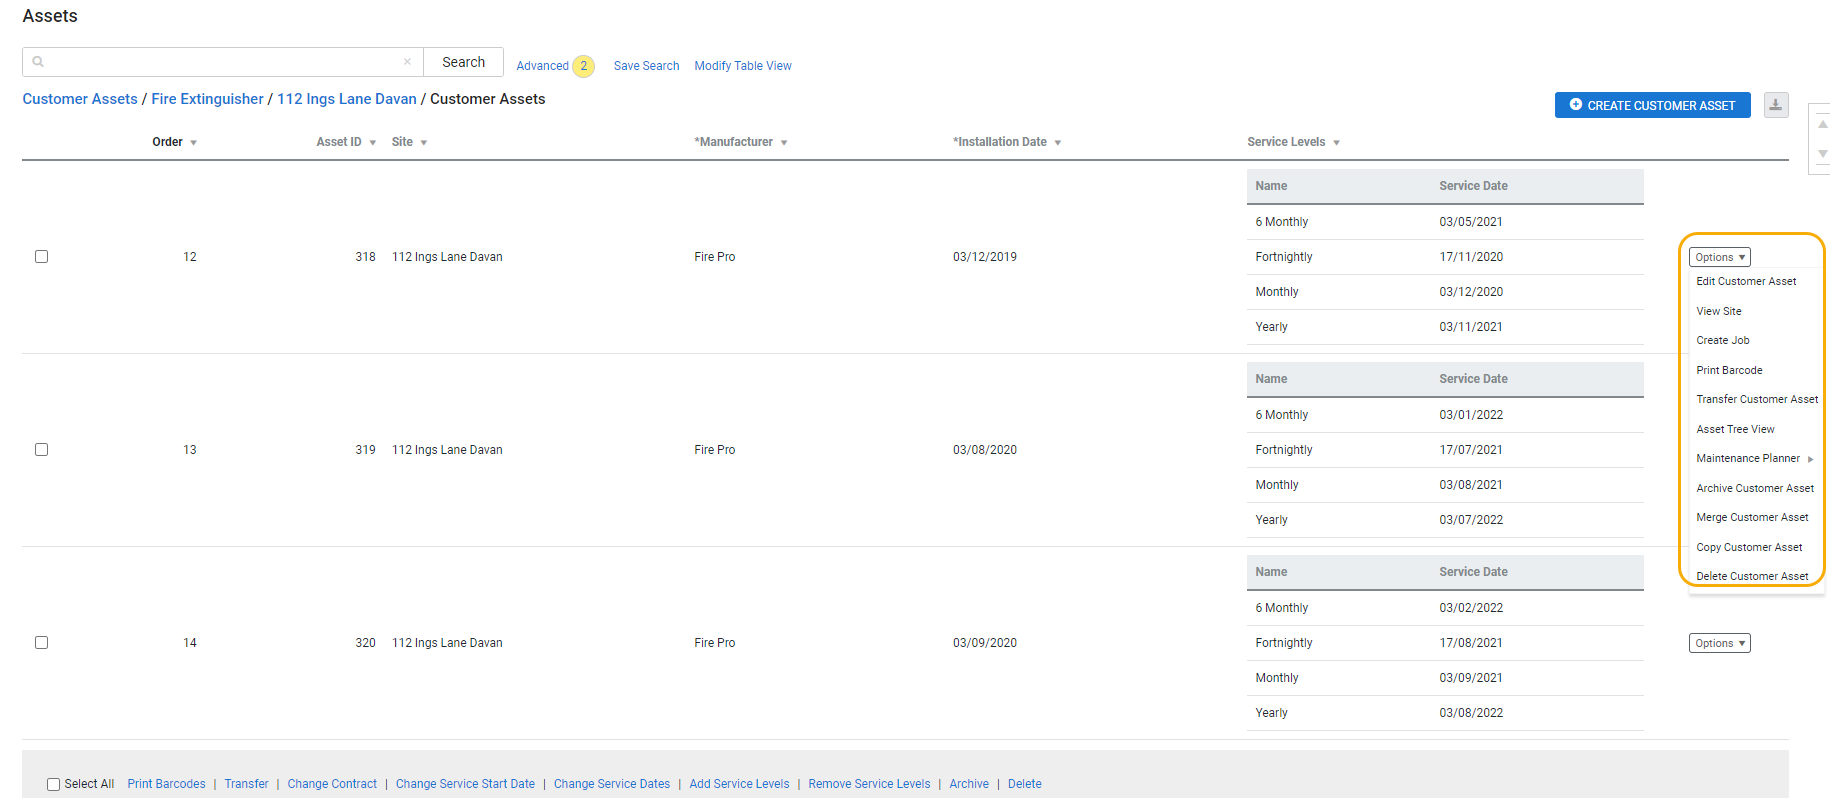
Click Options on an asset to access the following options:
| Edit Customer Asset | Access and edit the customer asset. You can also access the asset by clicking it. |
| Create Job | Create a new service job with the Job Cost Centre defined in the asset type in System |
| Print Barcode | Print a barcode entered in a custom field if applicable. |
| Transfer Customer Asset | Transfer the asset to another site by searching and selecting the site, then clicking Save. |
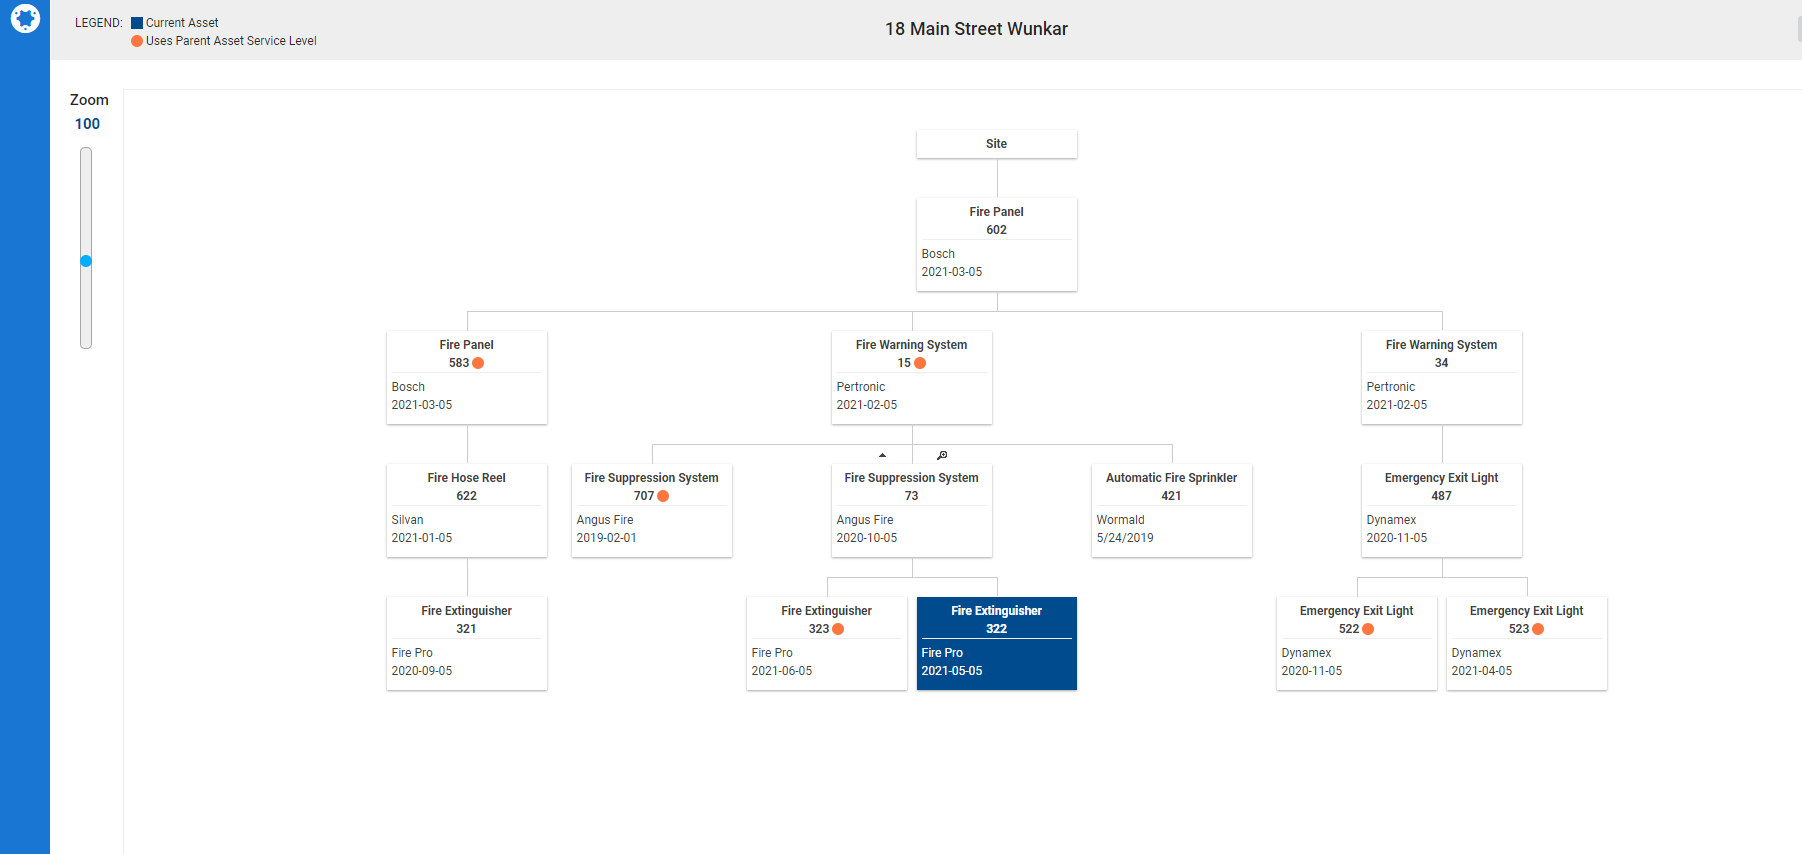
| Asset Tree View | Opens up a new tab to display visual relationships between assets in a tree view. |
|
|
Click:
|
| Archive Customer Asset | Archive a customer asset. You can view archived customer assets by going to Utilities |
| Merge Customer Asset |
Enter the Asset Number of the asset you want to merge the asset into and click Merge.
|
| Copy Customer Asset |
Create a new customer asset using the details of this existing asset. Click to display the Create Customer Asset page. Update details, as required and click Save and Finish. |
| Delete Customer Asset | Permanently delete a customer asset. |
Select the check boxes and access the following options in the footer:
| Change Contract | Select a new contract to associate these assets with. |
| Change Service Start Date | The Start Date defaults to today's date. You may wish to adjust the Start Date to reflect the date the asset was last serviced. |
| Change Service Dates | Select a new date for each service level. |
| Add Service Levels | Update the service levels in this asset. |
| Remove Service Levels | Remove any service levels from this asset. |
 Transfer assets between sites
To transfer assets between sites:
- Go to Utilities
 > Customer Assets.
 - Locate the customer asset by clicking the applicable asset type and site.
- Alternatively, perform a local search or click Advanced to filter assets.
- Click Options > Transfer Customer Asset.
- Search and select the site you wish to Transfer To.
- Select Transfer Child Assets to transfer any child assets on the same site. Learn more in How to Use Nested Assets.
- Click Save.
Click the customer asset to access it and ensure all information entered in Custom Fields are still correct, such as installation dates and site-specific information.
 Transfer assets from within a site
To transfer assets from within a site:
- Go to People
 > Sites, then locate and click the site.
 - Click the Customer Assets tab.
- Locate the customer asset either manually, or selecting from the drop-down list to Filter by Asset Type.
- Click Options > Transfer Customer Asset.
- Search and select the site you wish to Transfer To.
- Select Transfer Child Assets to transfer any child assets on the same site. Learn more in How to Use Nested Assets.
- Click Save.
- Click Save and Finish.
Click the customer asset to access it and ensure all information entered in Custom Fields are still correct, such as installation dates and site-specific information.
 Nest assets
You can organise your assets by creating parent-child relationships. Additionally, you can have parent-child assets use the same service levels to save time in creating jobs if you use Maintenance Planner. Learn more in How to Use Nested Assets.
 View assets in tree view
To see relationships between assets more easily, use the asset tree view.
- In a site card file, go to the Customer Assets tab.
- Click an asset.
- Go to the Related Assets tab.
- Click Asset Tree View.
- Alternatively, click Options > Asset Tree View.
The asset tree view opens in a new tab.
Use the scroll bar on the left to zoom in and out of the tree view.
To collapse the children underneath an asset, click the arrow icon above the asset.
To focus on a direct line of relationships and collapse all other assets on the same level, click the magnifying glass icon.
Click Close to close the tab and return to Simpro Premium.
 Add assets to jobs
Once assets are added to a job, you can see them on the job card in Simpro Premium and in Simpro Mobile, where you can record test results and notes about the work performed on the asset.
You can either automatically assign assets to jobs as they are created, or add assets to jobs manually.
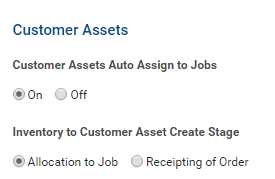
To automatically assign assets to jobs as they are created:
- Go to System
 > Setup > Defaults > System > Customer Assets.
 - Under Customer Assets Auto Assign to Jobs, select On.
- Click Save.
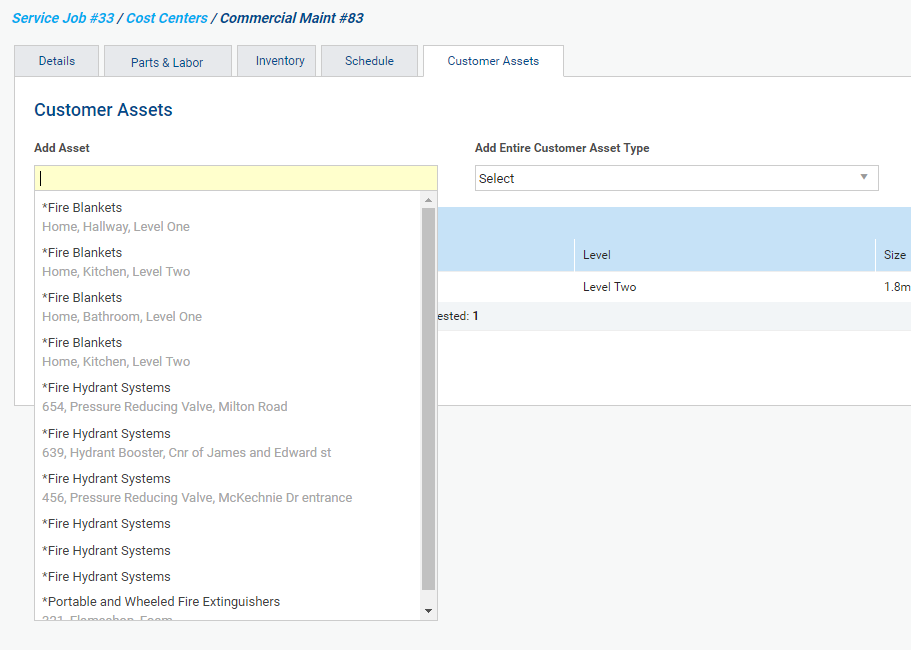
To add assets to jobs manually:
- Open the job as normal and go to the cost centre.
- Go to the Customer Assets tab.
- In the Add Asset field, search and select the asset. You can select any asset that is associated with the site and has not yet been added.
- You can also select an asset type under Add Customer Asset Type to add all assets of that type.
The asset is added to the job.
US only: If you use Simpro Premium in the United States, the term 'work order' is used instead of 'job card'.
