Last Updated: December 15 2025
Overview
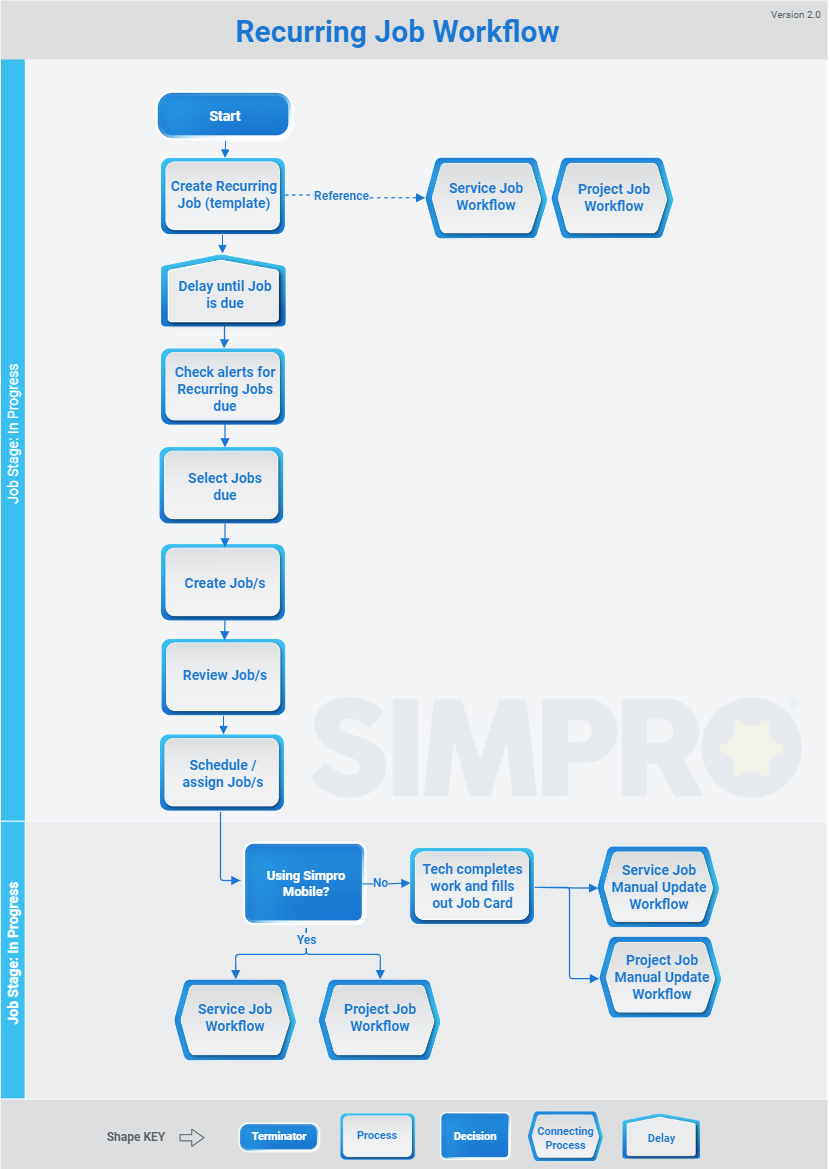
If you have a job that is performed at regular intervals, create a recurring job template. Simply add the relevant job details, materials and labour to the template, and you receive an alert whenever the job is due to be created.
This way you can save time by reusing the template instead of creating the job from scratch every time.
You can also use memberships to automatically apply a discount to all job templates created against a customer within a specified duration, boosting customer loyalty and revenue. Learn more in About Memberships.
Create recurring jobs in bulk by importing them into Simpro Premium, learn more in How to Import Recurring Jobs.
 Required setup
In order to view content or perform actions referred to in this article you need to have the appropriate permissions enabled in your security group. Go to System![]() > Setup > Security Groups and access your security group to update your permissions. The relevant security group tab and specific permissions for this article can be found here:
> Setup > Security Groups and access your security group to update your permissions. The relevant security group tab and specific permissions for this article can be found here:
 Create a recurring job template
Instead of creating a job manually each time, create a recurring job template, where you can add parts and labour and set the frequency to receive an alert to create the job for the customer.
You can create recurring templates for both service and project jobs.
You can also create a recurring job template by converting a quote.
If you want to make a change to the recurring job, you need to edit the template itself and not just one occurrence of the job. Only changes made to the template affects jobs created in the future.
 Create a recurring service job template
To create a recurring service job template:
- Go to Recurring
 > Create New Recurring Job.
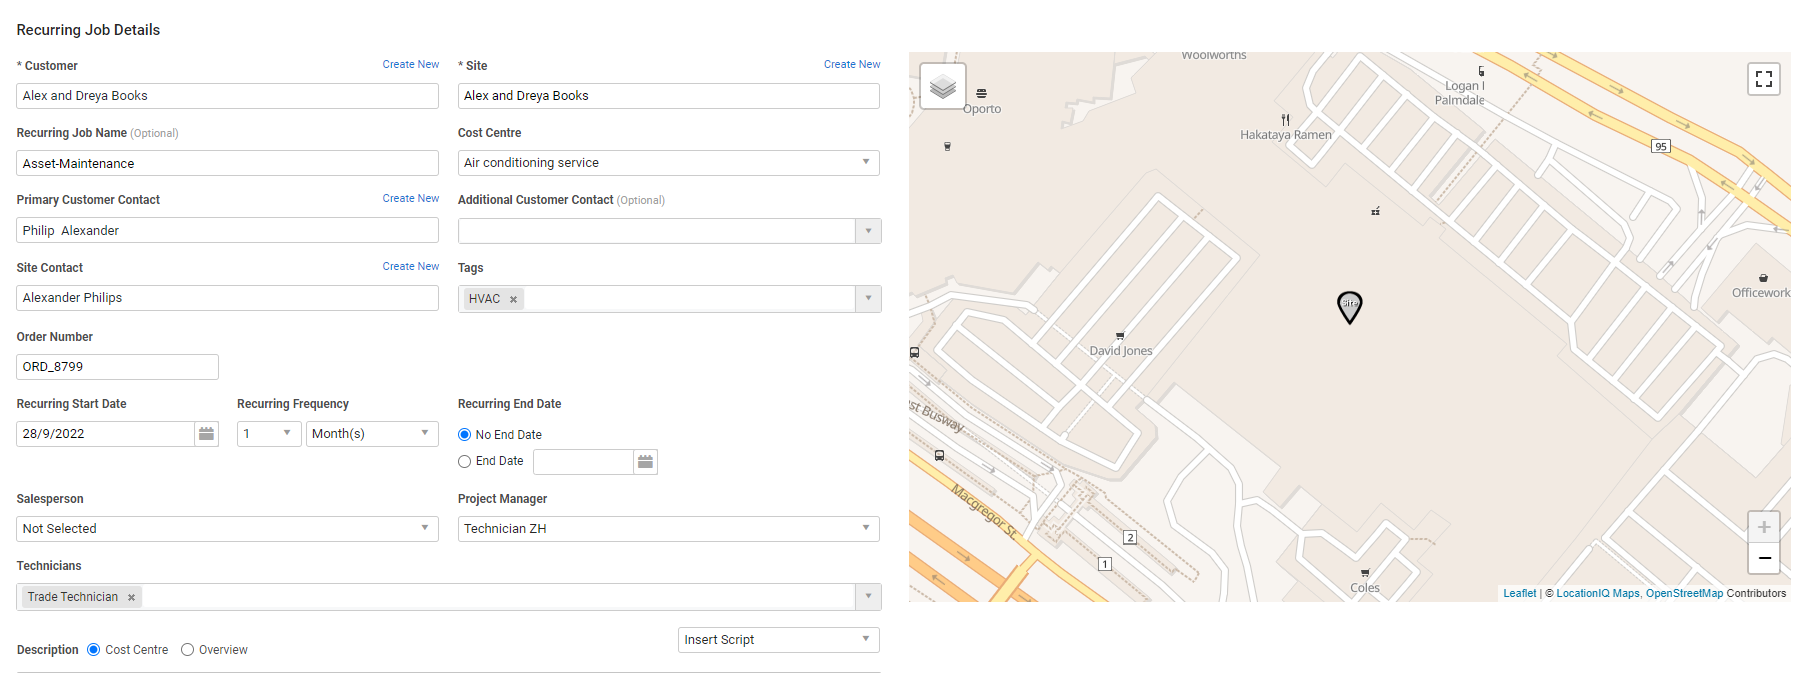
 - Search and select the Customer or customer contract.
- If the customer has an active membership, it appears in the header. Learn more in How to Use Memberships in Workflows.
- Selecting an existing customer may display a warning message if the customer has invoices that are outstanding. The message indicates if the invoice is more than 30 or 90 days overdue. Click View Statement in the warning message box to open the customer statement and email it, if required. Learn more in View and email the customer statement.
- Select the Site.
- Select or add contacts as required.
- Enter the Order Number and Recurring Job Name as applicable.
- Select a Cost Centre.
- Enter a Description.
- Select the Recurring Start Date, then set the Recurring Frequency by selecting the number of Week(s), Month(s), or Year(s) you wish to have the job recur.
- The Recurring Start Date and Recurring Frequency determines the due date of the recurring jobs generated from the recurring job template.
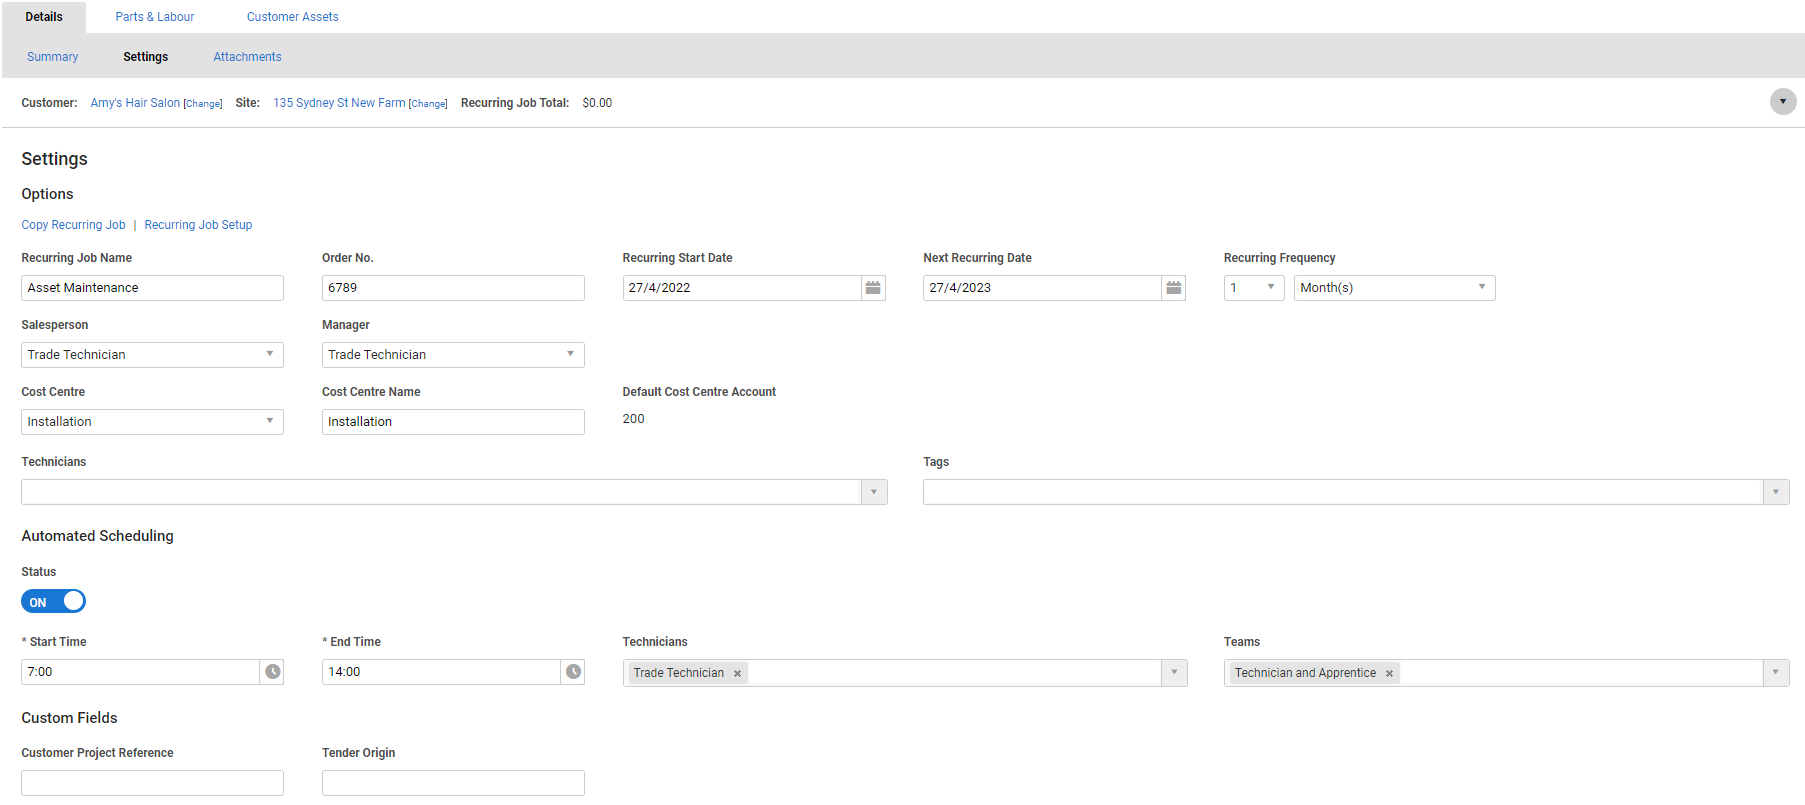
- If you want the next recurring date to be the end of each month, click Next and go to Details > Settings and select Set to EOM.
- Under Recurring End Date, select:
- No End Date to continue the recurring job until you manually archive the recurring template.
- End Date to select a specific final date for the recurring template.
- If required, assign a Technician, Salesperson and / or Project Manager.
- Under Technicians, you can select multiple employees / contractors to assign to this job.
- In the Optional tab, select Service as the Recurring Job Type.
- In the Optional tab, enter a new Cost Centre Name if required to provide more detail on what is involved in the cost centre.
- This name then appears in the job breadcrumbs when you click Next. Learn more about where else this new name appears in Rename a cost centre in a quote, job, recurring job, or recurring invoice.
- Click Next.
- In the Settings tab, set up Automated Scheduling, if required. Learn more in Automated Scheduling.
- Click Parts & Labour to add billable items and labour as you would for a service job. Learn more in Manage parts and labour in a service job.
- Click Details to review your Summary.
- Click Save and Finish.
 Create a recurring project job template
To create a recurring project job template:
- Go to Recurring
 > Create New Recurring Job.
 - Search and select the Customer or customer contract.
- If the customer has an active membership, it appears in the header. Learn more in How to Use Memberships in Workflows.
- Select the Site.
- Select or add contacts as required.
- Enter the Order Number and Recurring Job Name as applicable.
- Select the Recurring Start Date, then set the Recurring Frequency by selecting the number of Week(s), Month(s), or years you wish to have the job recur.
- If you want the next recurring date to be the end of each month, click Next and go to Details > Settings and select Set to EOM.
- Under Recurring End Date, select:
- No End Date to continue the recurring job until you manually archive the recurring template.
- End Date to select a specific final date for the recurring template.
- If required, assign a Technician, Salesperson and / or Project Manager to the invoice.
- Under Technicians, you can select multiple employees / contractors to assign to this job.
- In the Optional tab, select Project as the Recurring Job Type.
- Click Next.
- Add Sections, Cost Centres, and parts and labour as you would for a project job. Learn more in How to Create a New Project Job.
- You can also add the membership cost centre to sell the customer a membership every time a job is created from the template and invoiced to renew it in their card file. Learn more in How to Sell Memberships.
- Click Save and Finish > Save.
- Click the Recurring Invoice # in the breadcrumbs to review your Summary.
- Click Save and Finish.
 Automated Scheduling
Automated Scheduling allows you to set up a start and end schedule time and select technicians and teams on the recurring job template. Whenever a recurring job is generated from the template, the technicians are scheduled automatically.
- Go to the Settings tab and toggle ON Automated Scheduling.
- In the Start Time and End Time fields, use the sliders to Choose Time that the technicians are scheduled for the job and click Done.
- You can click Now to set the slider to the current time.
- To schedule technicians overnight, edit the Start Time and End Time, if a schedule runs overnight a warning text will appear.
- Under Technicians, select multiple employees / contractors to be scheduled to this job.
- Under Teams, select to schedule a group of employees, contractors or plant items to the job.
- Click Save and Finish > Save.
Note that when a recurring job is linked to a customer contract, and the contract expires, it is not possible to generate jobs beyond the expiration date. However, if a contract is modified and jobs have already been created and scheduled from a recurring job template, these jobs and schedule blocks must be modified or removed manually.
Schedules are always created in the first cost centre if the recurring job has more than one cost centre.
Technicians are automatically scheduled regardless of whether they have been scheduled to another project at the same time. Scheduling conflicts must be resolved manually.
The assigned technicians must be assigned the relevant cost centre and zone on their employee or contractor card else they will not be scheduled.
 Add parts and labour to a recurring job template
To add parts and labour:
- In the recurring job template, go to Parts & Labour > Billable.
- If applicable, select a Callout / Service Fee and click Add.
- Select one or more labour rates under Labour and click Add.
- Click through the Parts & Labour sub-tabs to add take-off templates, pre-builds, catalogue items and / or one off items as required.
- If the recurring job involves servicing a customer asset, click the Customer Assets tab:
- Select an asset under Add Asset.
- Select an asset type under Add Entire Customer Asset Type.
- Click Create Customer Asset to create and add a new asset.
- Click Finish > View Recurring Jobs.
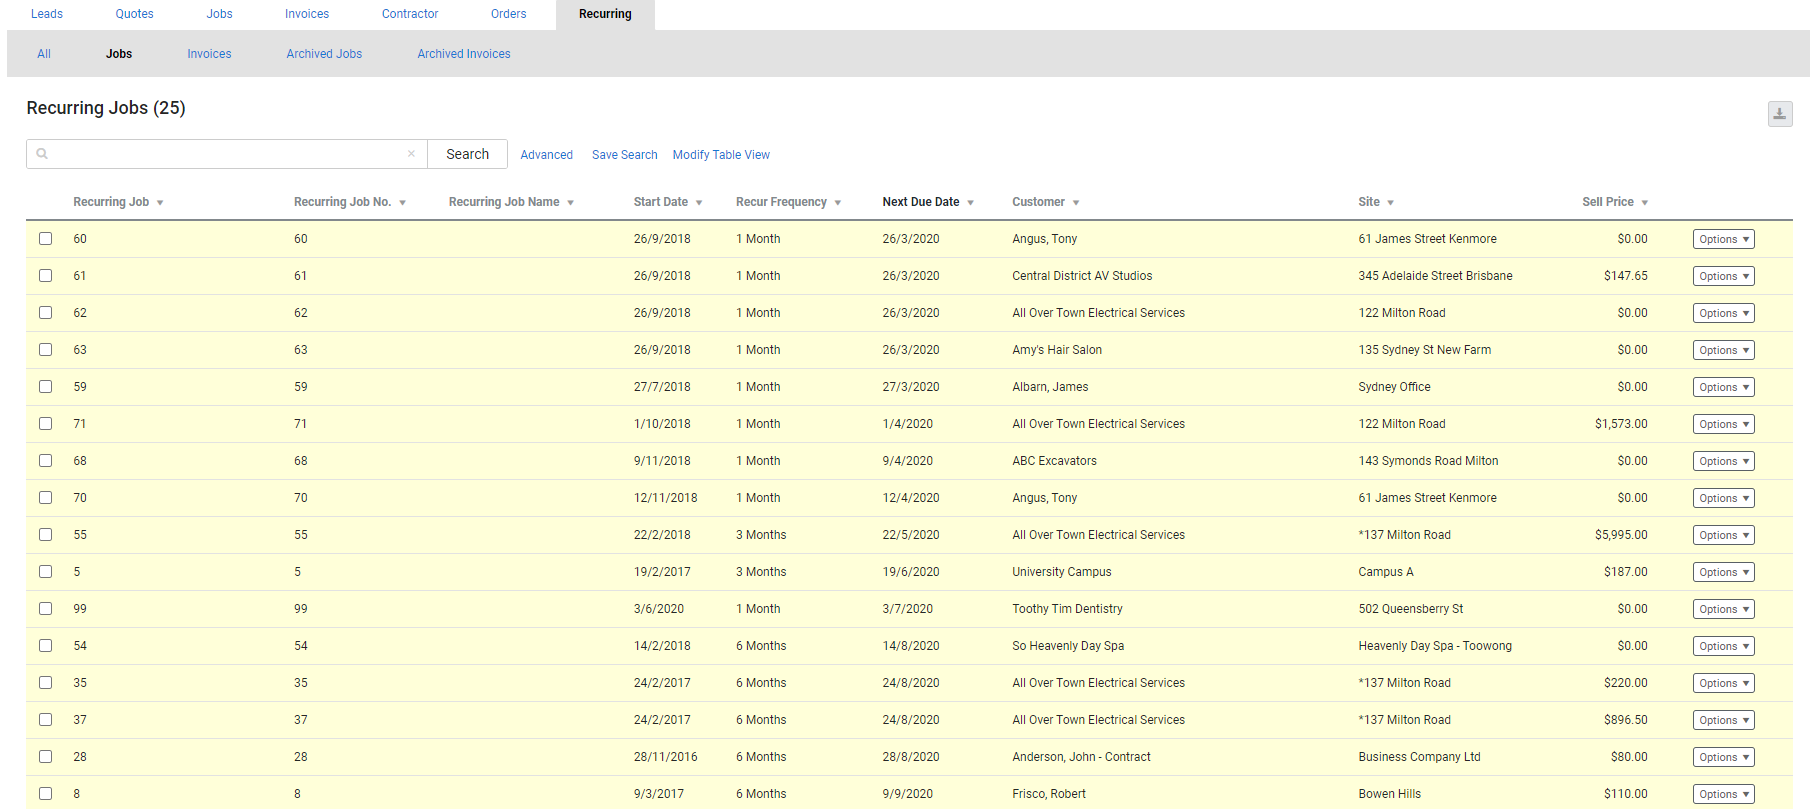
Once you have finished creating the recurring job template, it appears under Jobs ![]() > Recurring Jobs.
> Recurring Jobs.
 Skip a period
You can skip over a period of a recurring job so you do not receive an alert until the next due date.
To skip a period:
- Go to Recurring
 > Recurring Jobs.
 - Click Options or right-click the recurring job template.
- Click Skip Period.
To skip a period on multiple recurring jobs:
- Go to Recurring
 > Recurring Jobs.
 - Select the check boxes for each template you would like to skip.
- Click Skip Period at the bottom of the page.
The Next Due Date column now displays the updated next due date.
 Bulk-update prices
After you have created a recurring job template, the prices of your catalogue items, pre-builds, labour rates or default overhead may change. The template continues to use the old prices unless you update it.
Remember that you cannot update pricing on a job if the cost centre has been locked. If only the estimates and prices are locked, the pricing still updates but the sell price does not.
To update item prices in recurring job templates in bulk:
- Go to Recurring
 > Recurring Jobs.
 - Select the check boxes for the recurring job templates you wish to update.
- Alternatively, select All in the footer options.
- Click Update Pricing.
Jobs with customer-specific pricing from the customer's card file are not affected when you bulk-update pricing.
 Create a job from a template
If you receive an alert that a recurring job is due soon, click the alert to view the list of recurring job templates. Alternatively, go to Recurring![]() > Recurring Jobs.
> Recurring Jobs.
Recurring jobs that are due to be created are highlighted in yellow.
To create a job from a recurring job template, click Options > Create Job on the template. The newly created job appears under Jobs ![]() > Pending. You can make changes to it and schedule employees like you would for a normal job. You can also remove the membership discount applied to it if the customer has an active membership, but the job requires standard pricing. Learn more in How to Use Memberships in Workflows.
> Pending. You can make changes to it and schedule employees like you would for a normal job. You can also remove the membership discount applied to it if the customer has an active membership, but the job requires standard pricing. Learn more in How to Use Memberships in Workflows.
To create jobs from multiple recurring job templates:
- Select the check boxes for each template you would like to create jobs from.
- Alternatively, select the All Due check box to create jobs for all recurring job templates highlighted in yellow. This is the best option for creating invoices, because it ensures you do not create a recurring invoice that is not yet due.
- Click Create Jobs at the bottom of the page.
- If you are creating a single job, click OPEN JOB to open the newly created job.
- Click OK to close the message.
The newly created jobs appear under Jobs ![]() > Pending.
> Pending.
If you want to make a change to the recurring job, you need to edit the template itself and not just one occurrence of the job. Only changes made to the template affect jobs created in the future.
 Complete the job
When you assign or Schedule or assign a service job / How to Schedule a Project Job to a technician, they can complete the job and record the works performed in the field either by using Simpro Mobile, or completing a job card.
US only: If you use Simpro Premium in the United States, the term 'work order' is used instead of 'job card'.
 Invoice a recurring job
Jobs created from recurring job templates are invoiced the same way as other jobs. You cannot apply an invoice to the recurring job template.
If you have a regular invoice that is not related to any jobs, create a recurring invoice. Learn more in How to Create Recurring Invoices.
 Archive a recurring job
To archive a recurring job:
- Go to Recurring
 > Recurring Jobs.
 - Select the check boxes for the recurring job templates to be archived.
- Click Archive in the footer options.
- Alternatively, click Options > Archive Recurring Job.
 Walk Me Through
Need additional help?
Try Walk Me Through, our step-by-step guidance tool, to create a recurring job.
In Simpro Premium, go to Help ![]() > Walk Me Through and search Recurring Job.
> Walk Me Through and search Recurring Job.
Learn more in How to Use Walk Me Through in Simpro Premium.
 Learn more in the Learning Toolbox
For additional training, complete an interactive material in the Simpro's Learning Toolbox. Learn more in About Simpro's Learning Toolbox.


