Last Updated: December 15 2025
Overview
Use pricing tiers to create a set of tiered percentage markup![]() The percentage added to the cost price to achieve the total sell price. levels. These levels can be applied to catalogue items, catalogue groups and subgroups, customers, contracts, and or jobs.
The percentage added to the cost price to achieve the total sell price. levels. These levels can be applied to catalogue items, catalogue groups and subgroups, customers, contracts, and or jobs.
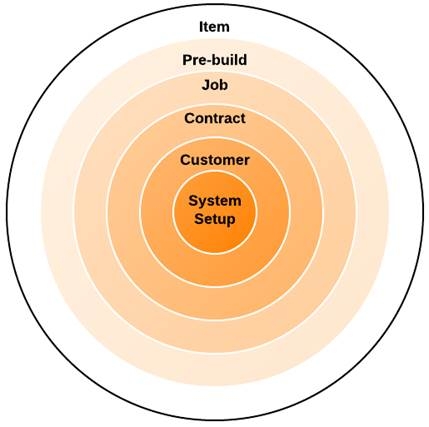
Pricing tiers set at certain levels override pricing tiers set at other levels. For example, the pricing tier set for a job overrides the pricing tier set as a default in System Setup. You can add pricing tier levels to customers, customer contracts, catalogue items, catalogue groups and subgroups, and jobs. See the diagram below to ensure that pricing tiers are set at the correct levels to override other pricing tiers.
 Required setup
In order to view content or perform actions referred to in this article you need to have the appropriate permissions enabled in your security group. Go to System![]() > Setup > Security Groups and access your security group to update your permissions. The relevant security group tab and specific permissions for this article can be found here:
> Setup > Security Groups and access your security group to update your permissions. The relevant security group tab and specific permissions for this article can be found here:
 Create pricing tiers
To create a pricing tier:
- Go to System
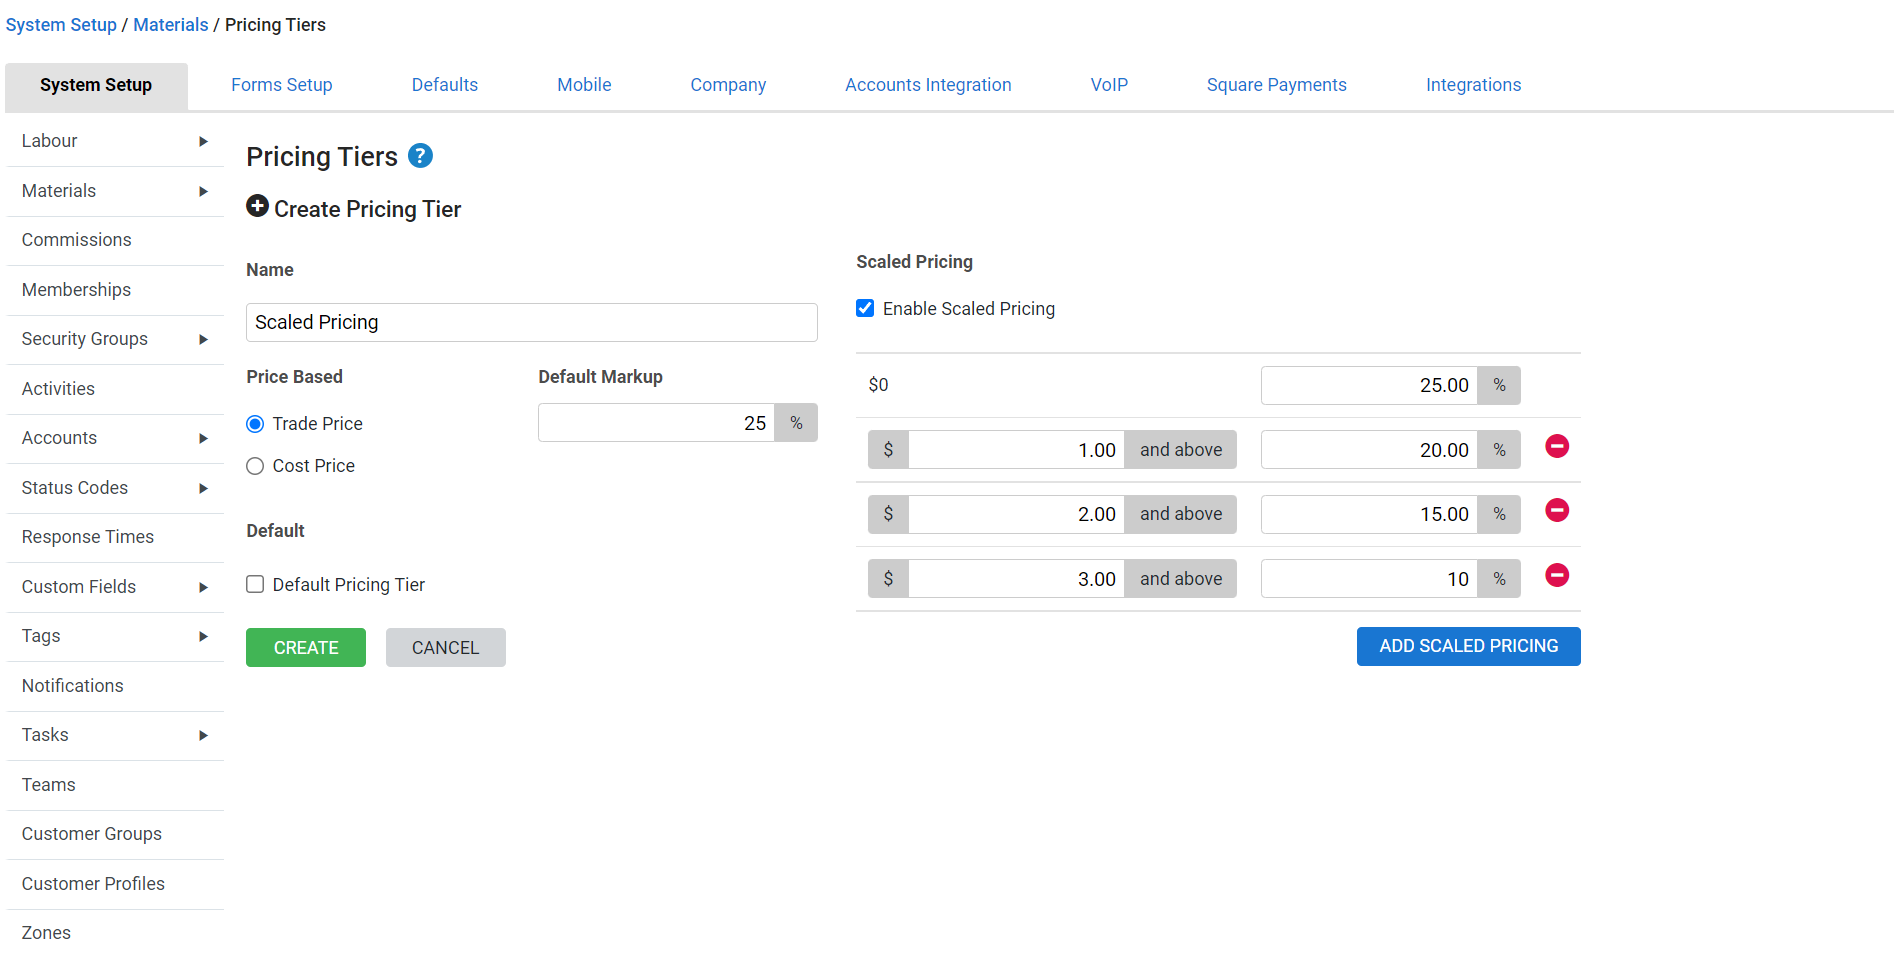
 > Setup > Material > Pricing Tiers.
 - Click Create Pricing Tier.
- Enter a Name for the pricing tier.
- Select Enable Scaled Pricing to enable scaled pricing if required. Learn more in Scaled pricing.
- Select whether the markup is based on the Trade Price or Cost Price.
- Enter the Default Markup.
- Select Default Pricing Tier to make this pricing tier the default for all customers and items created after the pricing tier is saved.
- If this option is selected, you may also select Update Customers Default Pricing Tier.
- Click Create.
 Scaled pricing
When creating a pricing tier, enable scaled pricing to allow the markup to change based on how expensive the item is. This means that items over a certain price have a different markup percentage than less expensive items.
To enable scaled pricing:
- Create a pricing tier as normal.
- Select Enable Scaled Pricing.
- Click Add Scaled Pricing to add fields as required.
- For each level, enter a minimum price and a markup percentage. The markup percentage applies to items from the minimum price and above, up to the next level.
- Click Create.
- In the pricing tiers table, scaled pricing tiers are indicated by a
 under Scaled Pricing.
 Add pricing tiers to a customer
To add pricing tiers to a customer:
- Go to People
 > Customers.
 - Click the customer.
- Click the Rates tab.
- Click the Materials sub-tab.
- Select from the Pricing Tier drop-down list.
- Select Use Pricing Tier Default or enter the markup manually.
- Click Save and Finish.
Learn more in How to Create Customers.
 Add pricing tiers to a customer contract
To add pricing tiers to a customer contract:
- Go to People
 > Customers.
 - Click the customer.
- Click the Rates tab.
- Click the Contracts sub-tab.
- Click Create Contract or click an existing contract.
- Click the Materials tab.
- Select from the Pricing Tier drop-down list.
- Select Use Default or manually enter the markup.
- Click Save Contract.
- Click Save and Finish.
Learn more in Create customer contracts.
 Apply pricing tiers to jobs
When you create a new job, the pricing tier in the customer's card file is automatically applied to the job. You can override this by selecting a different pricing tier on the job.
To adjust the pricing tier on a job:
- Create a new job.
- Click the Optional tab.
- Under Pricing Tier, select the pricing tier. This clears the Leave as default rate check box.
- If you want to apply a markup that is different to the pricing tier, clear the Use Default check box and manually enter the markup.
- Continue creating the job as normal.
Learn more in How to Create a Service Job.
 Apply pricing tiers to a catalogue group or subgroup
When you apply a pricing tier to a group or subgroup, it applies as the zero sell quantity level for all items within the group or subgroup.
- Go to Materials
 > Catalogue.
 - Locate the group / subgroup manually or using the Advanced search options.
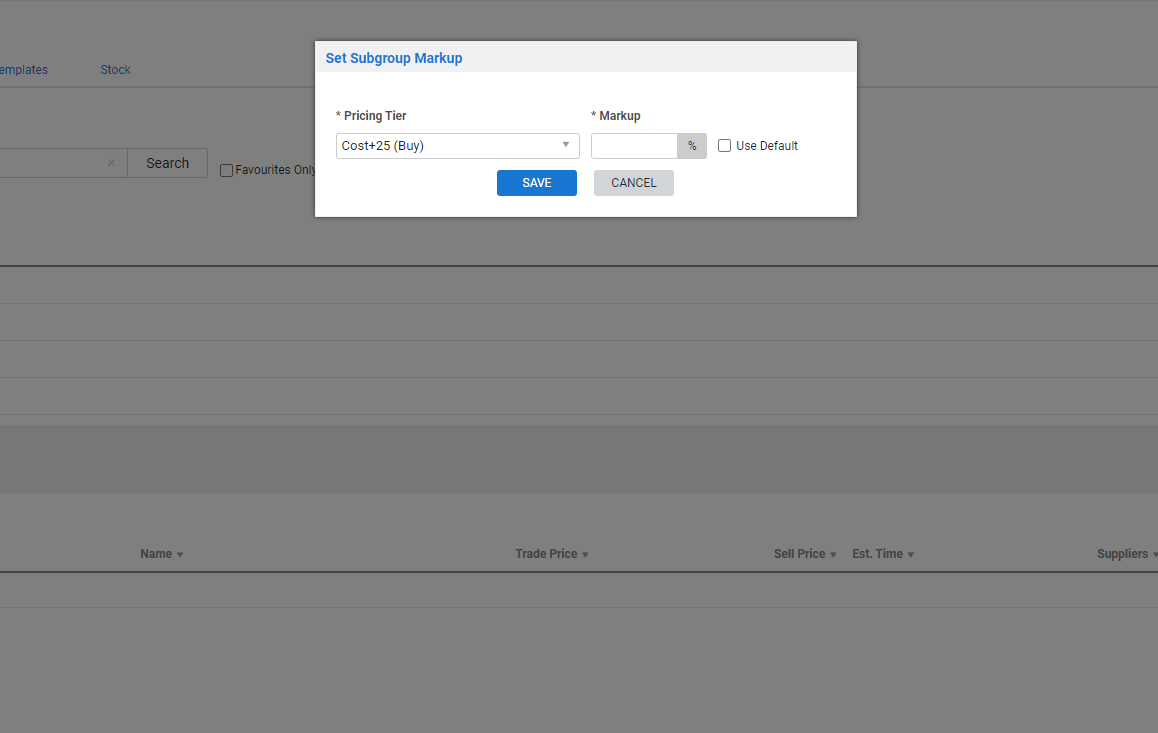
- Click Options > Set Group Markup / Set Subgroup Markup on the group / subgroup.
- Select the Pricing Tier you wish to apply.
- Enter the Markup.
- Alternatively, select Use Default to apply the default markup as set at the group, pre-build, job / quote, customer contract, customer or system level.
- Click Save.
Learn more in How to Use the Catalogue .
 Adjust pricing tiers for catalogue items
To adjust pricing tiers at the individual catalogue item level, go to Materials ![]() > Catalogue, click the applicable group / subgroup, then click the item and click the Pricing tab.
> Catalogue, click the applicable group / subgroup, then click the item and click the Pricing tab.
Pricing tiers set at the item level override pricing tiers set at any other level, including in System ![]() > Setup > Materials > Pricing Tiers, customer card files, customer contracts, jobs, quotes, pre-builds and catalogue groups, and catalogue subgroups.
> Setup > Materials > Pricing Tiers, customer card files, customer contracts, jobs, quotes, pre-builds and catalogue groups, and catalogue subgroups.
You can also add pricing tier levels based on the sell Quantity of an item. For example, an item can have a markup of 25 percent for a sell quantity of zero and above, a markup of 22.5 percent for a sell quantity of five and above, and a markup of 20 percent for a sell quantity of ten and above. Pricing tiers as created in System Setup are restricted by default to a quantity of 0 and above.
You can then select the applicable Setting for adjusting the pricing tier / pricing tier level:
| Use Default Markup |
Select to apply the default markup as set at the subgroup, group, pre-build, job / quote, customer contract, customer or system level. The Markup and Sell Price is then greyed out and restricted. This option is not available for pricing tier levels based on sell Quantity. |
| Fixed Markup | Select to adjust the Markup percentage. The Sell Price then automatically reflects your changes. |
| Fixed Sell Price | Select to adjust the Sell Price. The Markup then automatically reflects your changes. |
To remove a pricing tier level, click the ![]() icon.
icon.
Learn more in How to Create a Catalogue Item.
Pricing tiers on items affect pricing of any standard price pre-builds those items are a part of.


