Last Updated: January 07 2026
Overview
In Simpro Premium, you can use tasks to keep an interactive to-do list for quotes, jobs, customers, and internal needs.
A customer can be associated with any task. They do not receive any emails or alerts about the task unless they are also assigned as a stakeholder, but are able to view task details if they are using the customer portal with the Tasks menu enabled. If you wish to create an internal-only task, such as 'Update emergency contacts', create a customer card file for this purpose, such as 'Internal tasks' or your own company name.
To view only tasks assigned to you, go to Tasks ![]() > View. To view all tasks in the system, click the
> View. To view all tasks in the system, click the ![]() icon next to Search. Alternatively, view tasks in the card file of the customer they are associated with by going to History > Tasks, or in the job or quote they were created in by going to Details > Tasks.
icon next to Search. Alternatively, view tasks in the card file of the customer they are associated with by going to History > Tasks, or in the job or quote they were created in by going to Details > Tasks.
If you frequently carry out the same set of tasks for certain types of quotes or jobs, you may wish to use task templates to save time.
Learn more in How to Use Task Categories.
 Required setup
In order to view content or perform actions referred to in this article you need to have the appropriate permissions enabled in your security group. Go to System![]() > Setup > Security Groups and access your security group to update your permissions. The relevant security group tab and specific permissions for this article can be found here:
> Setup > Security Groups and access your security group to update your permissions. The relevant security group tab and specific permissions for this article can be found here:
Before performing the steps detailed below, ensure that this part of your build is set up correctly. The relevant steps to set up the features and workflows detailed in this article can be found here:
 Create a task
 Create a task from the main menu
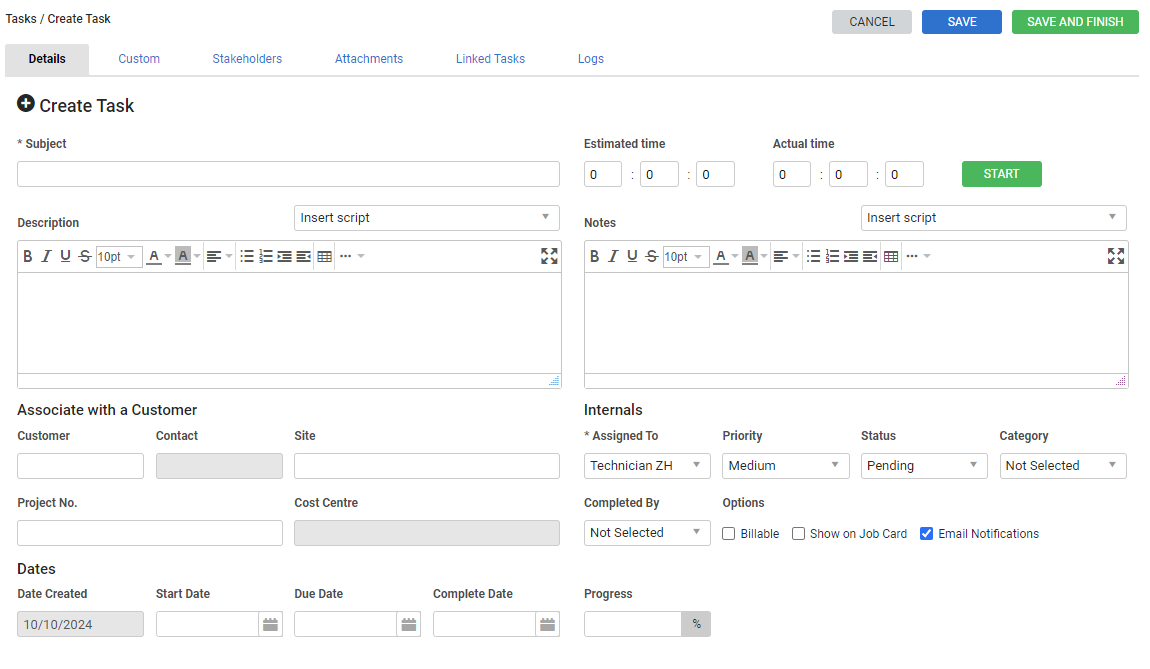
To create a task from the main menu:
- Go to Tasks
 , and click New. A new window opens.
 - Enter a Subject.
- Enter a Description and Notes as required. Notes are for internal use only.
- Under Associate with a Customer, search and select a Customer (see note below) and enter other relevant details, such as Contact and Site.
- Search and select the associated Project No. This makes the task visible within the selected project, and on the project's job card (if Show on Job Card is selected above). Based on the Project No., select the associated Cost Centre.
If a task is associated with a customer, the associated quote / job and cost centre must be for the relevant customer.
- Enter a Start Date, a Due Date, or both. The Start Date is when the people assigned first receive an alert. If no date is selected, no alerts are sent.
- If the task has a Prerequisite Task, you can not set the Start Date before the End Date on the Prerequisite Task.
- If required, enter the Estimated time.
- Under Assigned To, search and select multiple employees / contractors.
- All of the assigned employees / contractors receive an email notification when the task is created, specific updates are made, and closed. Note that email notifications must be set up and enabled prior to sending task emails. Learn more in Task email notifications triggers and How to Set Up Notifications.
- All of the assigned employees / contractors who are assigned a mobility licence can view and complete the task in Simpro Mobile.
- All of the assigned employees / contractors can view the task from the Project Dashboard.
- All of the assigned employees / contractors receive an alert when the task reaches its due date.
- If the assigned employee or contractor is logged in to Simpro Premium, a notification pops up at the bottom right on the user's screen. This notification displays for five seconds by default, or you can dismiss it to view it later using the
 icon in the System menu.
- Select a Priority, Status, and Category, as required. The default priority is Medium and the default status is Pending. Learn more in How to Use Task Categories.
- Select the Billable and Show on Job Card check boxes, as required.
- Marking a task as Billable and recording time against a task allows you to convert a task into a job and apply recorded time as a resource adjustment and labour rate on the job.
- Note that making a task Billable and recording time against the task does not update the cost of an existing job that a task could be associated with.
- To disable email notifications, clear the Email Notifications check box.
- Click the Stakeholders tab.
- Find the people you wish to add as stakeholders, and click their names to assign them to the task. Repeat as necessary. When you assign a task to another person, you are automatically added as a stakeholder.
- If required, add attachments through the Attachments tab.
- Click Save and Finish.
If a task is associated with a customer, the associated quote / job and cost centre must be for the relevant customer.
US only: If you use Simpro Premium in the United States, the term 'work order' is used instead of 'job card'.
 Assign multiple tasks to multiple employees
- Go to Tasks
 > View.
 - Select multiple tasks.
- From the Assign To drop-down, select multiple employees or contractors.
- Click Update.
 Create a task from within a quote, job, or customer card file
To create a task from within a quote, job, or customer card file:
- Open the quote, job or customer card file, or create a new one.
- For a quote or job, go to Details > Tasks. Tor a customer card file, go to History > Tasks.
- Click Create Task.
- Alternatively, Use a task template in a quote or job to quickly create multiple tasks that you frequently carry out for certain types of jobs. To learn how to set up task templates, see How to Use Task Templates.
- Follow the rest of the creation process above from step 2.
Creating a task from within a quote or job automatically populates the task's Associate with a Customer fields with the relevant customer information. You can manually edit the customer details if required.
The number of open tasks also appears in brackets in the Details > Tasks sub-tab. Learn more in View an open task count in a quote or job.
 Task email notifications triggers
An Email Notification will be triggered when a certain update is applied to a task. A notification will trigger if the following sections are updated:
- Subject
- Description
- Assigned to. Only adding new users sends an email, not removing users.
- Status
- Start Date
- Complete Date
If the Due Date is updated this will not send an email notification but instead create an Alert, with the bell icon above.
 Add notes or linked tasks
After clicking Save in a new task, or opening an existing task, the Notes and Linked Tasks tabs are visible.
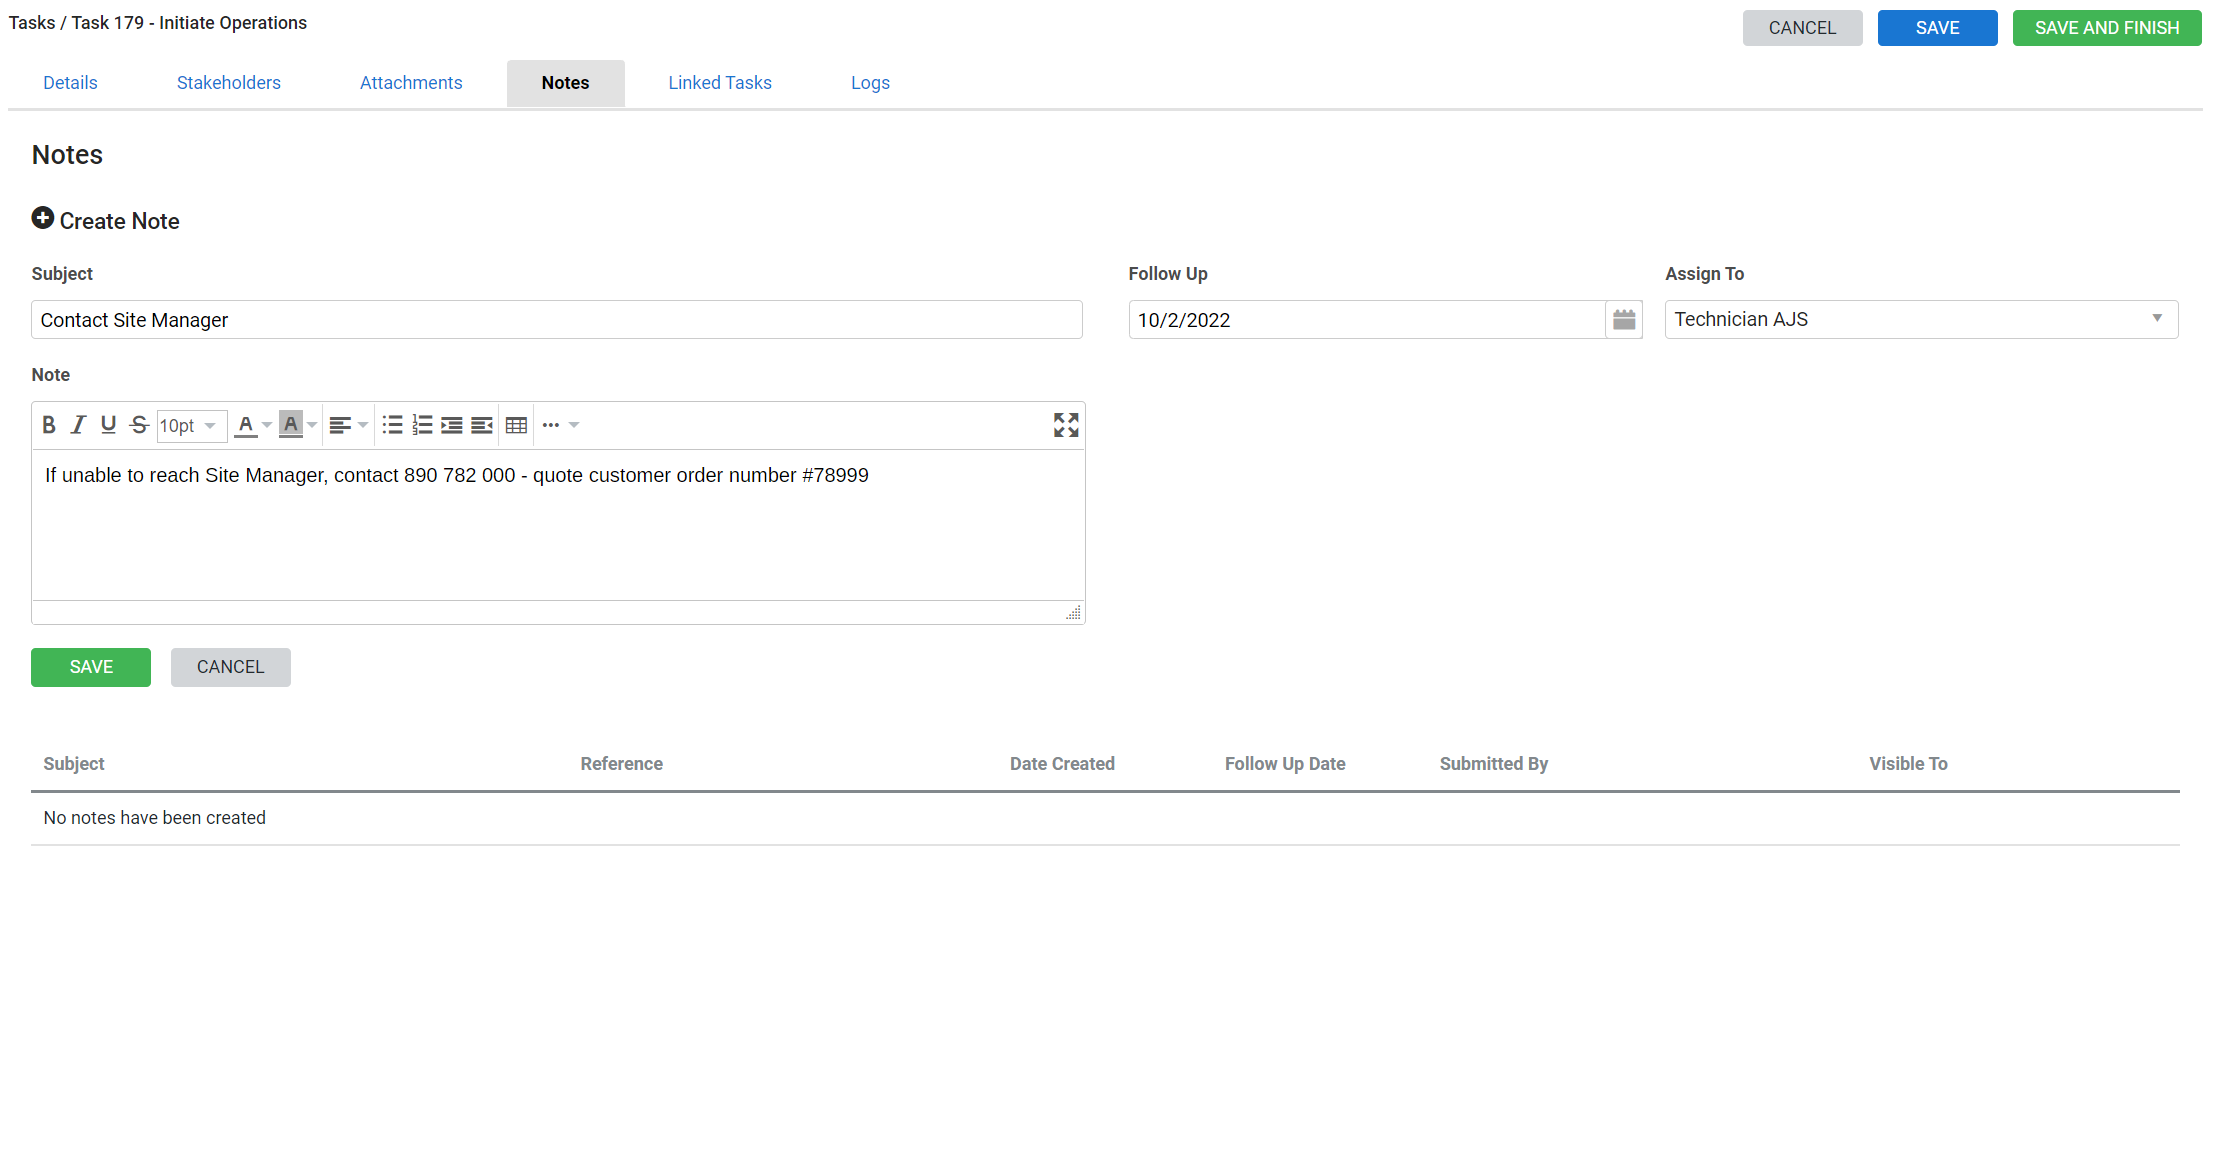
 Add a note to a task
If a task is particularly complex, you may wish to create a follow-up note as a reminder for activities or actions that still need to be finalised.
To add a note to a task:
- Open a task, or create a new one and click Save.
- Click the Notes tab.
- Click Create Note.
- Enter a Subject and Note as required.
- Select a Follow Up date if required.
- Select a person from the Assign To drop-down list if required.
- The assigned employee will receive an Alert on the Follow Up date.
- Click Save.
Click a note to edit it, or click the ![]() icon then click OK to delete notes as required.
icon then click OK to delete notes as required.
 Add a linked task
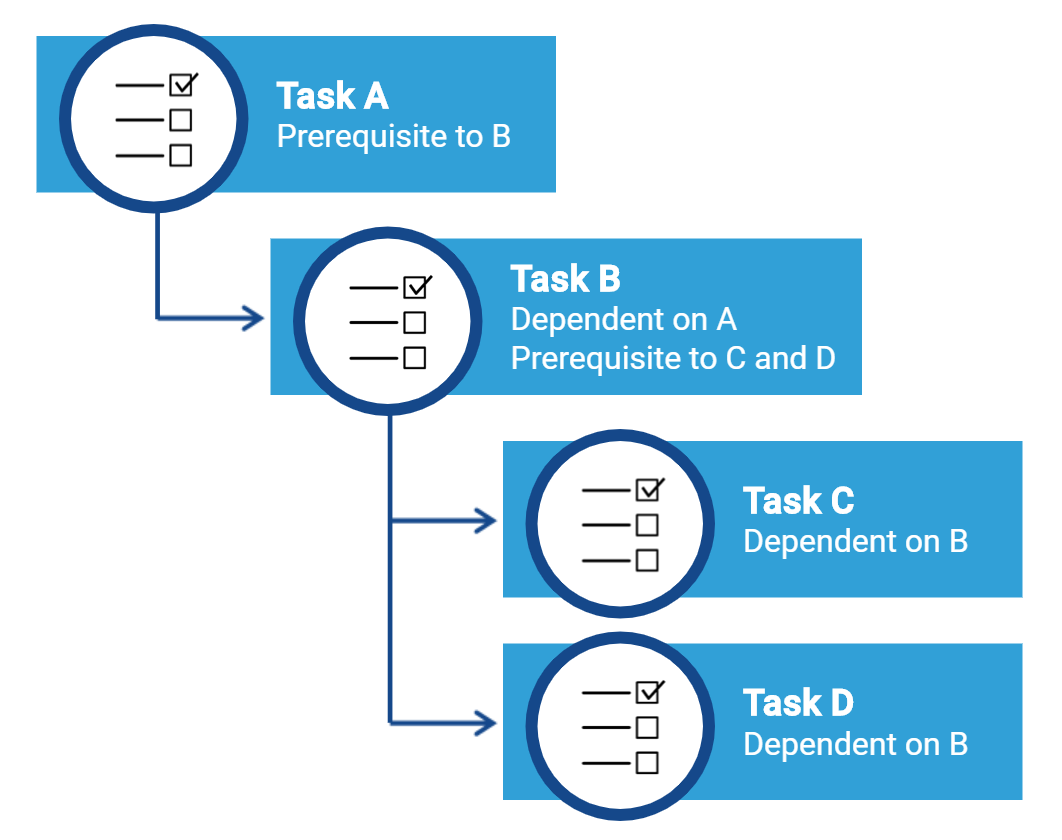
Dependencies are sub-tasks, which should be completed once the original task is completed. For example, if a task is called 'Call council', the sub-tasks may be 'Arrange council visit', 'Submit council form', 'Get Council approval' and so on.
Dependencies may be useful when teaching someone a standard process. If you just want to explain the process of a task without creating separate dependencies, simply list the details under Details > Description.
You can choose to prevent dependent tasks from being closed until the prerequisite task is closed.
It is best practice to keep your processes streamlined. Dependencies can be useful, but you may wish to be cautious of over-administration.
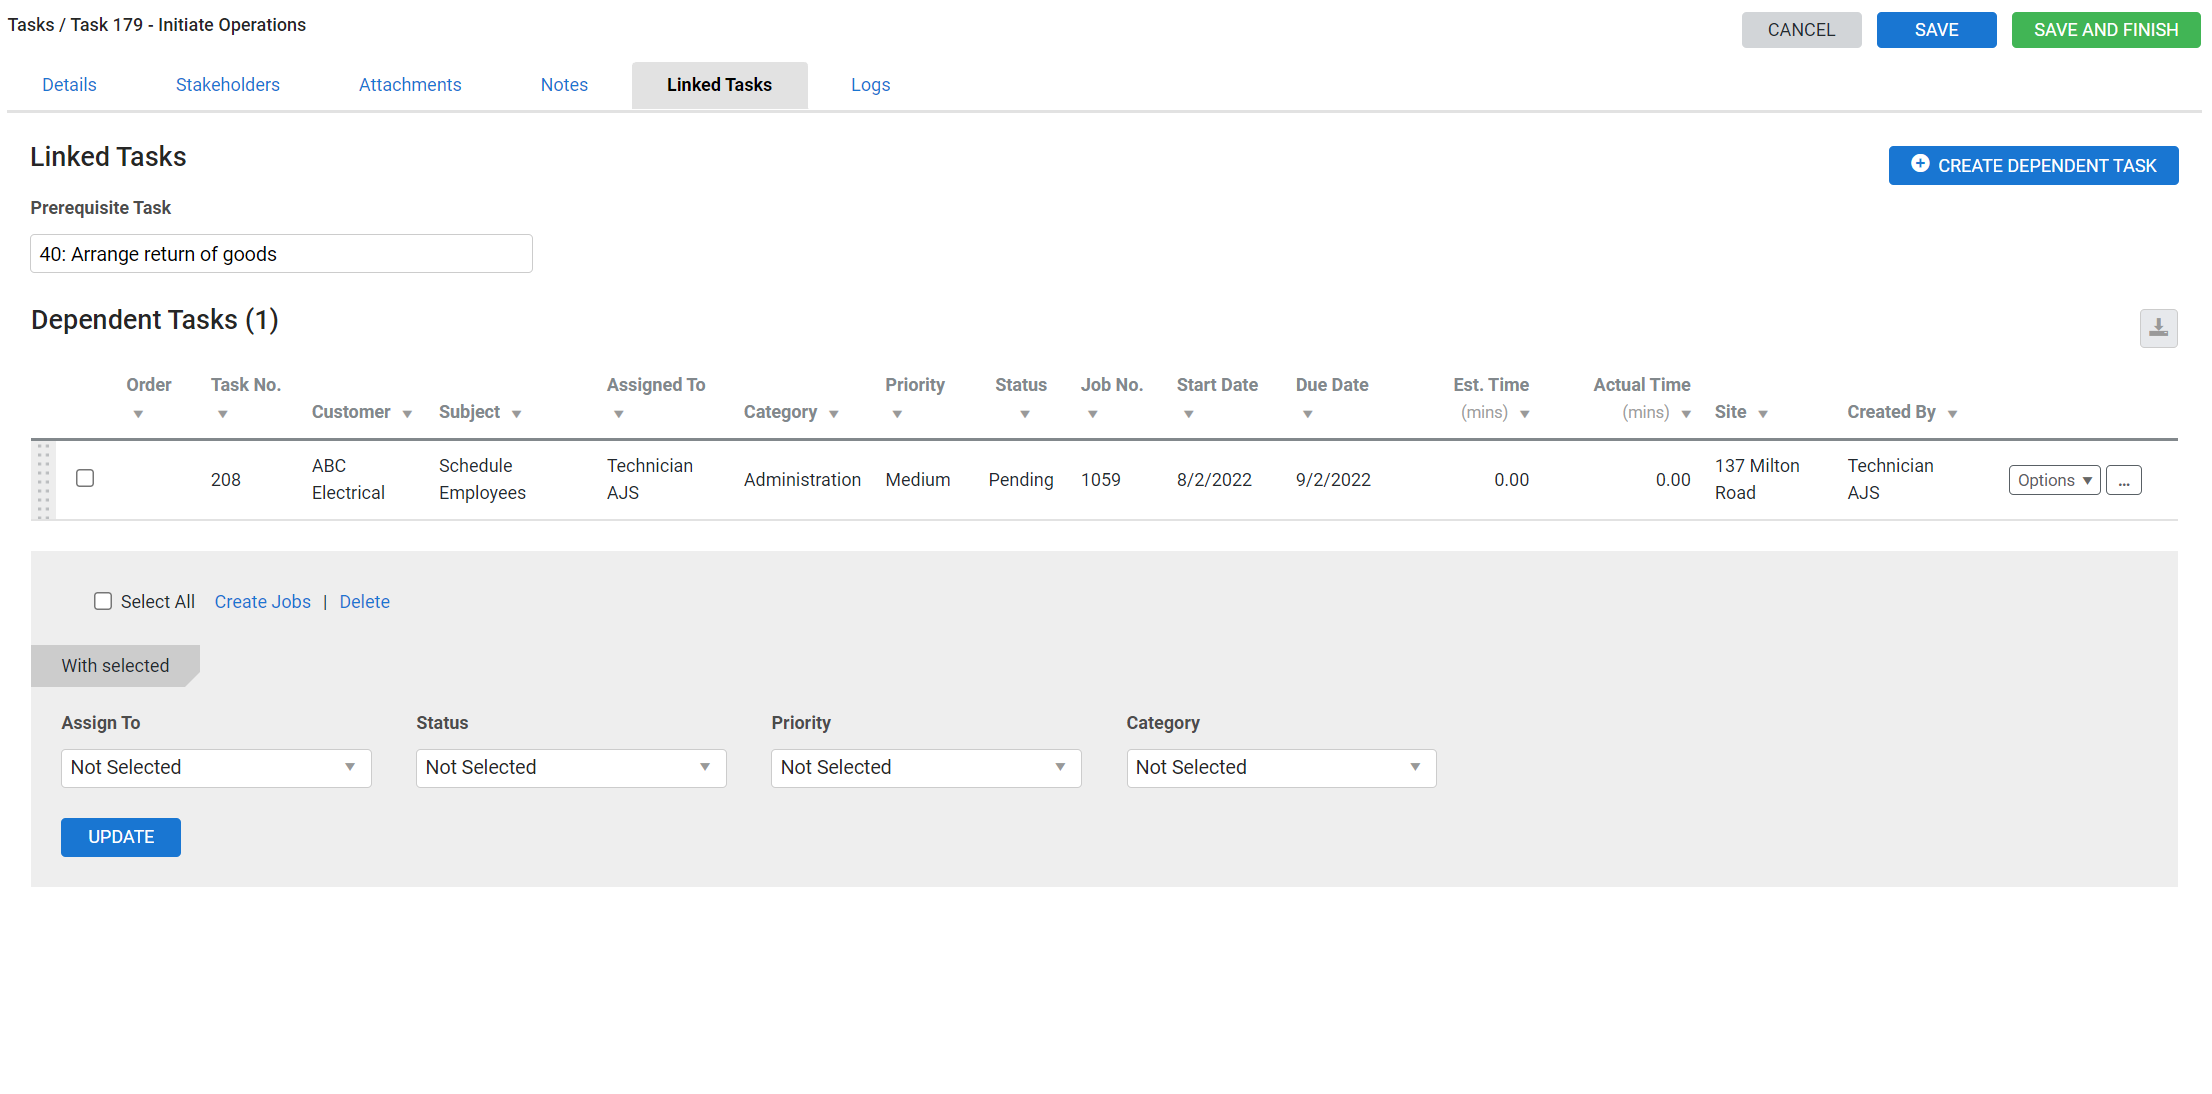
To create a linked task:
- Open a task, or create a new one and click Save.
- Click the Linked Tasks tab.
- If required, click to select a Prerequisite Task. The new dependency is listed under this task's Linked Tasks tab.
- The Complete Date on the Prerequisite Task must be set before the Start Date of the dependent task.
- If the Completed Date on the Prerequisite Task is moved forward or backward, the dependent task's start date also gets adjusted by the same number of days, retaining the gap between the two tasks.
- Any task can only have one Prerequisite Task.
- Click Create Dependent Task and enter the task details. Similarly, create and add more tasks to the workflow.
- A task can have any number of dependent tasks. Dependent tasks can further have their own dependent tasks.
- Click Save and Finish.
 Audit logs
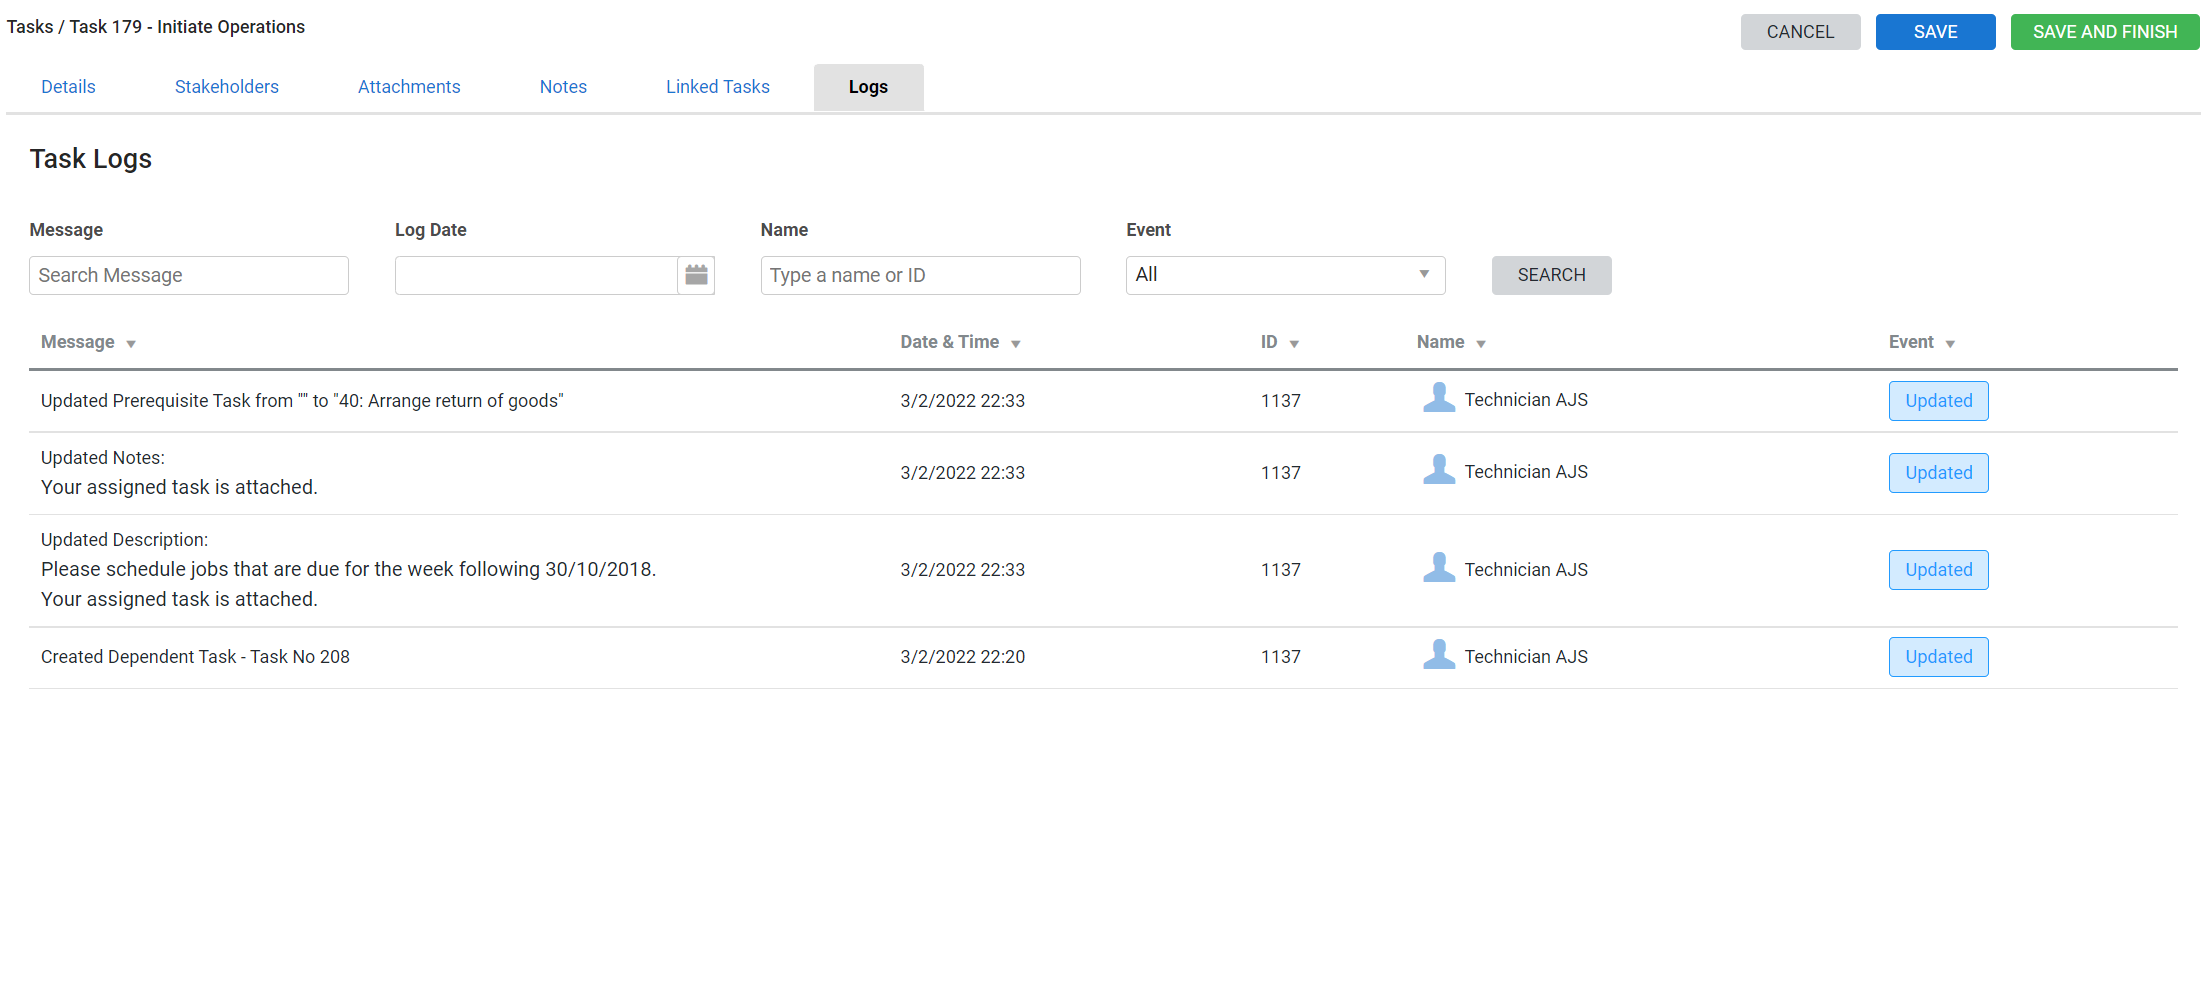
In the Logs you can view extensive audit logs that help ensure your project workflows are carried out effectively. The data listed details information about who has viewed, updated, created or deleted a task, who has downloaded task attachments and when any task-related notifications are sent.
- Open the required task and click the Logs tab.
- Use the Message filter to search for specific logs, for example, enter description to view details about who updated the description along with the corresponding time stamp.
- Apply other filters, such as Log Date, Name of a relevant employee and the type of Event, as required.
- Click Search.
All the events for the corresponding task are displayed in the log table.
 Edit a task
Edit a task to change any of its key details, including its Priority, Status or Category. This can also be done using the bulk-manage options.
To edit a task:
- Go to Tasks
 > View, or another task list as required.
 - Click the task you need to edit.
- Make changes as required.
- Enter the percentage of the task completed as Progress, if required.
- Click Save and Finish.
Learn more in How to Use Task Categories.
 Delete a task
To delete a single task:
- Go to Tasks
 > View, or another task list as required.
 - On the task you wish to delete, click Options > Delete Task.
- Click OK.
To delete multiple tasks at once:
- Go to Tasks
 > View, or another task list as required.
 - Select the check boxes of the tasks you wish to delete, or select Select All below the tasks list.
- Click Delete below the tasks list.
- Click OK.
 Complete a task assigned to you
 View alerts for tasks assigned to you
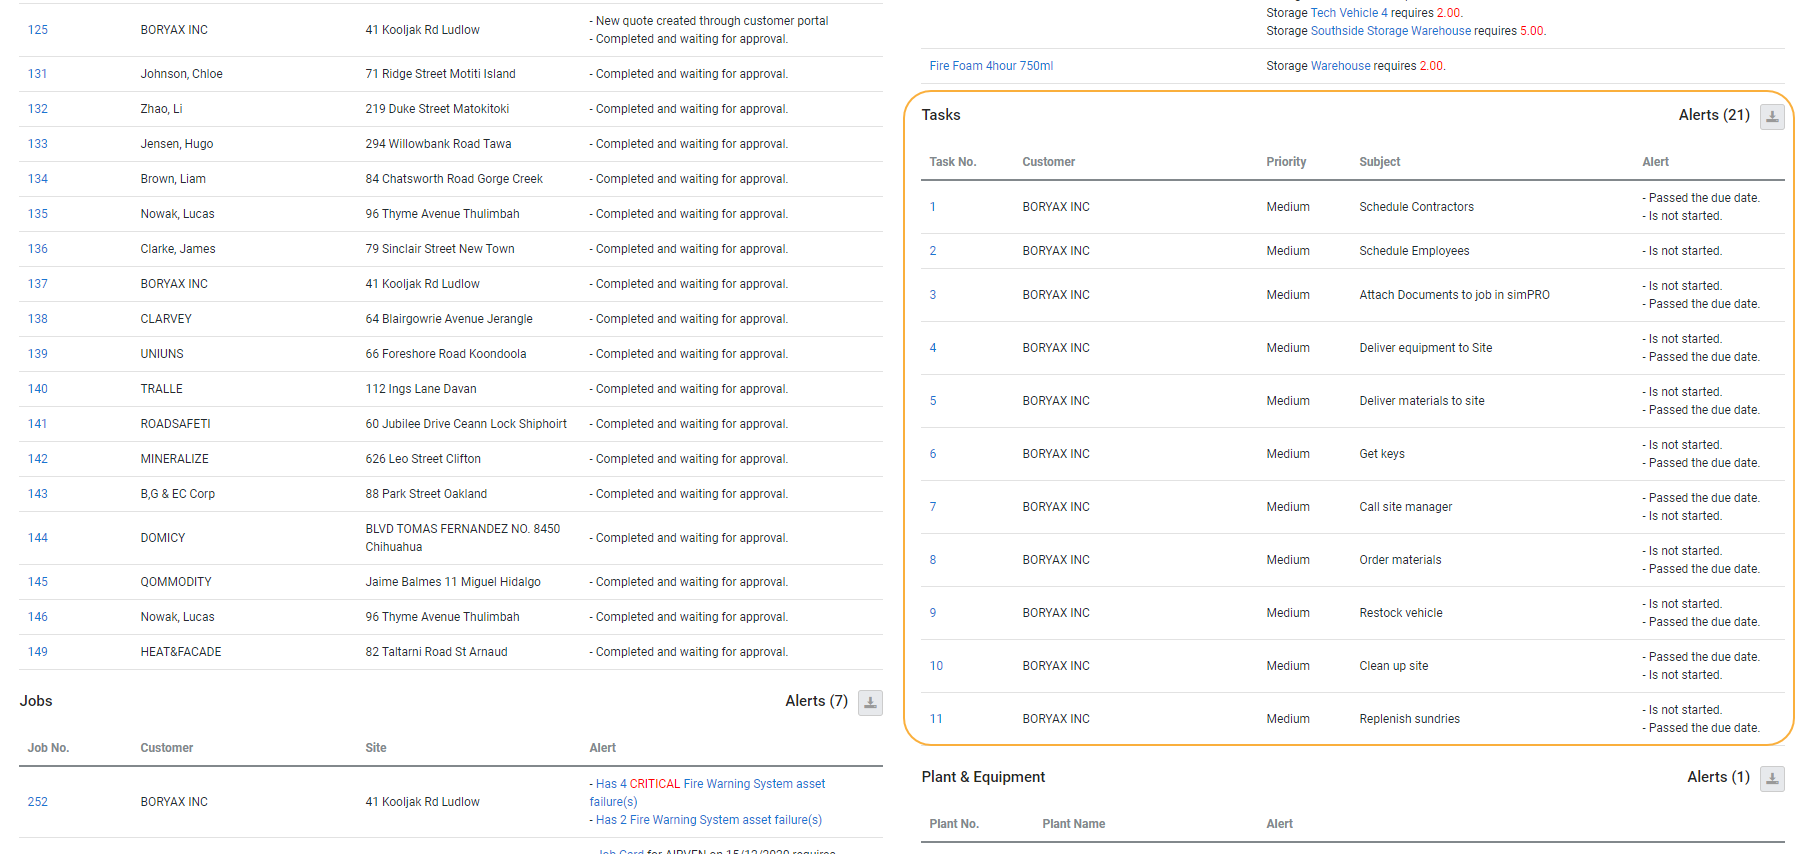
When a task is assigned to you, you receive an email summarising the new task. When the task reaches its start date or becomes overdue, you receive an alert in Simpro Premium. Alerts only appear to the person the task is assigned to, and do not appear for stakeholders.
To view Simpro Premium task alerts for tasks assigned to you:
- Click the red Alerts icon at the top of the screen.
- If a task alert is visible under the Tasks section, click its task number to open and view it.
Read the task Subject, Description and Notes for the details you need to complete the task, and view any relevant Attachments and Dependencies. Save additional Notes if required.
You can also view open tasks in a quote or job using the notification number in the Details > Tasks sub-tab. Learn more in View an open task count in a quote or job.
 Record the actual time a task took to complete
Recording the actual time taken to complete tasks is most useful for billable tasks, where it carries over if the task is used to create a job. Recording time is also helpful for monitoring productivity and planning future work.
Note that making a task billable and recording time against the task does not update the cost of an existing job that a task could be associated with.
You can use the built-in timer to record time as you complete a task, or manually enter the actual time afterwards.
To use the built-in timer in a task:
- Open the task or create a new one.
- Click the Details tab.
- Next to Actual Time, click Start to start the timer.
- When the task is complete, click Stop.
- Click Save or Finish.
The time recorded by the timer is cumulative, so if you leave the task and come back and use the timer again, it adds to the time already recorded.
To manually record the actual time a task took to complete:
- Open the task or create a new one.
- Click the Details tab.
- Under Actual Time, enter the hours, minutes and seconds, as required, the job took to complete.
- Click Save and Finish.
 Mark a task as closed
Once you have completed a task, you need to mark its status as 'Closed'.
To mark a task as closed:
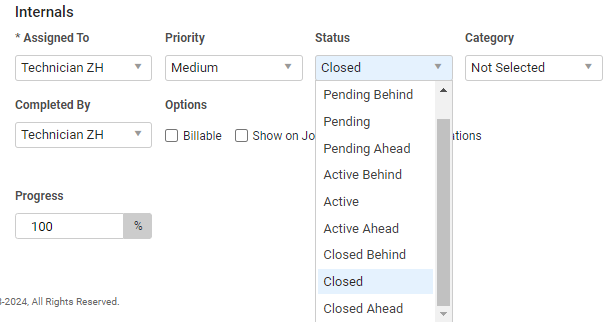
- Open the task and go to the Details tab.
- Under Internals, select Closed / Closed Ahead / Closed Behind from the Status drop-down list, as applicable:
- If blank, the Completed By field updates to the logged in employee.
- If blank, the Complete Date updates to the current date. Note that the Completed Date cannot be before the Start Date.
- The Progress updates to 100%.
- Click Save and Finish.
You and any assigned stakeholders receive an email notifying you that the task has been closed. The task is no longer be listed under Open tasks in Tasks ![]() > View.
> View.
If you have a number of tasks to mark as complete, you may wish to use the bulk-manage options.
 Advanced
 Filter tasks
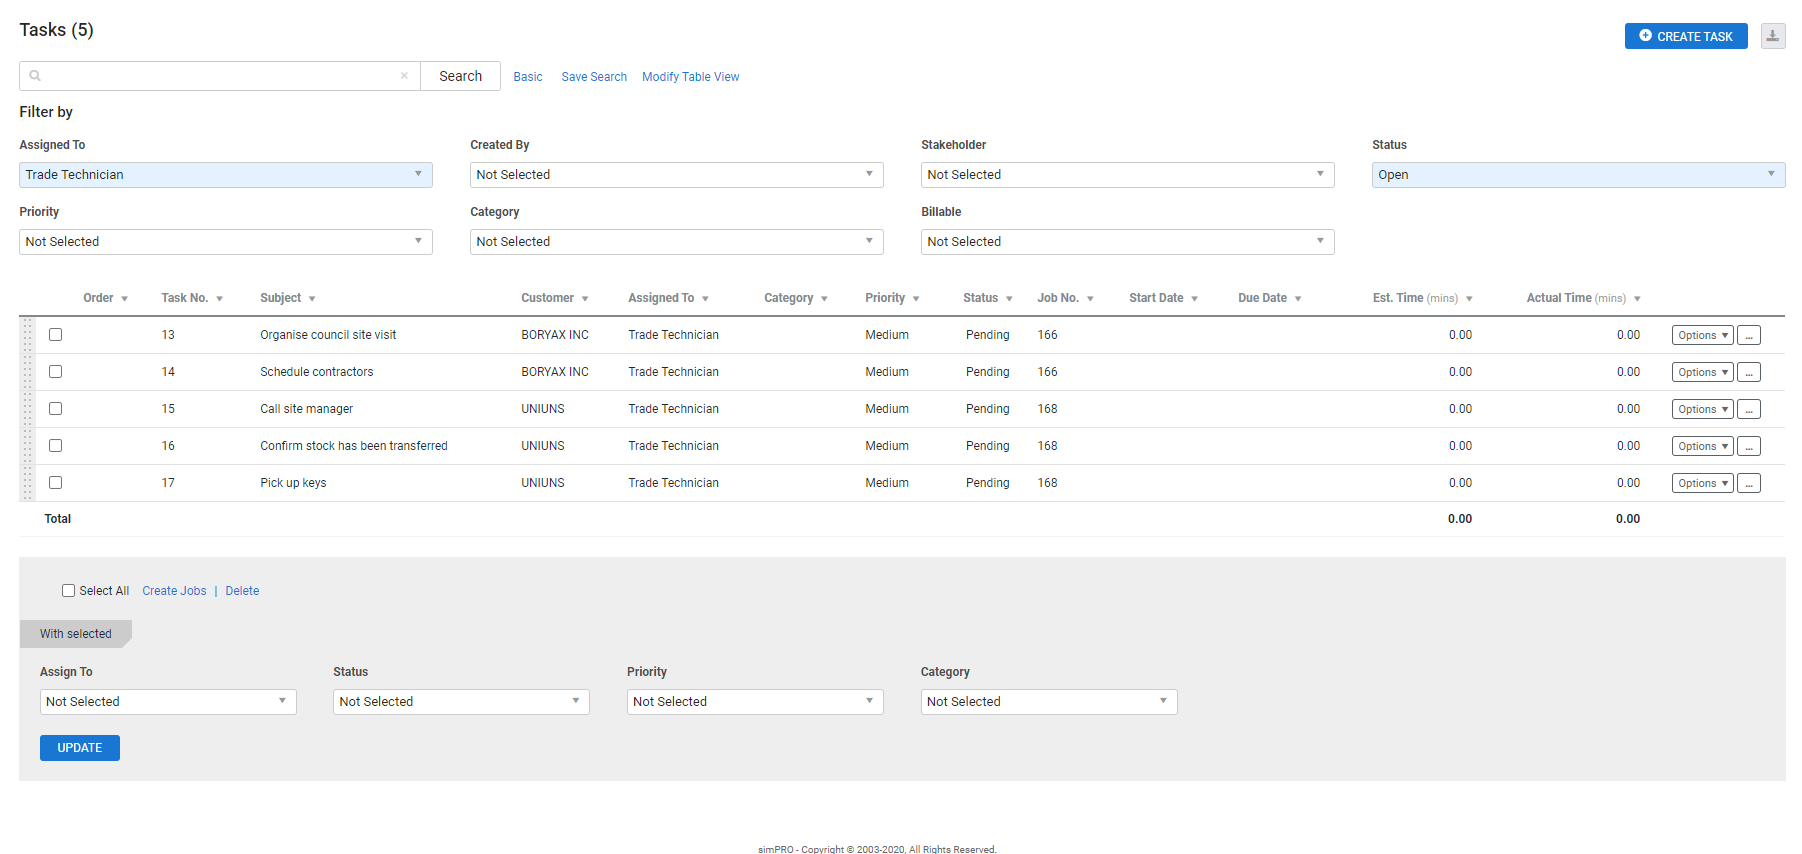
Use a range of filters to narrow down the tasks displayed. For example, you may wish to view only tasks assigned to or created by a certain person.
To filter tasks:
- Go to Tasks
 > View.
 - Next to the search bar, click Advanced.
- Select an option from the drop-down lists under Filter by, such as Status.
The task list update accordingly. You can then click the ![]() icon in the top right of the table to export the filtered results, or save the filter options as a saved search to access a particular task list more quickly.
icon in the top right of the table to export the filtered results, or save the filter options as a saved search to access a particular task list more quickly.
When you filter tasks by Stakeholder, you can only view stakeholders who are employees or contractors.
 Modify the task table view
You can modify the Tasks table view to include or exclude information about a task, as well as change the order of the columns the information is presented in. You can then view the fields of information you include when you click the ![]() icon in the top right to export the Tasks table, as well as when you access tasks in jobs and quotes.
icon in the top right to export the Tasks table, as well as when you access tasks in jobs and quotes.
To add, remove, or reorder fields in the Tasks table:
- Go to Tasks
 , then click View Tasks.
 - Click Modify Table View.
- Select the fields you wish to include in the Tasks table.
- Clear check boxes for fields you wish to exclude. You cannot exclude the Order and Task No. fields.
- Click and drag the
 icon on fields to reorder of their columns in the Tasks table.
 - You cannot reorder the Show Descriptions or Show Notes fields.
- Click Save and Finish.
Modifying the table view changes the settings for all users. It is recommended that you use security groups to restrict modifying table view permissions to specific employees.
 Bulk-manage tasks
Use bulk-manage options to change multiple tasks' status, priority, and category, or to change the person they are assigned to.
To bulk-manage tasks:
- Go to Tasks
 > View, or another task list as required.
 - Select the check boxes for the tasks, or click Select All below the task list.
- Under With selected, select an option from each of the drop-down lists as required.
- Click Update.
Learn more in How to Use Task Categories.
 Create a job from a task
To create a job from a billable task:
- Go to Tasks
 > View, or another task list as required.
 - Select the check box for the task you wish to convert to a job. You can select multiple tasks to create multiple jobs.
- Click Create Jobs.
The task is deleted, and a new job created using the task's details.
 View an open task count in a quote or job
When working in a quote or job, you can view the number of open tasks in a quote or job in brackets in the Details > Tasks sub-tab. Open tasks include those with the following statuses:
- Pending behind
- Pending
- Pending ahead
- Active
- Active ahead.
When working in an individual cost centre in a quote or job, the sub-tab only displays the number of tasks open within that cost centre. When working in the quote / job overview, the sub-tab displays the number of tasks open for all cost centres in the quote / job.
 Walk Me Through
Need additional help?
Try Walk Me Through, our step-by-step guidance tool, to create a task.
In Simpro Premium, go to Help ![]() > Walk Me Through and search Create a Task.
> Walk Me Through and search Create a Task.
Learn more in How to Use Walk Me Through in Simpro Premium.
