Last Updated: January 08 2026
How to Create an Asset Plan
Overview
Create Asset Plans directly from your As Built plans to quickly and easily assign assets in your takeoffs.
You can create As Built drawings to take into account the differences between the final drawing and initially planned takeoff versions. Then create Asset Plans from the As Built drawings, where materials and items placed in the As Built drawing could be used to assign assets. Asset Plans can be made from As Built drawings as they capture the actual representation of the work completed and the items installed.
You can attach Asset Plans to jobs to help provide an accurate record of a project and the assets on the site. Unlike Takeoffs, you cannot update a job with materials added to an Asset Plan.
 Create an Asset Plan from an As Built
You can create an Asset Plan from an existing As Built in takeoffs.
- Go to Utilities
 > Takeoffs.
 - Search for the required job using details such as a customer, site and name.
- Click Search and open an existing job from the results.
- Expand the required section, cost centre and open the As Built drawing.
- Add items, draw and update the As Built drawing, as required.
- Note that only catalogue items with the Assets field enabled in Details > Attributes can be assigned an asset in the Asset Plan. Learn more in How to Create a Catalogue Item.
- Click Save after you finish the updates.
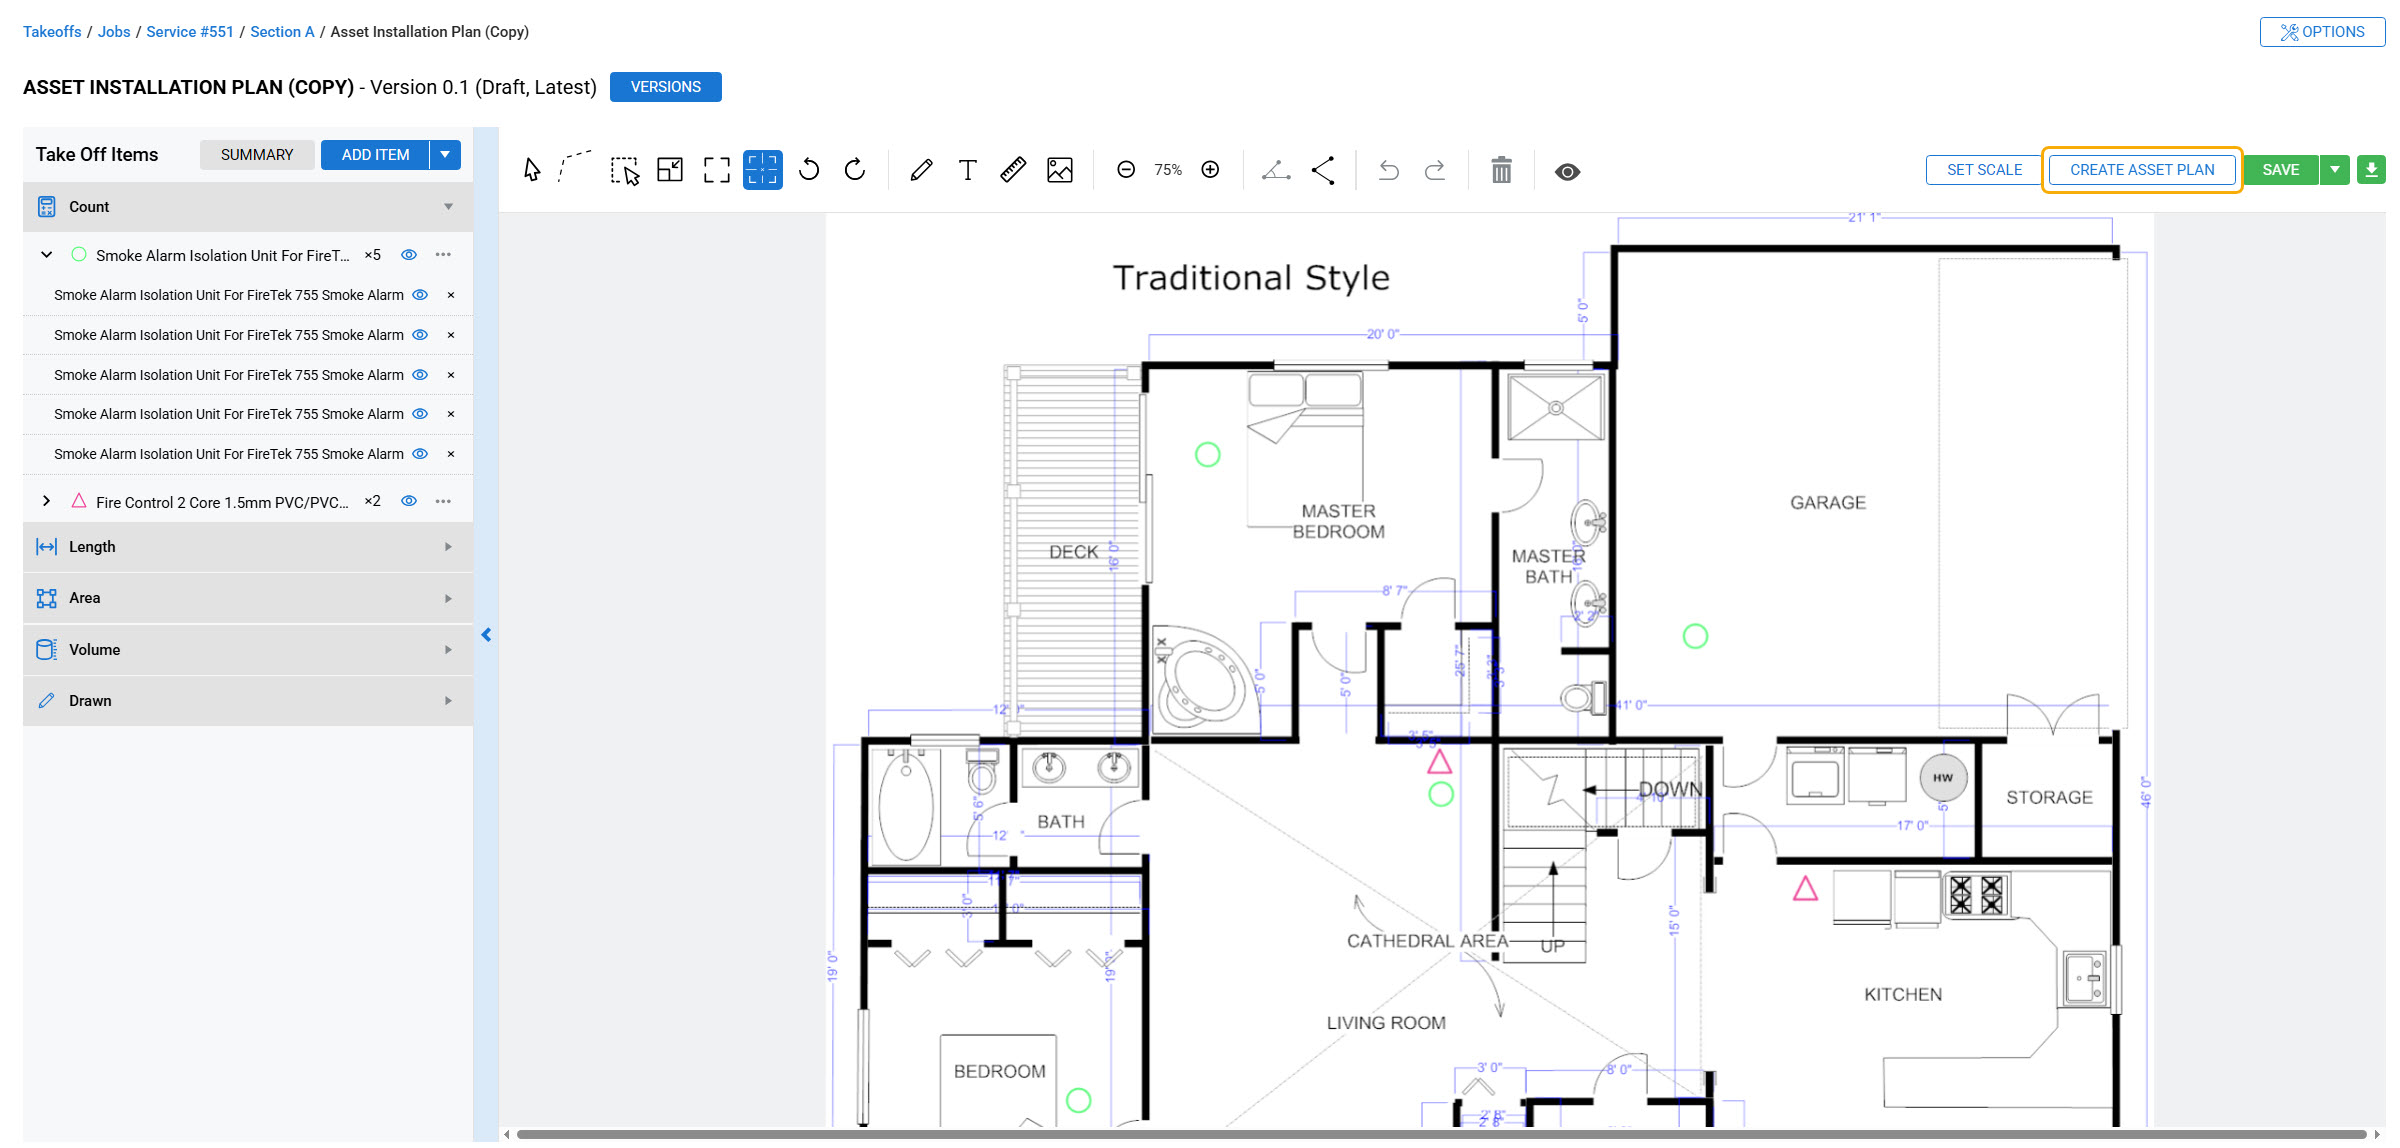
- Click Create Asset Plan in the toolbar.
You can build the As built drawing using the same functionality as Takeoffs. Learn more in How to Build Simpro Takeoffs.
Using the toolbar
The toolbar at the top of your Asset Plan provides you with managing and navigating large drawings.
You can zoom in on the plan by rotating your mouse wheel or click and drag to pan around the image.
| Rotate Left |
Rotate the drawing left or right. Continue clicking to flip the drawing. |
| Zoom | Zoom in and out. |
| Undo |
Undo or redo your last action performed. |
| Visibility |
Select to hide a single or multiple item types on the takeoff drawing. These include Count, Length, Area, Volume, Drawn, and Measurements. |
| Download |
Download a JPG, PNG or PDF copy of the asset map, along with an asset table to use externally. |
Assigning Assets to an Asset Plan
When an Asset Plan is created, catalogue items with the asset attribute enabled can be assigned as an asset.
Note that only catalogue items with the Assets field enabled in Details > Attributes can be assigned an asset in the Asset Plan.
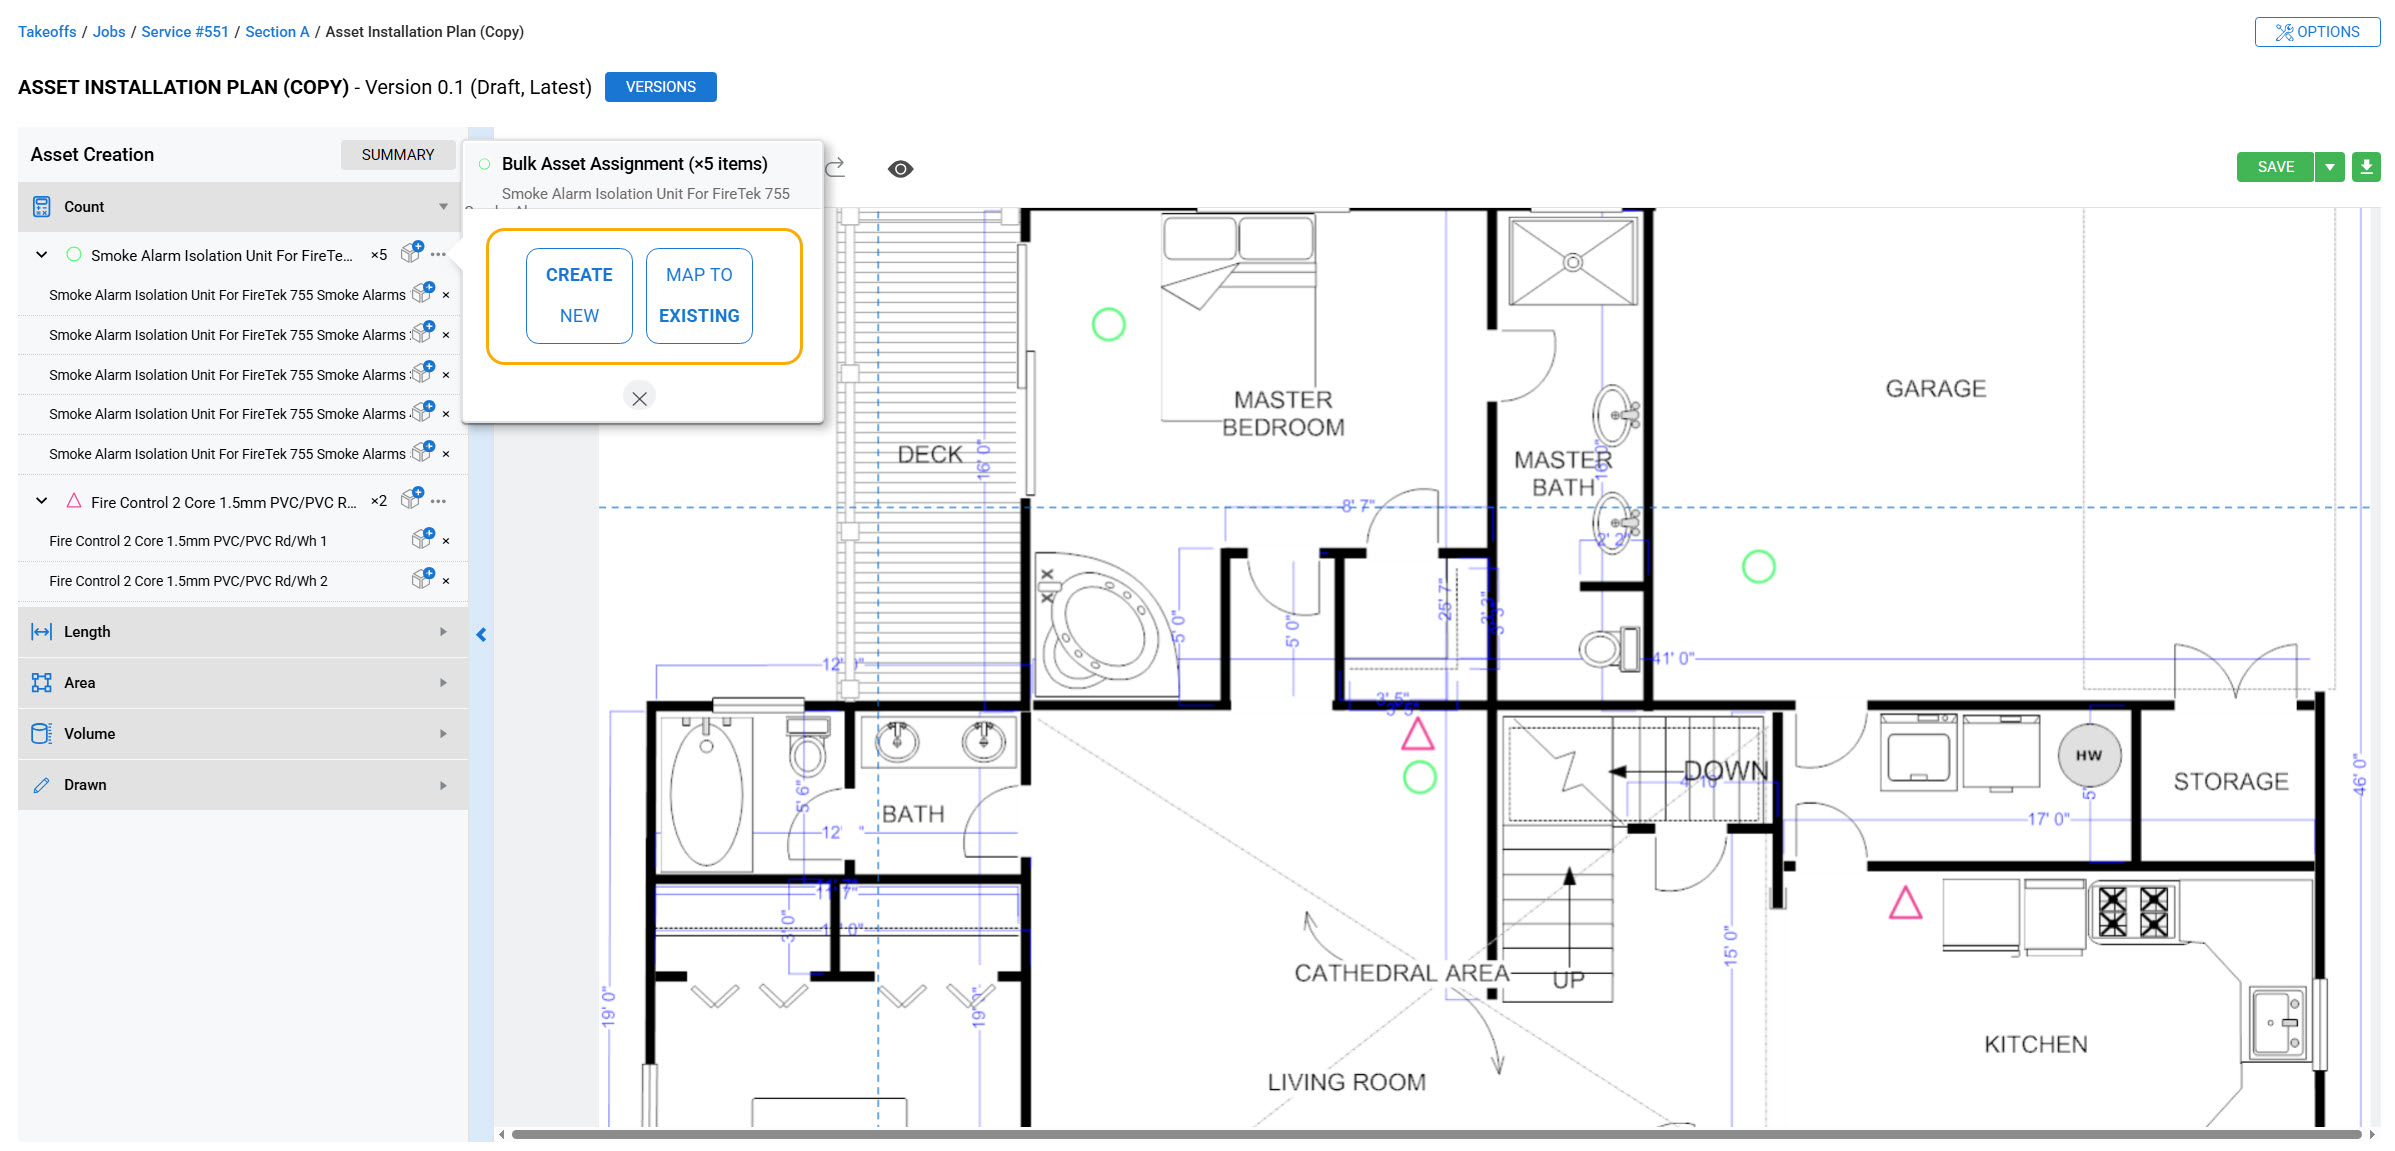
To assign assets in bulk to an Asset Plan:
- In the Asset Creation menu, click the drop down arrow next to the relevant item type.
- Click the Materials icon
 next to the relevant item to assign assets in bulk.
- Clicking x will delete and remove the full catalogue item and all markups associated with the catalogue item, including any linked assets.
- Click Create New to create a new asset to assign to all items.
- Enter the relevant details. This may include Asset Custom Fields from the Asset Type assigned to the catalogue item.
- Click Save.
- The information entered will be saved and will be taken to the next available catalogue item.
- Click Skip to skip an item when creating a new asset assignment.
- Alternatively, click Map to Existing to search for and map to an existing asset. You will be able to search for an asset from the assets listed in the Site Card Assets for the Asset Type assigned to the catalogue item. Note that the relevant item will be highlighted on the Asset Plan. Hovering over the item’s icon on the asset plan will highlight the item in the Asset Creation menu.
- Clicking on the blue Materials icon
 again will bring up the Asset Creation menu, where you can Unassign an asset from the selected item.
 - Click Save.
- Or click Save and Complete to save a completed version of the asset plan.
To individually assign assets to an Asset Plan:
- Click the drop-down arrow beside the relevant material item, to expand and view all individual items.
- Click the Materials icon next to the relevant individual item to assign an asset.
- Clicking x will delete and remove the full catalogue item and all markups associated with the catalogue item, including any linked assets.
- From the Create New tab, enter the relevant details. This may include Asset Custom Fields from the Asset Type assigned to the catalogue item.
- Alternatively, click Map to Existing to search for and map to an existing asset. You will be able to search for an asset from the assets listed in the Site Card Assets for the Asset Type assigned to the catalogue item. Note that the relevant item will be highlighted on the Asset Plan. Hovering over the item’s icon on the asset plan will highlight the item in the Asset Creation menu.
- Click the blue Materials icon again to view the Asset Creation menu, where you can Unassign an asset from the selected item.
- Click Save.
- Or click Save and Complete to save a completed version of the Asset Plan.
Once an asset has been mapped to an item, the materials icon will change to a blue Materials icon ![]() to signify an asset has been assigned to an item. To remove an assigned asset from an item, click the x icon next to the asset, or click the three dots next to the material and select Delete to remove the assets in bulk.
to signify an asset has been assigned to an item. To remove an assigned asset from an item, click the x icon next to the asset, or click the three dots next to the material and select Delete to remove the assets in bulk.
Note that only catalogue items with the Assets field enabled in Details > Attributes can be assigned an asset in the Asset Plan. Learn more in How to Create a Catalogue Item.
Download an asset plan
When an Asset Plan has been completed, you can download the Asset Map.
- Click the download icon
 .
. - Click Download PDF to download the Asset Map and Asset Table.
- Click Send to Site to send the PDF to the associated site as an attachment.
Learn more in the Learning Toolbox
For additional training, complete an interactive material in the Simpro's Learning Toolbox. Learn more in About Simpro's Learning Toolbox.