Last Updated: December 15 2025
Overview
Go to System ![]() > Setup > Defaults > Schedule to set your system-wide schedule defaults, including the default view and format of your Day, Week, Month, Project View, as well as workflow schedules.
> Setup > Defaults > Schedule to set your system-wide schedule defaults, including the default view and format of your Day, Week, Month, Project View, as well as workflow schedules.
You can also set up the formatting and information fields displayed in your schedule blocks, as well as the length and start of a typical work week for timesheets. Be sure to click Save after making any changes.
To learn how to use the schedule, go to About Schedules.
 Required setup
In order to view content or perform actions referred to in this article you need to have the appropriate permissions enabled in your security group. Go to System![]() > Setup > Security Groups and access your security group to update your permissions. The relevant security group tab and specific permissions for this article can be found here:
> Setup > Security Groups and access your security group to update your permissions. The relevant security group tab and specific permissions for this article can be found here:
 Set up defaults for the Scheduler Display
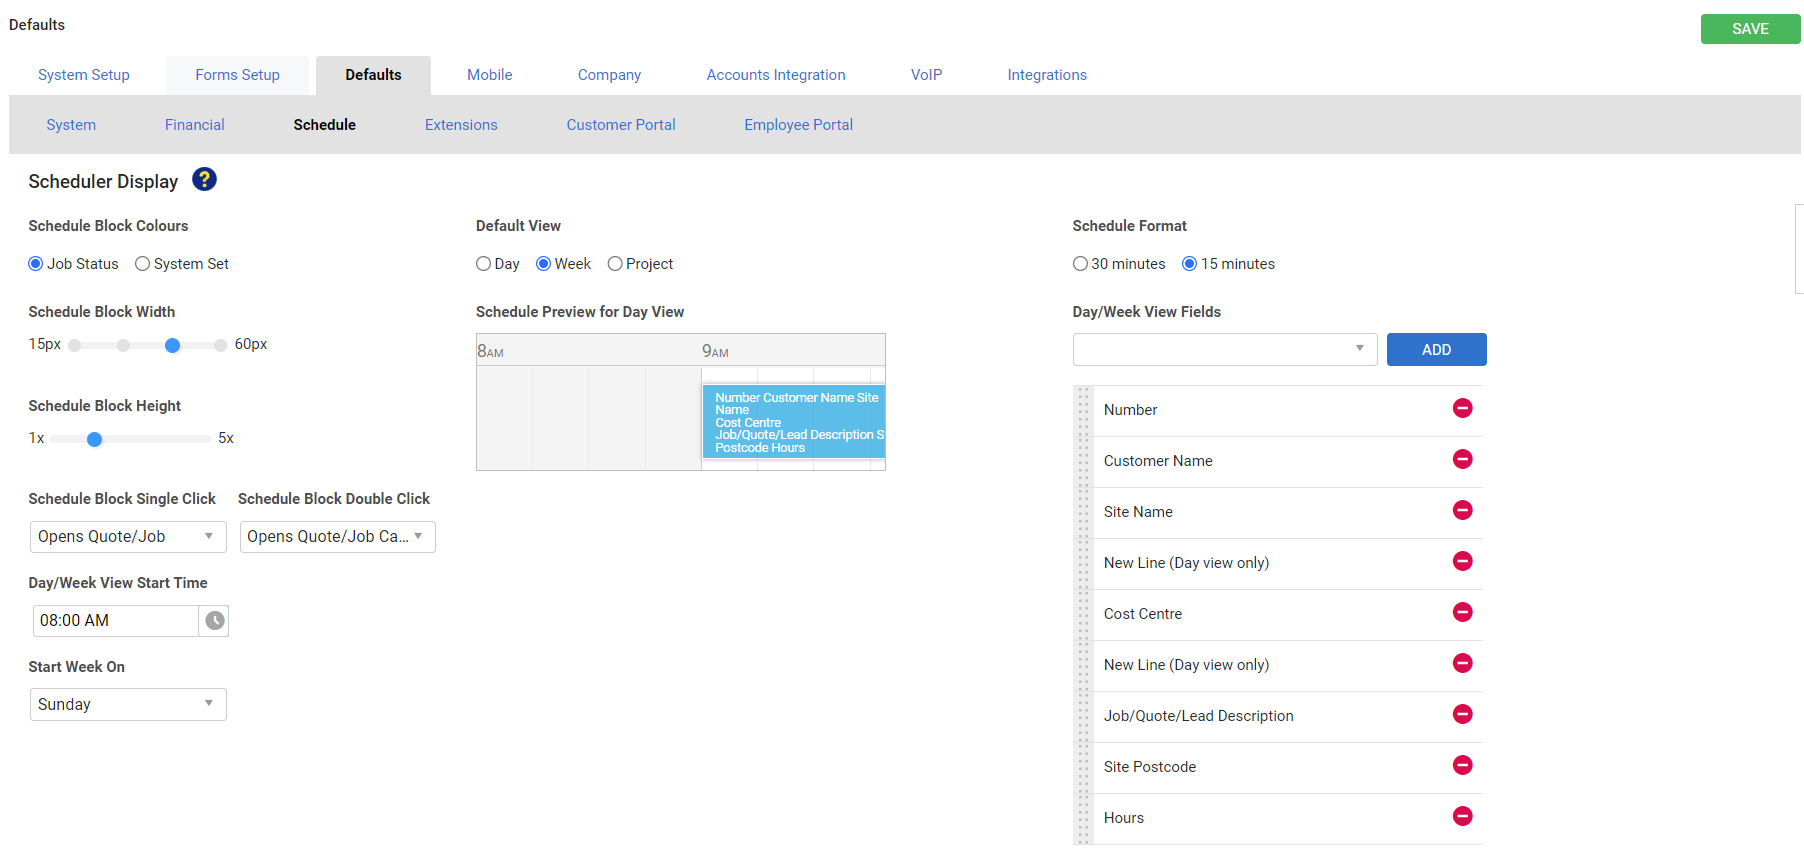
Go to System ![]() > Setup > Defaults > Schedule > Scheduler Display to adjust the format of your schedule view.
> Setup > Defaults > Schedule > Scheduler Display to adjust the format of your schedule view.
Refer to the Schedule Preview for Day View to view how your changes apply when you adjust the following default settings:
| Schedule Block Colours | Select Job Status to colour schedule blocks according to status codes defined in System |
| Schedule Block Width | Click and drag the blue circle along the slider to set schedule blocks at a width of 30px, 45px or 60px. |
| Schedule Block Height | Click and drag the blue circle along the slider to set schedule blocks at a height between 1x and 5x. |
| Schedule Block Single Click |
Select which action is triggered when a schedule block is clicked once:
|
| Schedule Block Double Click |
Select which action is triggered when a schedule block is double-clicked:
|
| Day/Week View Start Time | Use the sliders to select the time of the beginning of the schedule in Day View and Week View and click Done. |
| Start Week On | Select the relevant day that you want the Week View of the schedule to start on. |
| Default View | Select Day, Week or Project as the default schedule view in any given workflow. |
|
Schedule Format |
Select to view and schedule in blocks of 30 Minutes or 15 Minutes. This impacts quoting and invoicing. |
| Day / Week View Fields | Select and Add the information fields you wish to display in a schedule block in the schedule Day View / Week View. Then, click and drag the grey drag handle to reposition them within the schedule block. |
You can also select and Add line breaks to separate specific fields into different lines for clearer formatting. Select New Line (Day view only), click Add, then click and drag the grey drag handle between the fields you wish to separate.
When you are adding and formatting Day / Week View Fields, you may wish to order the information from most important to least important. For example, you can place the customer's name at the top instead of the job number. This is useful if you have added many fields to the schedule block but the Schedule Block Width / Height is too narrow / short to display all of them in the block.
 Adjust timesheet settings
Go to System ![]() > Setup > Defaults > Schedule > Timesheet to adjust the following timesheet settings:
> Setup > Defaults > Schedule > Timesheet to adjust the following timesheet settings:
| Work Day | Enter the number of hours in a typical working day. This is important for schedule viewing and reporting. |
| Work Week Start | Select the starting day of your payroll week. This affects timesheets, run sheets, job cards, and scheduled reports. |
Learn more about timesheets in How to Use Timesheets.
US only: If you use Simpro Premium in the United States, the term 'work order' is used instead of 'job card'.
 Walk Me Through
Need additional help?
Try Walk Me Through, our step-by-step guidance tool, to set up schedule defaults.
In Simpro Premium, go to Help ![]() > Walk Me Through and search Schedule Defaults.
> Walk Me Through and search Schedule Defaults.
Learn more in How to Use Walk Me Through in Simpro Premium.
