Last Updated: June 28 2024
How to Dispatch Forms
Overview
Create a new dispatch or upload a list of dispatches to get a form filled in immediately or schedule for a later date. You can also fill in fields in Simpro Digital Forms prior to sending out a dispatch. Note that mobile users can also complete forms without the form being dispatched. Dispatches can be used in conjunction with Workflows if you want multiple mobile users to collaborate on filling in the form.
Learn more in Simpro Digital Forms Mobile App and How to Create a Workflow.
 Manage Dispatches
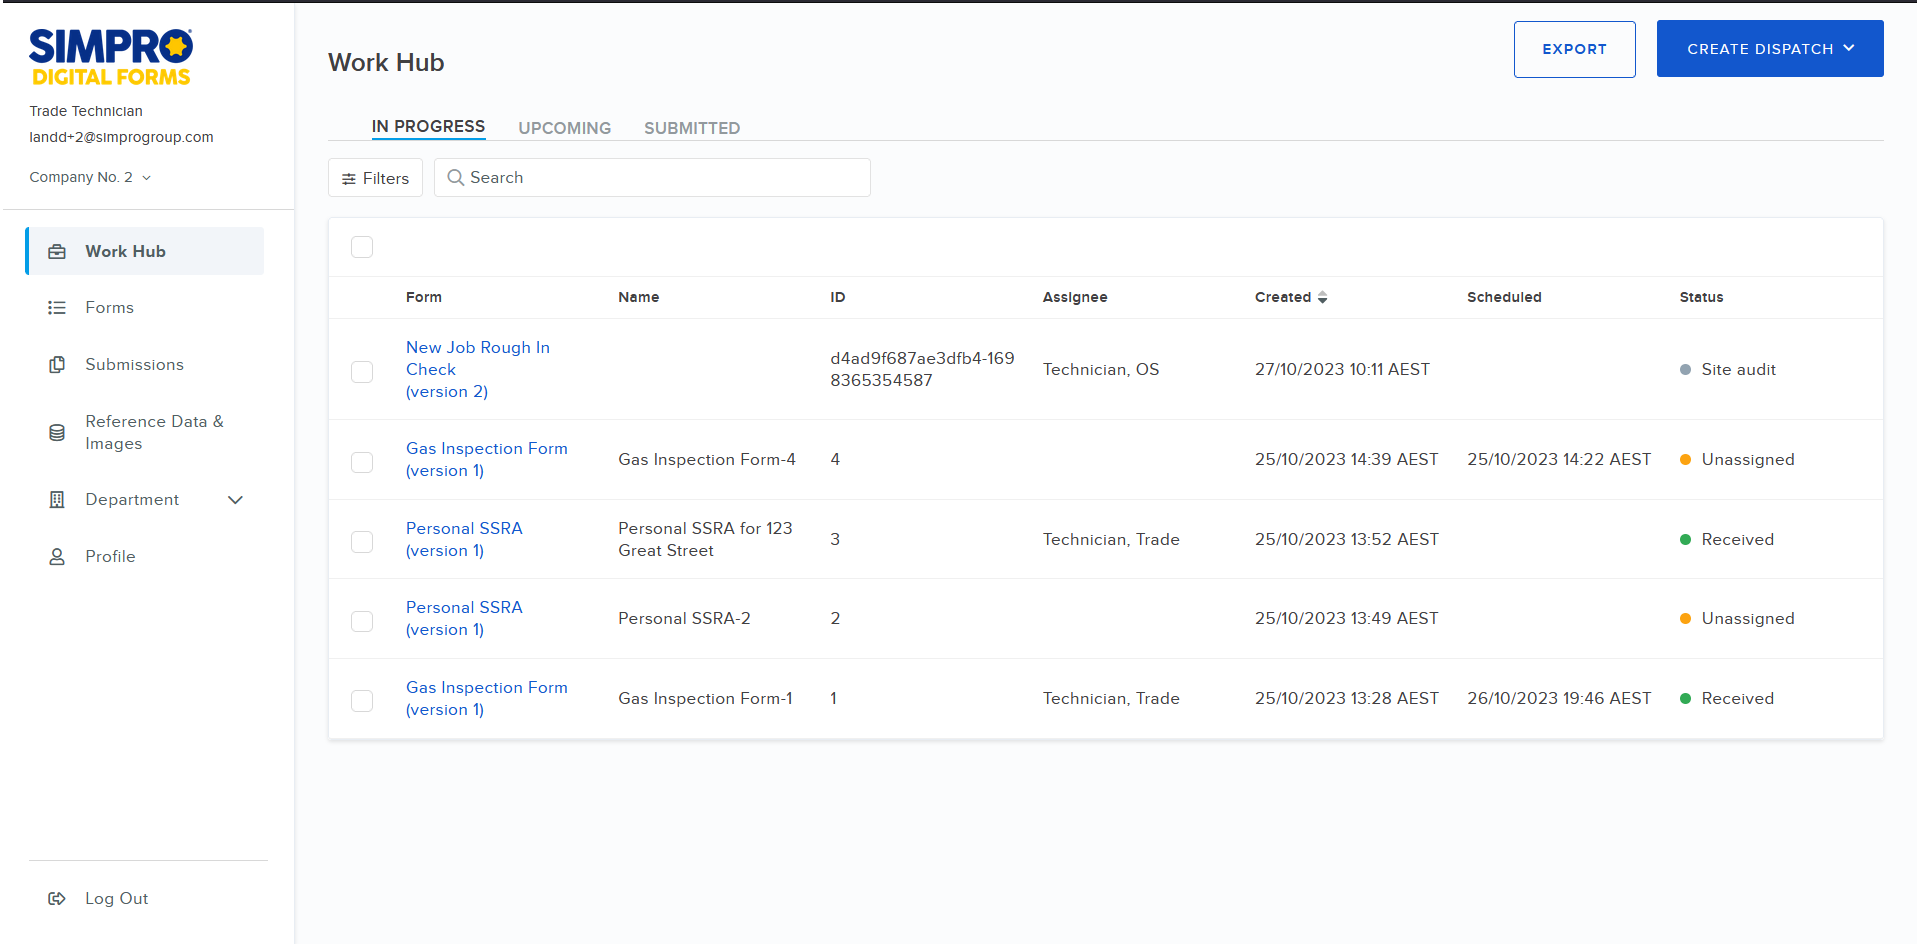
Manage existing dispatches to view who has been assigned to complete forms when and edit existing dispatches. Click Work Hub to view dispatches.
Click EXPORT to download a CSV file of your dispatches. Select to export Dispatches or Workflows, select a date range, which Forms to export and the required Form Versions.
The dispatch option available depends on whether the dispatch is IN PROGRESS, UPCOMING or SUBMITTED.
IN PROGRESS
- Click IN PROGRESS to view dispatches that have not been assigned or scheduled.
- Click Filters to only view dispatches that were created within specified Dates, for specific Forms, or assigned to a selected user.
- Search for a dispatch using the form name, dispatch name or assignee.
- Select one or more forms to access the following options:
- Click the
 icon to save the selected dispatches in a list format as a CSV file.
 - Click the
 icon to make a copy of the selected dispatches.
 - Click the
 icon to reassign the selected dispatches in bulk.
 - Click the
 icon to unassign the selected dispatches in bulk.
 - Click
 to Delete the selected dispatches.
- Click the
- Click on the Form name of a dispatch view the dispatch details including the Dispatch Entries. Click Edit to make changes to the dispatch.
UPCOMING
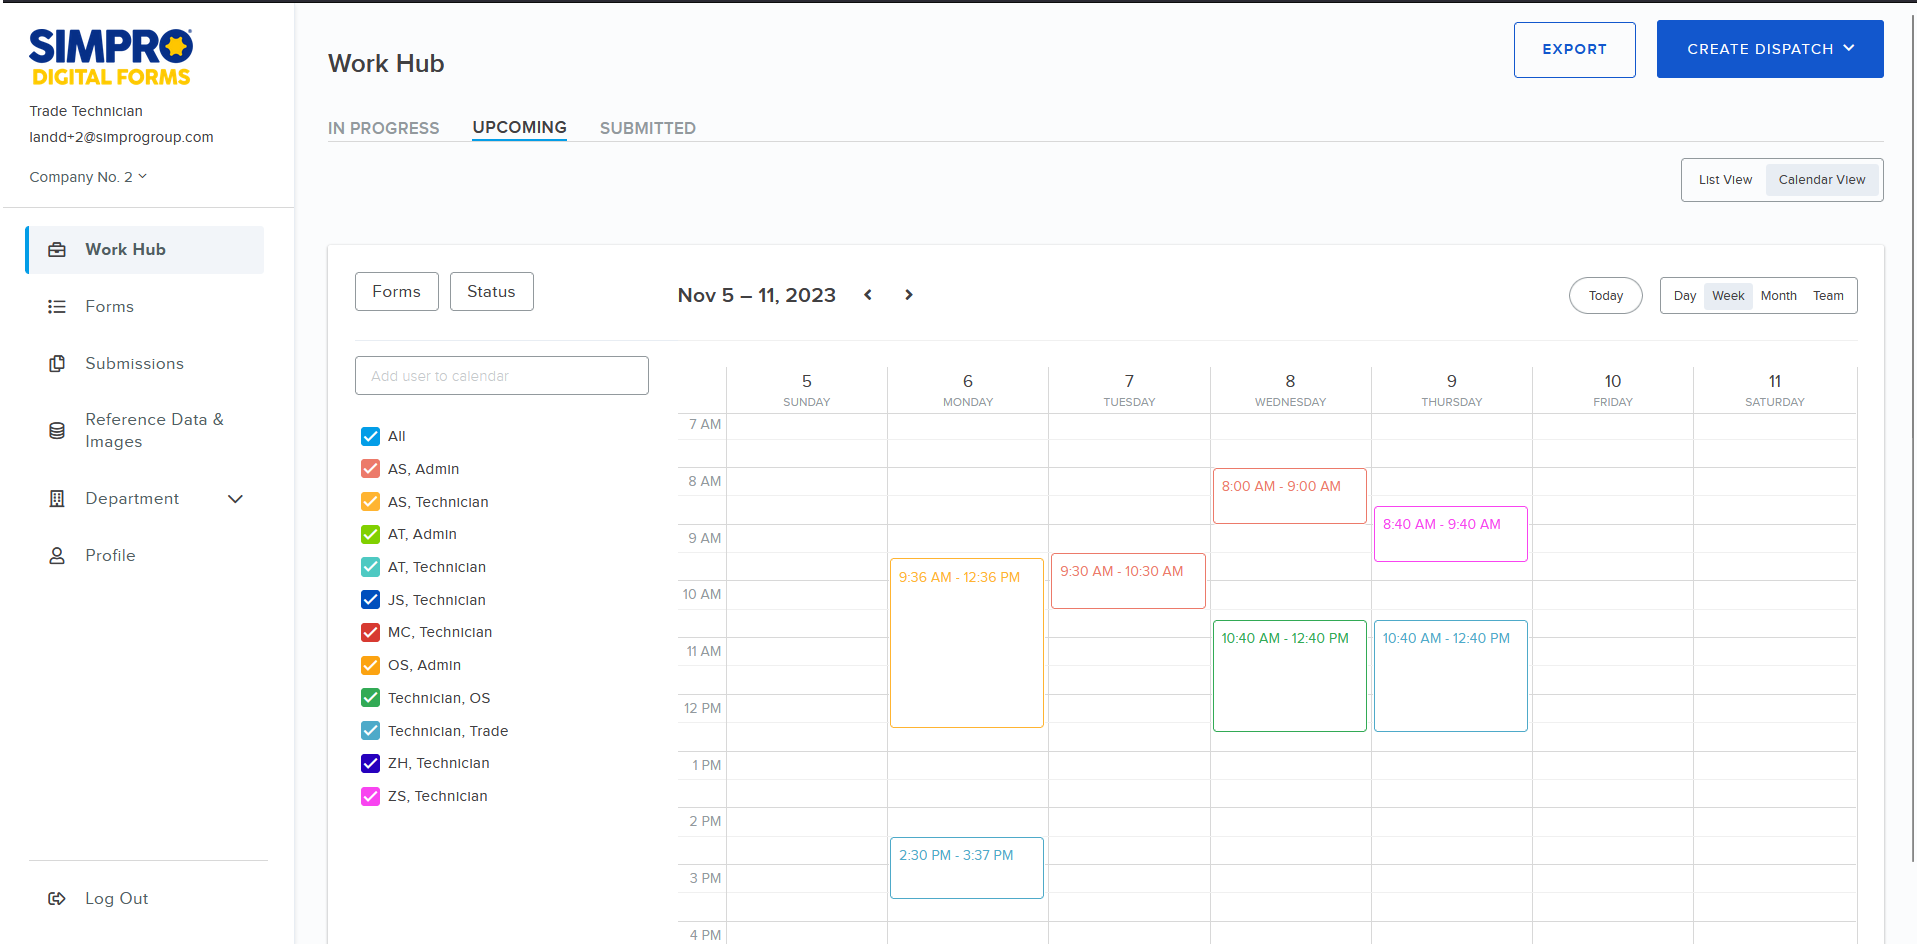
Click UPCOMING to see dispatches that have been scheduled but not submitted.
- Click List View to access a list of all your upcoming dispatches. You can Search, select dispatches and apply the same options available for IN PROGRESS dispatches.
- Click Calendar View to view scheduled dispatches laid out on a calendar.
- Click Forms to filter the dispatches that appear on the calendar based on which form they use.
- Click Status to filter the dispatches that appear on the calendar based on what status they are currently in.
- Click Today to move the calendar to the current date.
- Click Day, Week, Month or Team to change the calendar view.
- Under Add user to calendar you can add users that have been previously deleted from the calendar.
- Deselect a user to hide their scheduled dispatches from the calendar.
- Hover over a user to delete them from the calendar or change the colour of their assigned dispatches.
SUBMITTED
- Click Filters to only view dispatches that were created within specified Dates, for specific Forms, or forms that were completed by a selected Submitter.
- Search for a dispatch using the form name, dispatch name or submitter.
- Select one or more forms to Delete the selected submissions.
- Click on the form name to view a summary of the information filled in by the mobile user.
- Click
 to View or Download the form in a Designer PDF format.
- Note that the Standard Forms are not available for the current version of the Simpro Digital Forms portal.
- Click
 icom > Enter recipient email address > click Done to send a copy of the PDF form.
 Create a new dispatch
Creating a new dispatch prompts a specific user to fill out a form at a specific time. You may also want to fill in certain fields before the form is sent to the mobile user.
To create a new dispatch:
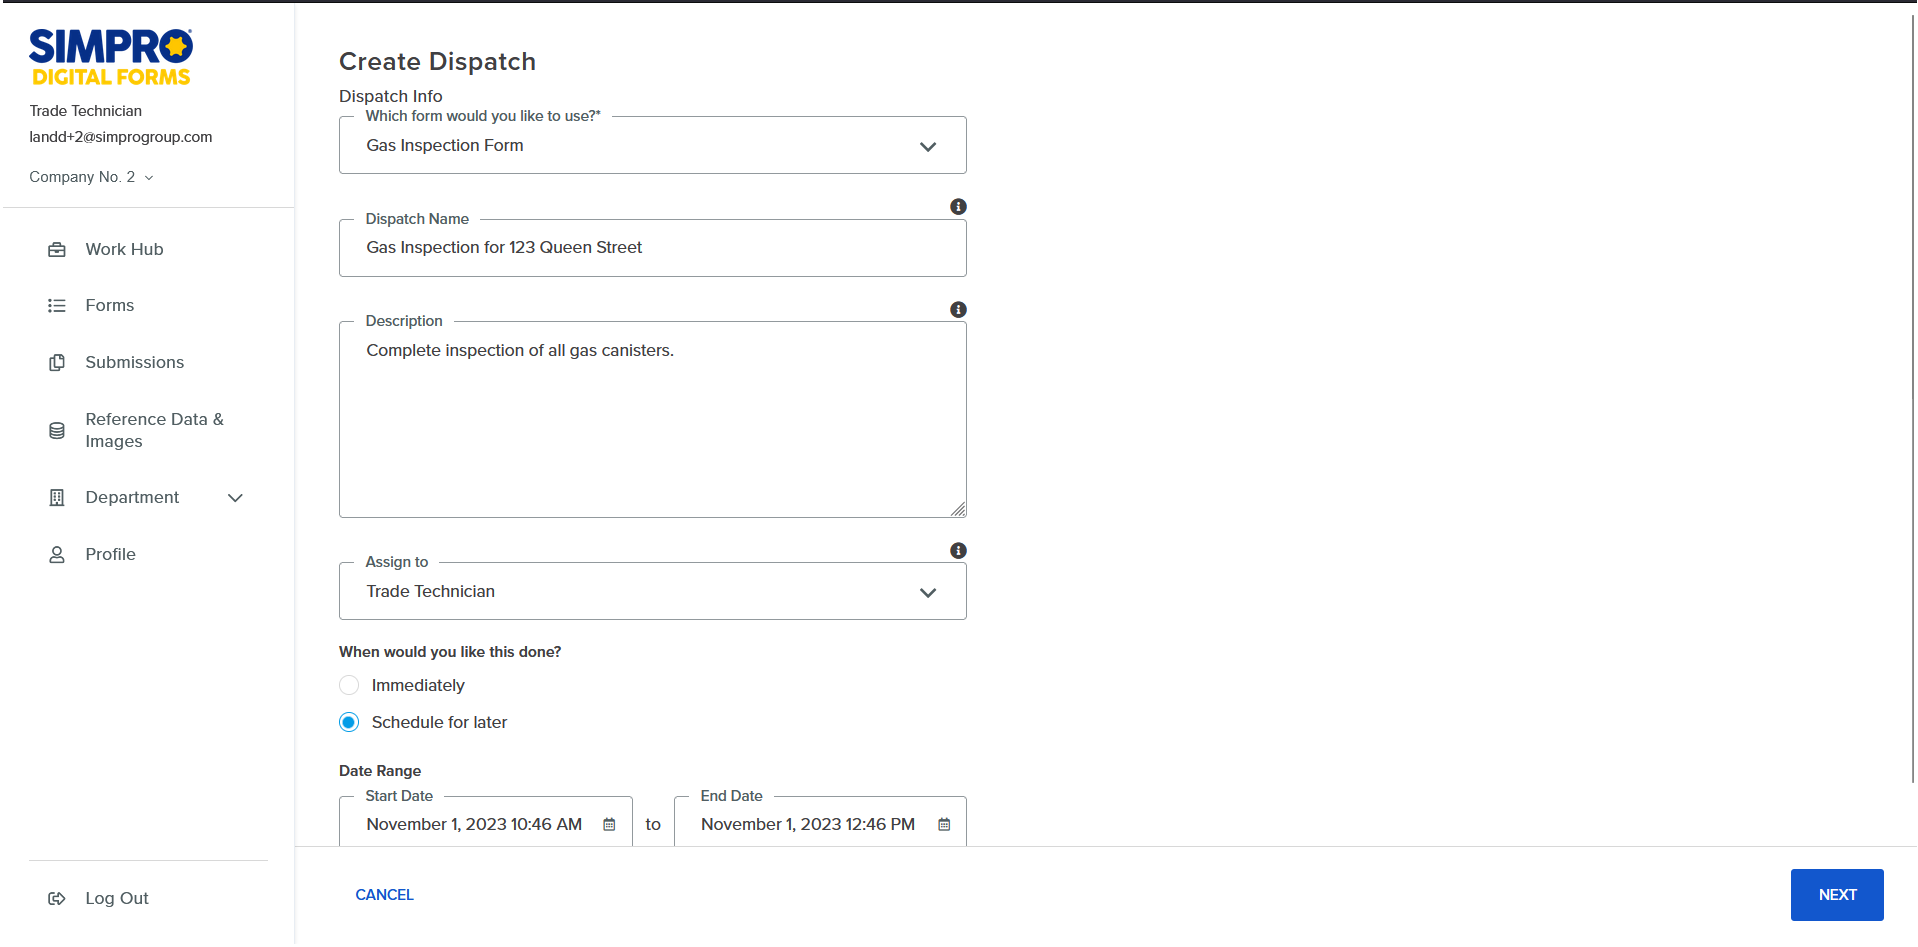
- Click Work Hub > CREATE DISPATCH > Create New.
- Under Dispatch Info from the Which form would you like to use? drop-down select the form that needs to be completed.
- Only forms that have been published are available. Learn more in How to How to Manage Digital Forms.
- Enter a Dispatch Name to identify the purpose of this dispatch to provide the mobile user with some context. If left blank this defaults to the form name.
- For example, enter the form name followed by the job number, associated customer, order number, site address or internal process number.
- Enter a Description to provide further context to the mobile user filling in the form and any important information.
- Under Assign to select the employee who is being dispatched the form for completion.
- If the user you want is not listed here, then the form is not assigned to that person. Go to the Forms page to edit the form assignment. Learn more in How to Manage Digital Forms.
- Select whether to dispatch the form Immediately or Schedule for later.
- If scheduled for later, select the Date Range and the start and end time when the mobile user should complete the form.
- If scheduled, select to Send a calendar invite via email if required and select when the Reminder should go out relative to the scheduled date.
- Click NEXT.
- Pre-fill any information before you create the dispatch to save the mobile user having to enter these details. Depending on the form setting this step may be mandatory. This is useful if you have easy access to key information in the office that may not be as readily available in the field.
- Click CREATE DISPATCH. Upon creating a dispatch you are taken to the Create Dispatch page where you can start creating another dispatch. If another dispatch is not required click CANCEL to return to the Work Hub page.
 Upload Dispatches
If you are dealing with a large volume of dispatches and need to pre-fill a lot of fields you can Upload Dispatches rather than creating or editing them one at a time.
To upload Dispatches:
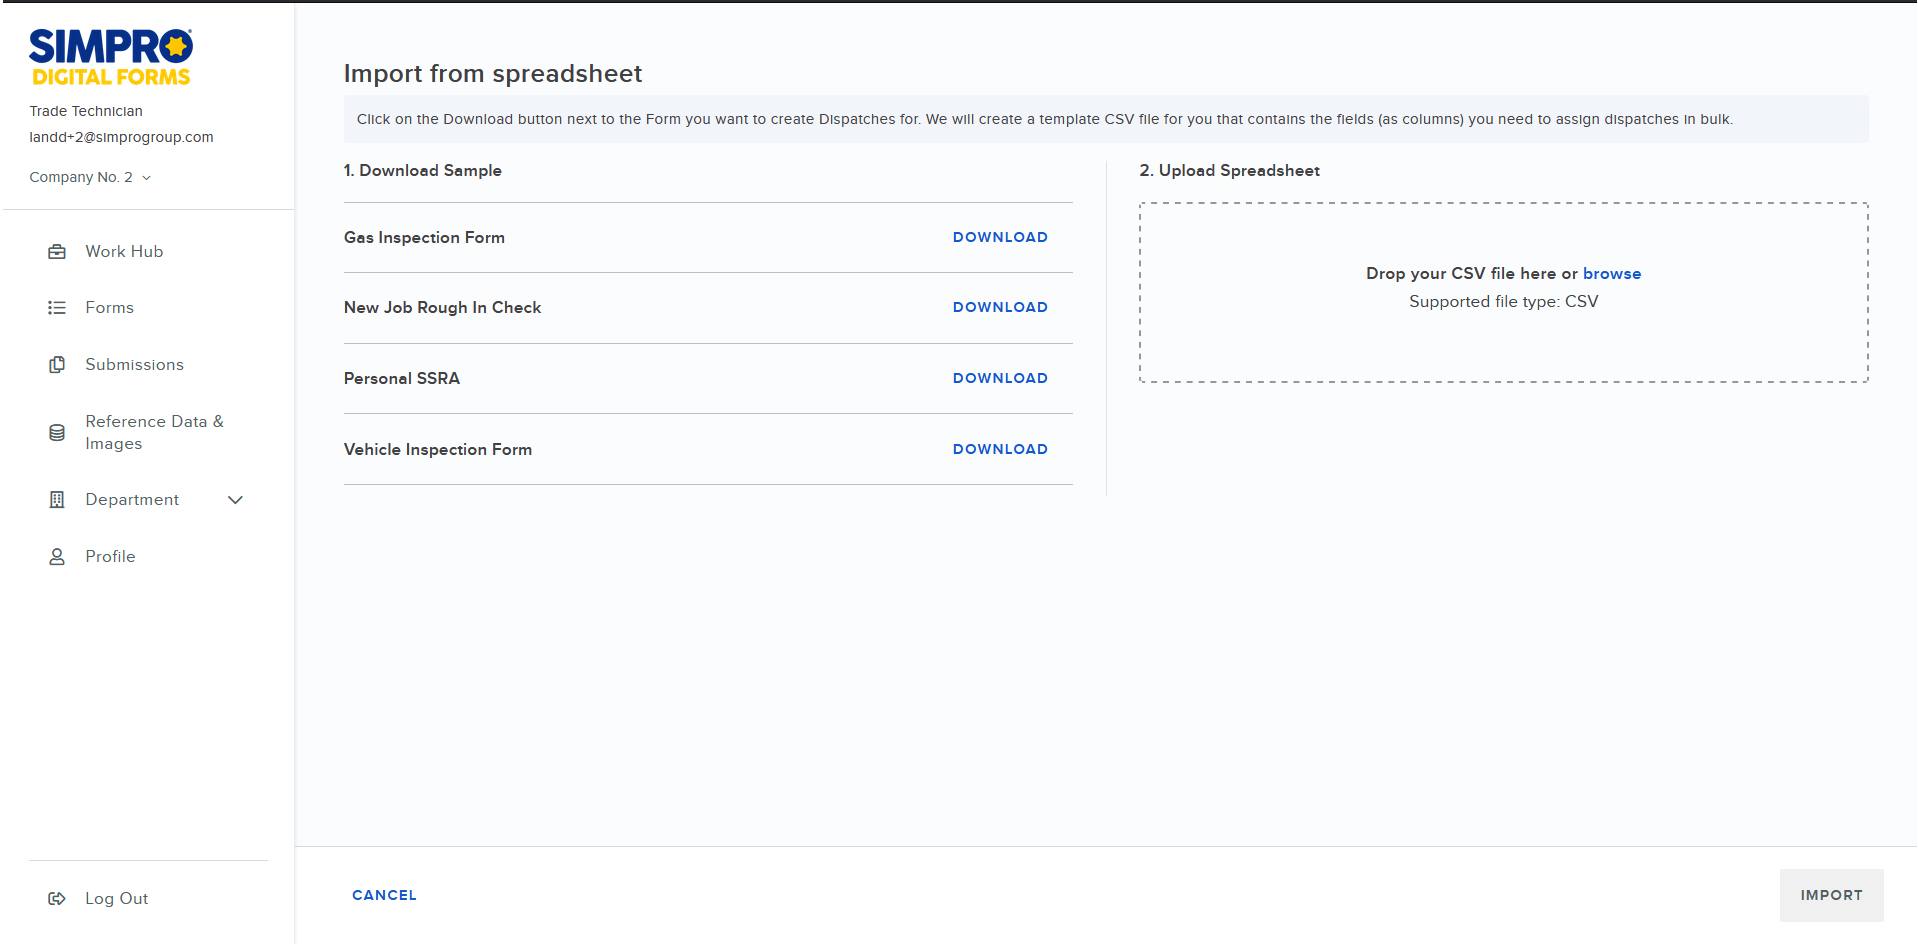
- Click Work Hub > CREATE DISPATCH > Upload Dispatches.
- Under Download Sample you can download a CSV template for each of your published forms. Click DOWNLOAD on the form that the dispatches are being created for.
- Open the downloaded CSV file. For each dispatch being created fill in the following fields:
- App Name: Copy the name of the form.
- Dispatch Name: Identify the purpose of this dispatch to provide the mobile user with some context. If left blank this defaults to the form name.
- Description: Provide further context to the mobile user filling in the form and any important information.
- User e-mail: The registered email address of the mobile user who is being assigned the dispatch.
- Scheduled At: Enter the scheduled date and time in MM/DD/YYY HH:MM format.
- Duration: Enter the total duration in minutes.
- Reminder: Enter the number of minutes before the scheduled time that the mobile user will receive an email reminder.
- Send Invite: Enter yes or no as required.
- Department: Enter the Simpro Digital Forms Department that the form and user is associated with.
- Fill in any fields that should be pre-filled when the mobile user receives the dispatch.
- Save the CSV.
- In Simpro Digital Forms click browse or click and drag the CSV file to upload it.
- Click IMPORT.


