Last Updated: December 04 2023
Manage COVID-19 Contact Tracing with Simpro Premium
Overview
Use Simpro Premium to effectively manage and record important information based on your local government requirements. Keep track of your technicians' movements and assist with effective contact tracing to investigate COVID-19 cases.
Use Simpro eForms to create a custom digital form to capture and record contact tracing information in PDF documents. Alternatively, you can use Simpro Premium scripts to assist technicians with recording contact tracing information on their job cards and export as a CSV document.
 Using eForms to manage contact tracing
Use Simpro eForms to create a custom digital contact tracing form to capture information required by your local governments.
 About eForms
Design and manage your contact tracing forms in the eForms portal, and have your technicians complete the form in the field to record contact tracing details as they happen.
eForms can be used standalone or integrated with Simpro Premium. Learn more in How to Integrate eForms with Simpro Premium.
Simpro eForms can be used to:
- Edit and customise your forms in the eForms Designer in the eForms portal.
- Submit forms electronically from the eForms app to the eForms portal in real time.
- Integrate the eForms portal with Simpro Premium to auto-complete forms with data from quotes and jobs.
As eForms is a separately licensed add-on product, your Simpro Premium licence does not give you access to eForms.
Don’t have Simpro eForms? Contact our Sales team in your respective country to purchase eForms licences.
|
Australia sales@simpro.com.au 1300 139467 (press 2) |
United Kingdom sales@simpro.co.uk 0800 622 6376 (press 3) |
New Zealand sales@simpro.co.nz 0800 100 854 (press 2) |
United States sales.us@simpro.co (855) 338-6041 (press 1) |
 Create a Contact Tracing eForm
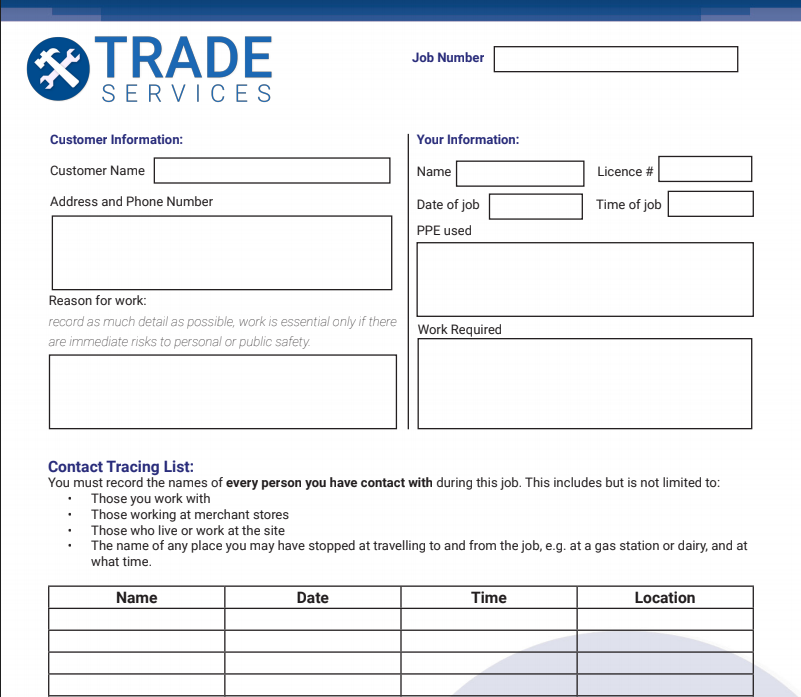
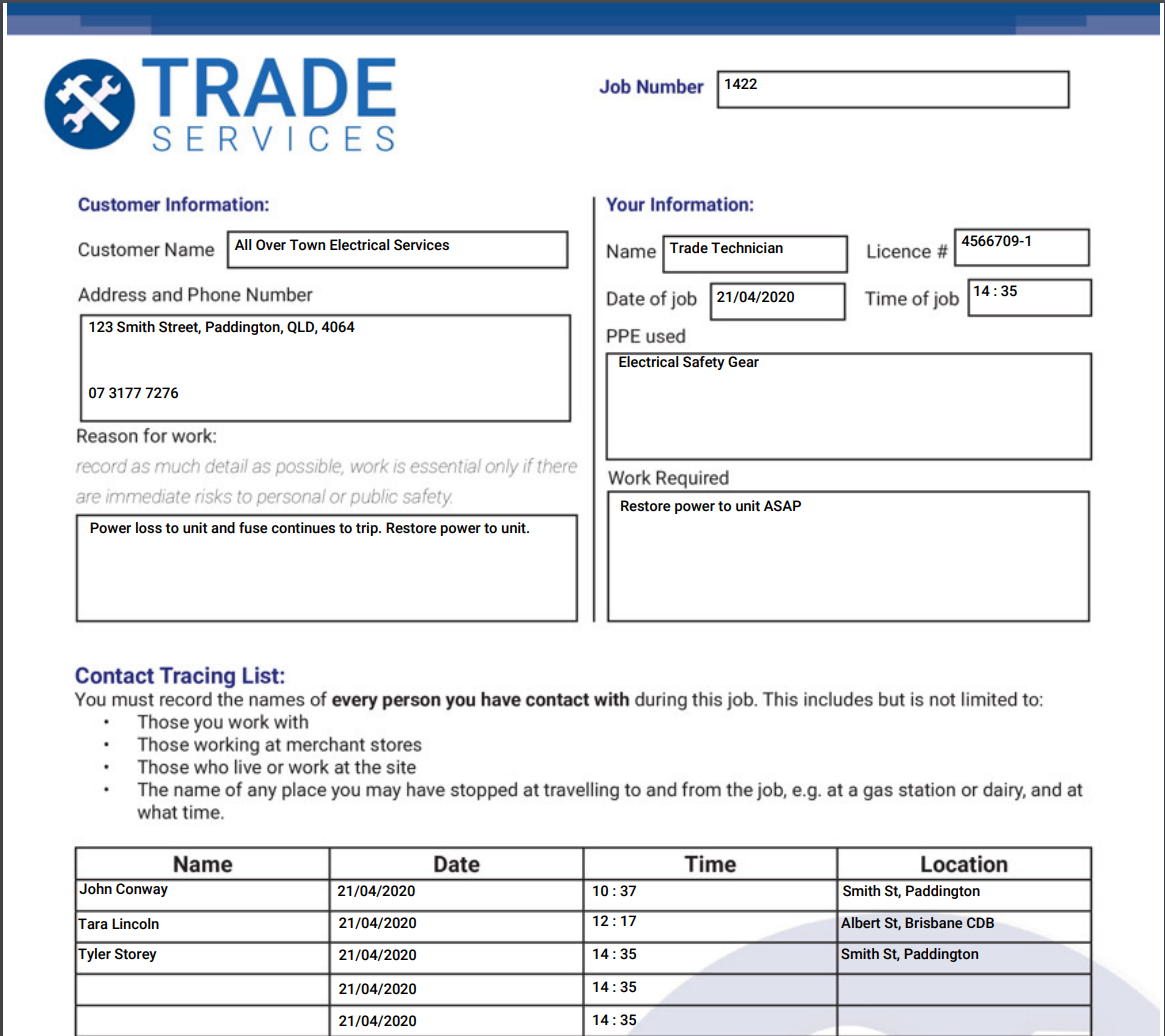
You may want to create a PDF background document in Word or another document creation software. Create your document layout and include all the required information to ensure you are accurately recording all relevant information. Save this document as a PDF to upload and use as your eForm template background.
This example may differ from your local government requirements.
To create the contact tracing eForm template:
- Log into your eForms Portal.
- Go to System
 > Setup > Forms.
 - Click Create Form.
- Enter an identifiable Form Name, for example “Contact Tracing Form”, then click Next.
- You can only enter alphanumeric characters, spaces, and underscores in the form name.
- Read the terms and conditions of legal indemnity, then select I Agree to continue creating the template.
- If you do not select I Agree, you are not able to create the form template.
- Click Upload Background, then locate and open your PDF file.
- Adjust email and review settings as required.
Add input fields to the eForm Template
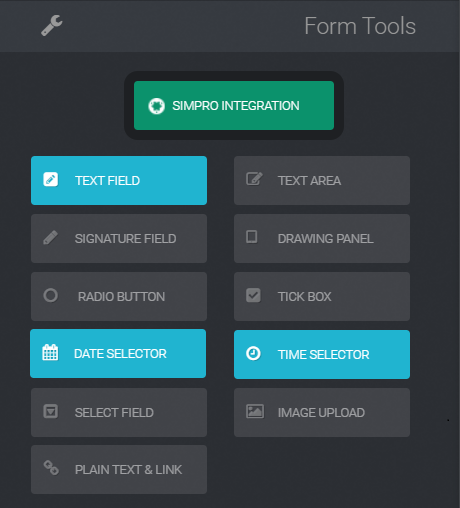
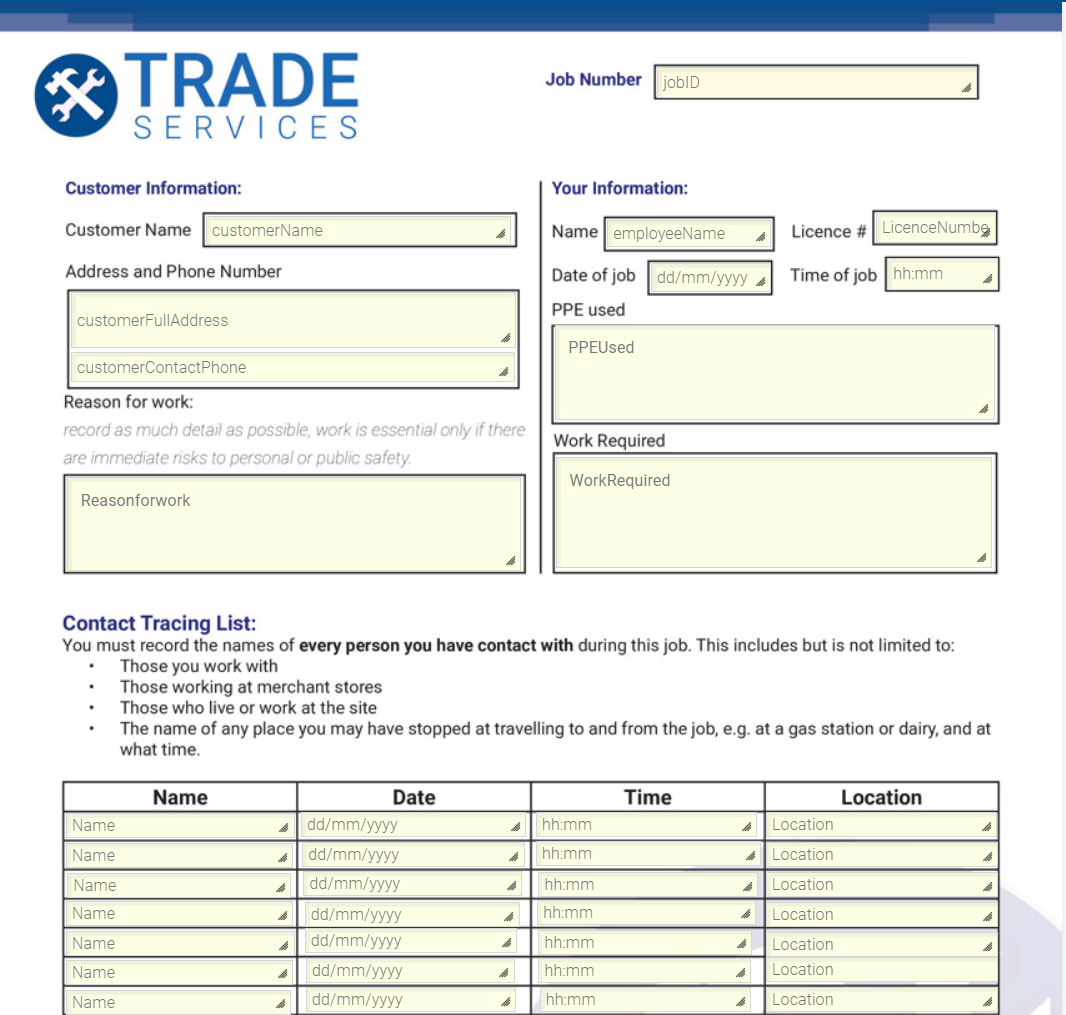
- Click a field type, then click and drag your cursor across the area of the form background to add it to the template. Learn more in Field types and editing options.
- Enter an Element Name to identify the type of information to be entered in the field, or select an Auto-Population option.
- You can only enter alphanumeric characters, square brackets, and underscores in the element name, with no punctuation or spaces.
- Adjust the field's editing options as required. Learn more in Field types and editing options.
- Click Save as you complete each field type.
- Click Finish to save and complete the form and return to the eForms Portal.
Tips for placing fields:
- Click and drag the
 icon in the bottom right corner of a field to resize it. The minimum size for a signature field is 100px by 40 px.
 - Click Unlock to reposition the field using the
 icon. You can also reposition using the field using the arrows on your keyboard. To move the fields in smaller movements, press CTRL, then the arrows on your keyboard.
 - Click Clone to create a copy of the field directly below the original.
- Click Delete to remove the field from the template.
 Include Simpro Premium Integration in the eForm Template
If you have Simpro Premium and eForms, you can integrate eForms with your Simpro Premium build and create integrated forms to automatically populate Simpro Premium data and send a copy of the completed eForm back to Simpro Premium. Learn more in How to Integrate eForms with Simpro Premium.
Add Simpro Premium Integration to the eForms Template
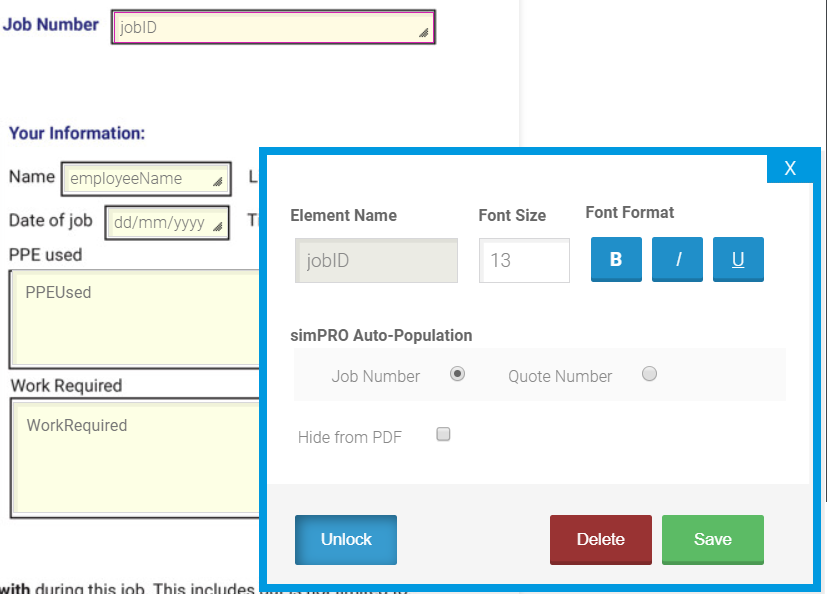
- Click SIMPRO INTEGRATION, then click and drag your cursor across the area of the form background where you wish to capture the Simpro Premium job or quote number when a technician completes the form in the eForms app.
- Under Simpro Premium Auto-Population, select to retrieve Simpro Premium data using the Job Number or Quote Number that a technician enters when completing the form.
- This automatically defines the Element Name.
- Select the Font Size and Font Format of text entered in the field, or alternatively, select Hide from PDF to hide the job or quote number when the form displays as a PDF.
- Click Save.
The SIMPRO INTEGRATION button is now green and enabled for the Text Field and Text Area fields.
 Complete the contact tracing eForm in the Field
Once the eForm template has been created, your field technicians can access this from the eForms application. Learn more in .
Complete the contact tracing form in the field
- Log into the eForms App.
- Go to the Forms tab and tap the contact tracing form template.
- Enter information into the text fields as required by your local government.
- Enter the Simpro Premium Job Number to pull information from Simpro Premium on integrated forms.
- To enter information in the date or time field, select from the drop-down lists, then tap Finished.
- Tap Send to submit the form to the eForms Portal.
- Alternatively tap the save icon to create a draft. Learn more in Edit form drafts.
- Adjust the form file name if required, then tap Send > Ok.
When a form has submitted successfully, you are returned to the dashboard and an upload successful message appears. Tap Ok to close.
 Manage and Export submitted eForms
View, approve and export submitted contact tracing eForms to manage and share the information with the required parties.
Manage submitted eForms
Log in to the Simpro eForms portal to view, edit, download and archive all Simpro eForms submitted from the eForms app. Simpro Premium integrated forms are sent directly to Simpro Premium as a job or quote attachment once approved or submitted. Learn more in How to Manage Submitted Forms.
To access the submissions overview, log in to the eForms portal, or if you are already logged in, click the eForms logo in the top left.
The submissions overview displays all forms submitted to the eForms portal from the app, along with their Status, Form Name, File Name (as defined in the eForms app when the form was submitted), Date & Time Sent, Sender Name, Form Version, and submission and project ID numbers.
You can narrow your results by using the Date Range, Forms, Sender Name, Submission ID and Project ID filters and search options.
Every form you submit is given a unique Submission ID, which can provide Simpro Support with information if you need assistance with a particular form.
Export submitted forms
From the submission overview, click Options on individual forms to view and download the form PDF.
Alternatively, select the relevant forms and click Download PDFs from the footer options to export a PDF of all selected forms.
 Using Simpro Premium to manage contact tracing
You can use Simpro Premium to create a script to assist technicians with recording contact tracing information on their job cards.
 Create a script in Simpro Premium
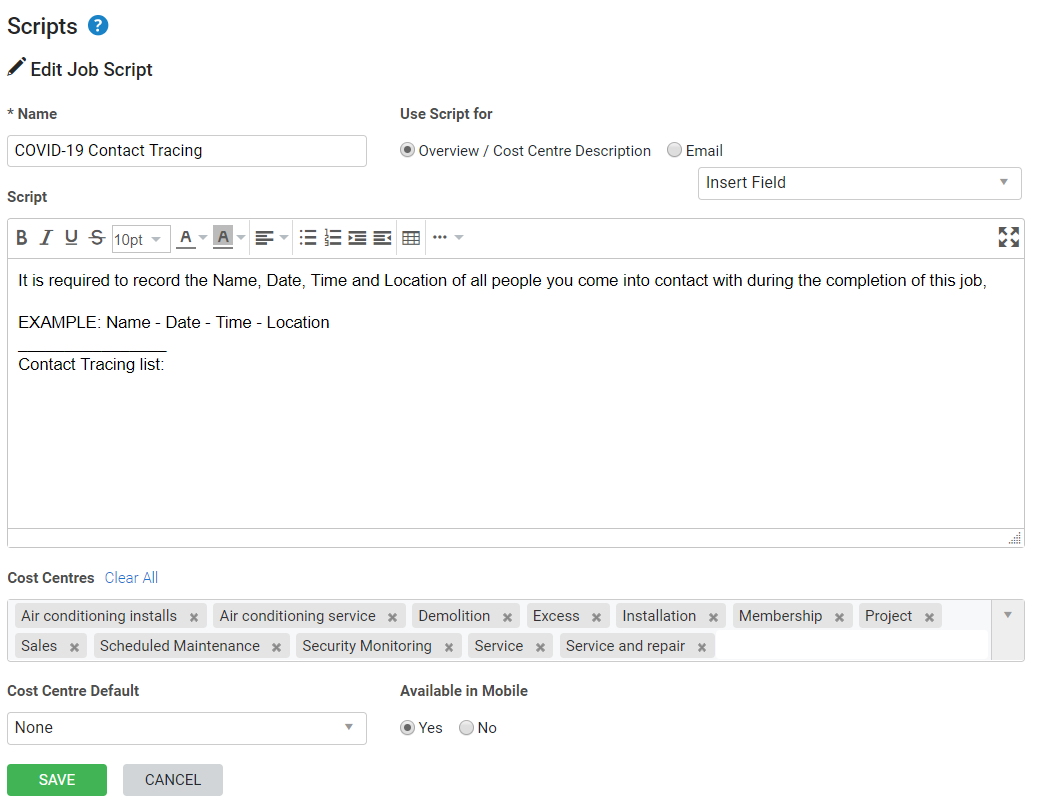
Scripts are editable, pre-written responses or templates to record and share information. Creating a script template for contact tracing, assists your technicians with recording the correct information inline with your local government requirements.
To create a script:
- Go to System
 > System Setup > Scripts.
 - Click the Job tab to create a script for your technicians job cards.
- Click Create Script.
- Name the script appropriately so it is easy to locate, for example “COVID-19 Contact Tracing”.
- Under Use Script for, select Overview / Cost Centre Description to make this script available for description fields.
- In the Script field, enter directions and an example of the information that is to be recorded.
- Click the Cost Centres field to view available cost centres. Select individual cost centres to assign them, or click Add All to make this script available for all cost centres.
- Under Available in Mobile select Yes so your technicians can access this in the field.
- Click Create.
 Use the script to record contact tracing information in the field
Once the mobile enabled script has been created, your technicians can place this script in their Work Completed Notes, to send the information back to the job in Simpro Premium.
Use the Service module in Simpro Mobile to access and manage the quote / job in real time. Technicians recording contact tracing information access the job in the Service module and complete the information in their job card.
To insert a script:
- Log into Simpro Mobile Service module.
- Access the relevant job.
- Tap START WORK to begin editing the job card details.
- Expand the Your Jobcard section.
- Note that the Your Jobcard section is available for editing only when START WORK is active.
- Tap the edit pen next to Work Completed to enter notes.
- Click INSERT SCRIPT and select the “Contact Tracing” script.
- Enter the required details of the people that you have come into contact with.
- Complete the job as required.
- Tap REVIEW AND FINISH to sign off and submit the job to complete it. Learn more in Complete a scheduled job.
 Export contact tracing information from Simpro Premium
Once the job has been completed and submitted back to Simpro Premium, the technicians contact tracing list is available to place onto the job and export from Simpro Premium as a CSV.
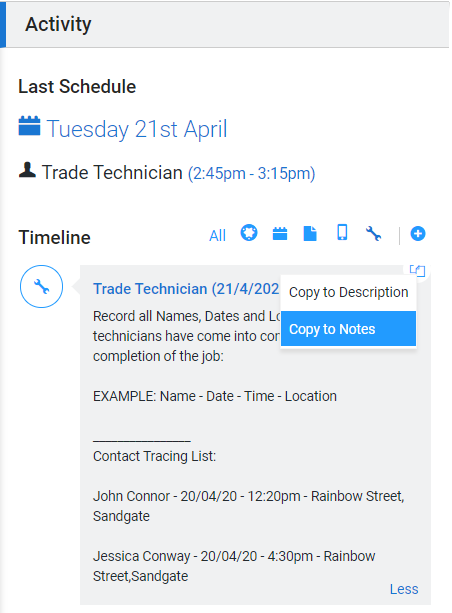
To copy the work note to the job note:
- Locate the relevant job.
- The technicians work note is displayed in the Activity Timeline.
- Click the icon to Copy to Notes.
- Click Save and Finish.
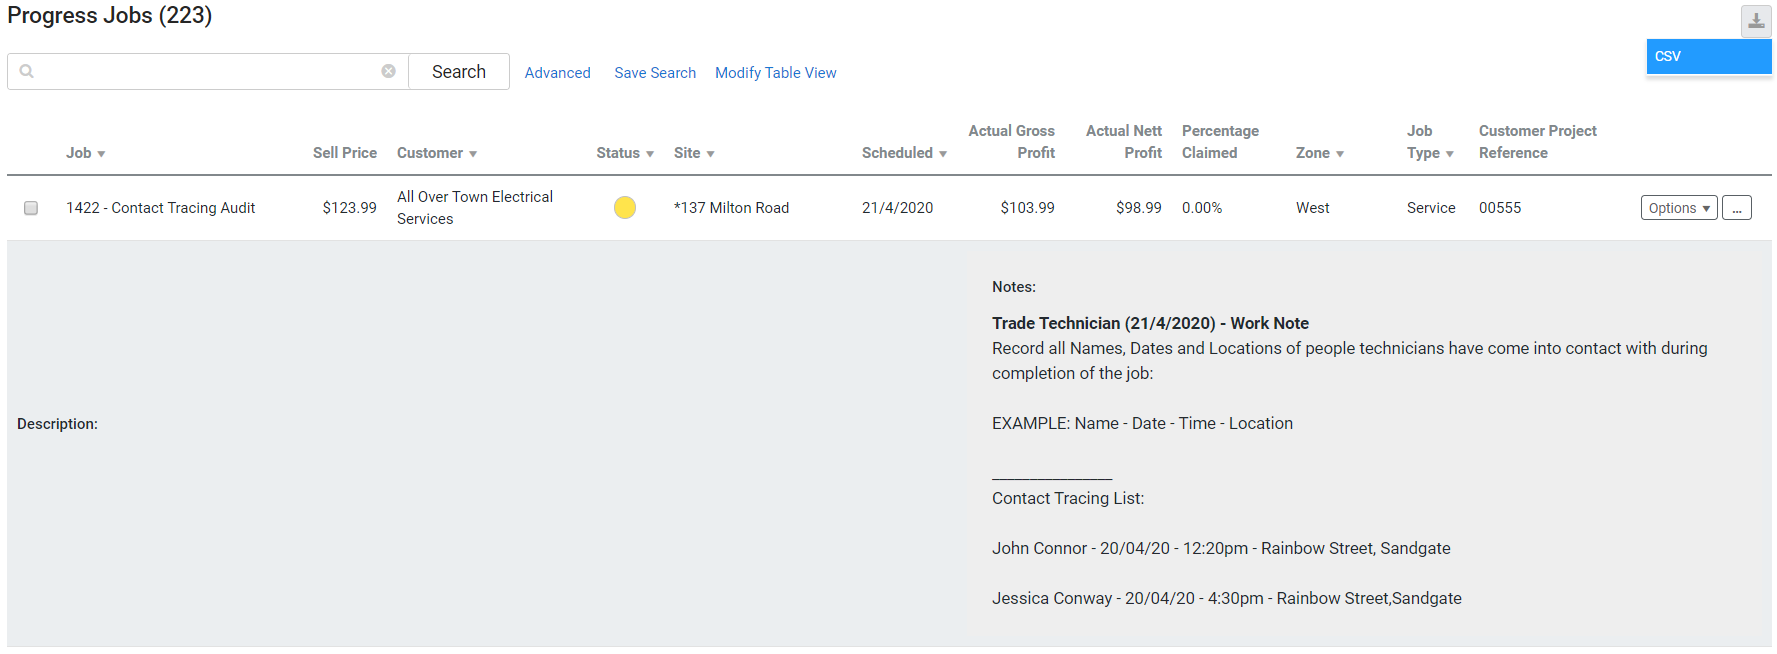
To export the job notes from Simpro Premium:
- Hover over Jobs and select the relevant job stage.
- Click Modify Table View.
- Enable Job Notes.
- Click Save and Finish.
- Use the Advanced search options to display only the relevant jobs or use the search bar to locate specific jobs.
- Click the download icon to export a CSV file of the information displayed in the table view.
