Last Updated: December 12 2025
Overview
Through the customer![]() The entity (individual or company) that receives the invoice for work provided. A customer may be associated with multiple sites, for example, if they are a franchise. portal, you can provide your customers with the ability to:
The entity (individual or company) that receives the invoice for work provided. A customer may be associated with multiple sites, for example, if they are a franchise. portal, you can provide your customers with the ability to:
- View their own quotes, jobs and invoices
- Pay invoices online
- View and edit their contact and site details
- Request quotes and book jobs online
-
 View detailed asset information and reports, and search and add assets requiring maintenance to quotes and jobs.
You can set up your customer portal to give customers access to the information and functionality that best suits your business. For example, you may want customers to only be able to view and pay their invoices online, or you may want them to have full access to view their quotes, jobs and invoices and be able to book a quote or job quickly and easily from within their own portal.
When customers request a quote or book a job through their portal, the new quote or job appears in your system and you receive an alert. This saves you time manually obtaining quote and job information from customers and creating quotes and jobs in Simpro Premium, and gives the customer greater control.
Each customer has their own unique login details. Once a customer has access to their portal, they can also create portal login details for as many of their own employees as they require.
Before using the customer portal we recommend ensuring your customer, quote, job, invoice and other information in Simpro Premium is up to date, so the information customers see is correct.
 Required setup
In order to view content or perform actions referred to in this article you need to have the appropriate permissions enabled in your security group. Go to System![]() > Setup > Security Groups and access your security group to update your permissions. The relevant security group tab and specific permissions for this article can be found here:
> Setup > Security Groups and access your security group to update your permissions. The relevant security group tab and specific permissions for this article can be found here:
 What can customers do through the portal?
You can set up the portal to enable customers to use the following areas of Simpro Premium:
| Quotes | View and print approved quotes; view, print, accept and reject outstanding quotes; and request a new quote. Depending on your settings, you can also select from available assets and pre-builds. |
| Jobs | View and print jobs of all stages, and book a new job. Depending on your settings, you can also select from available assets and pre-builds. |
| Invoices | View, print and pay unpaid invoices; view a page summary of all outstanding invoices; view and print paid invoices; view, print and save a PDF statement of invoices and payments applied, filtered by date range. |
| Tasks | View a basic summary of tasks the customer is associated with. |
| Sites | View and edit sites associated with their customer card file, add new sites, add new site contacts. |
| Assets |
|
| Reports |
View asset reports |
| Preferences | View and edit their own company details; view, edit and add company contacts and give portal login credentials to additional people; view assigned labour rates and response times; and view contracts and prepaid time purchased. |
 Set up your customer portal
Use the settings under System ![]() > Setup > Defaults > Customer Portal to select the menus, options and information you want displayed in your portal, and when notifications are sent.
> Setup > Defaults > Customer Portal to select the menus, options and information you want displayed in your portal, and when notifications are sent.
The settings you select apply to all customers' portals, not to an individual customer.
 Adjust general settings
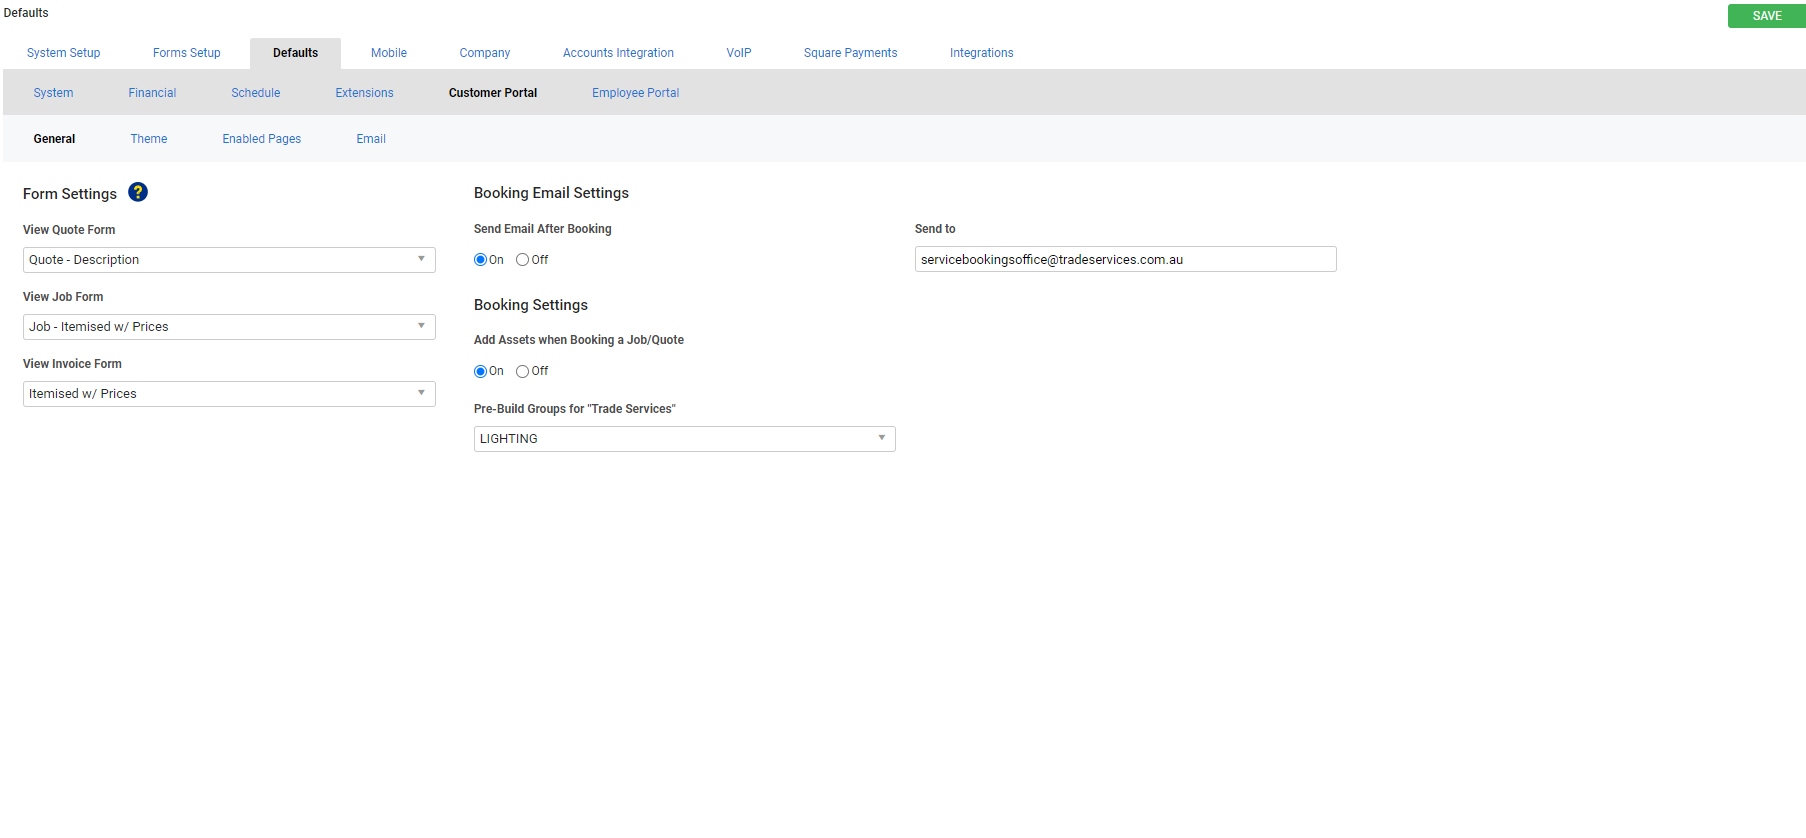
To adjust the customer portal's general settings, go to System ![]() > Setup > Defaults > Customer Portal > General.
> Setup > Defaults > Customer Portal > General.
When you have finished making changes, click Save.
| Form Settings | The amount and type of information a customer sees when viewing quotes, jobs and invoices in the portal depends on the forms you select here, in the same way as when you select a form to email or print a quote, job or invoice in Simpro Premium. You can adjust the way these forms look through the quote, job and invoice setup. |
| Booking Email Settings | Choose whether you would like an email to be sent whenever a customer makes a booking through the portal, and who you would like the email sent to. |
| Booking Settings |
Under Add Assets when Booking a Job / Quote, select On to enable customers to search and add assets to be serviced when they book a job or request a quote. Select the pre-build groups you want a customer to be able to select from when making a booking through the portal. This helps customers easily add pre-priced items to the quotes or jobs they create through the portal. If you are using a multi-company build, you are able to select these for each company. |
If you have selected to automatically assign customer assets to jobs in System ![]() > Setup > Defaults > System > Customer Assets > Customer Assets Auto Assign to Jobs, this setting only applies to jobs created in Simpro Premium. Learn more in How to Set Up System Defaults. Customers booking jobs in the customer portal need to manually add assets requiring maintenance. If no assets are added in the portal, there are no assets added to the job when it is pushed to Simpro Premium.
> Setup > Defaults > System > Customer Assets > Customer Assets Auto Assign to Jobs, this setting only applies to jobs created in Simpro Premium. Learn more in How to Set Up System Defaults. Customers booking jobs in the customer portal need to manually add assets requiring maintenance. If no assets are added in the portal, there are no assets added to the job when it is pushed to Simpro Premium.
 Set up Custom Theme
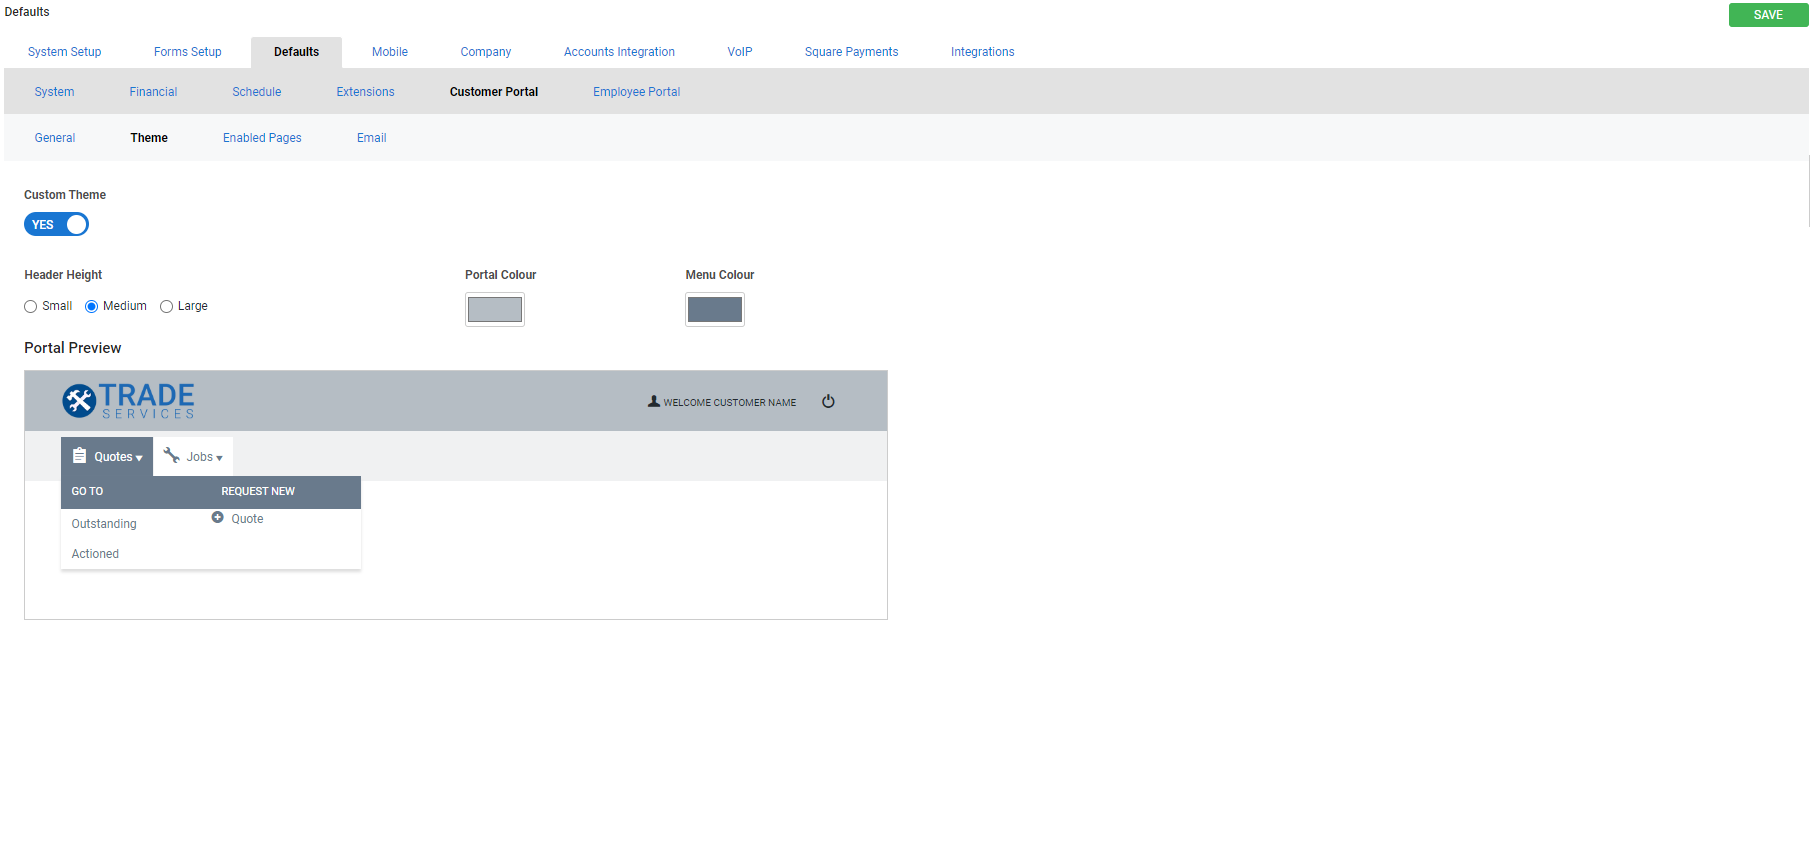
To customise the colours visible in the customer portal, go to System ![]() > Setup > Defaults > Customer Portal > Themes. Instead of standard colours, you can use your own brand colours to customise the look of all pages in the customer portal. The logo that appears in the customer portal banner is pulled from the Company Logo section under System
> Setup > Defaults > Customer Portal > Themes. Instead of standard colours, you can use your own brand colours to customise the look of all pages in the customer portal. The logo that appears in the customer portal banner is pulled from the Company Logo section under System ![]() > Setup > Company. If no logo is uploaded the Simpro logo is used by default. Learn more in Add your company logo.
> Setup > Company. If no logo is uploaded the Simpro logo is used by default. Learn more in Add your company logo.
In multi-company builds, the appearance of the customer portal is always shared, regardless of sharing options available, the customer portal will always show the template company logo.
- Toggle on Custom Theme.
- Update the Header Height to suit your logo dimensions.
- Pick a suitable Portal Colour and Menu Colour from the RGB colour selector to set the colour that is displayed in the customer portal.
- The Portal Preview shows how the banner will appear in the customer portal with your company logo and colours.
- When you have finished making changes, click Save.
 Adjust enabled pages
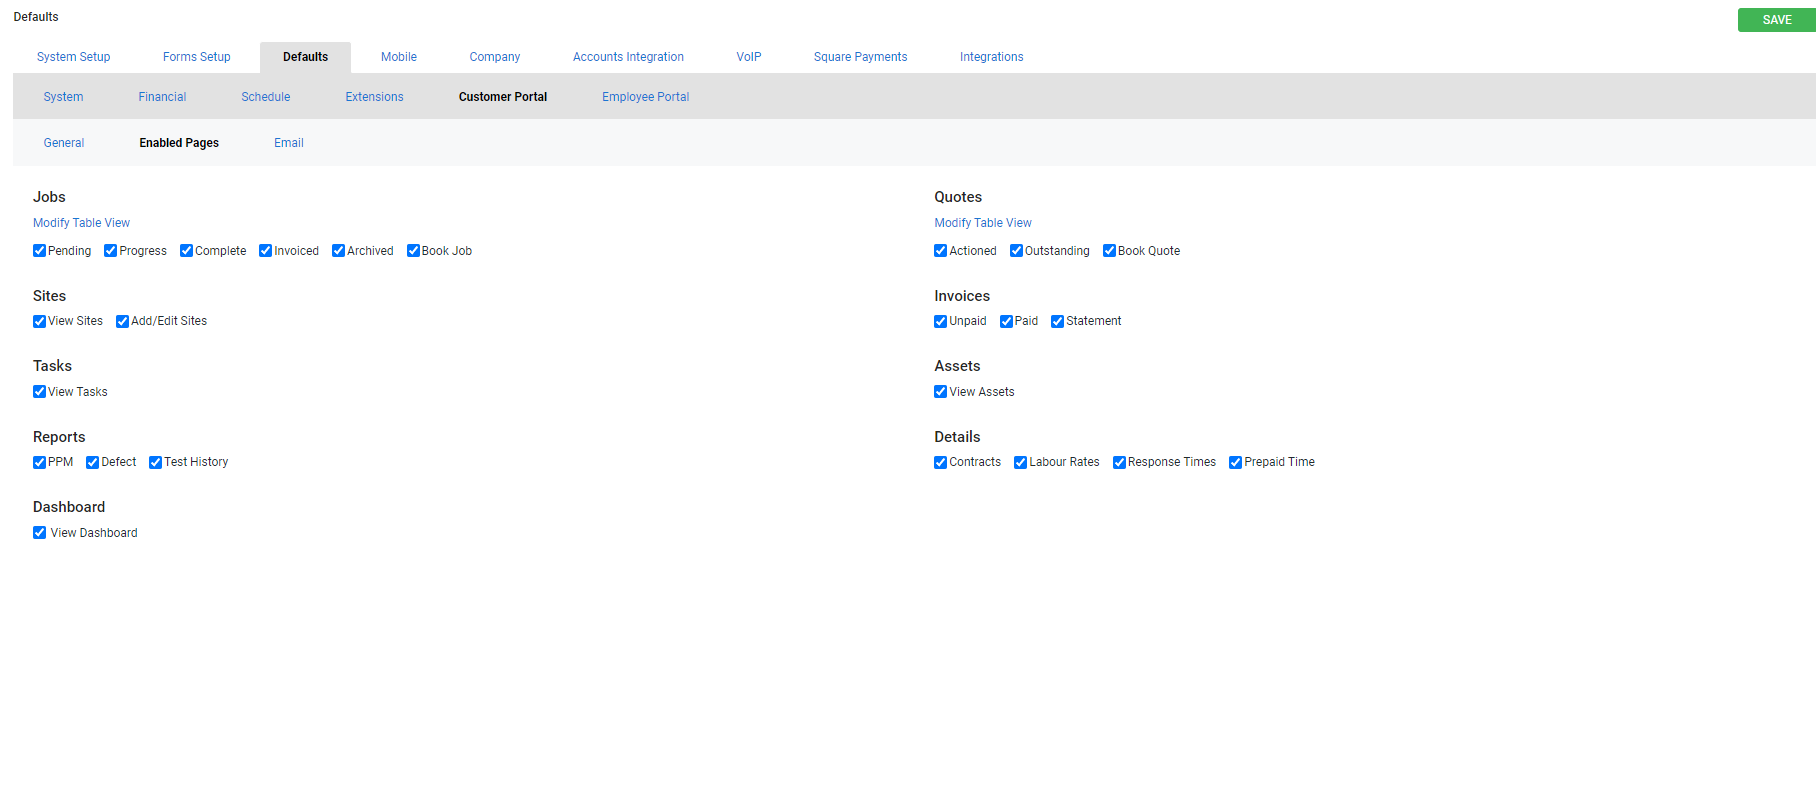
To adjust the pages visible in the customer portal, go to System ![]() > Setup > Defaults > Customer Portal > Enabled Pages.
> Setup > Defaults > Customer Portal > Enabled Pages.
Use the Modify Table View option for Jobs / Quotes to customise the information displayed in quotes / jobs tables in the Customer Portal.
These settings change which pages a customer is able to see in the customer portal's main menu and the Preferences menu.
When you have finished making changes, click Save.
Quote / Job Viewer
To manage the visible fields in the customer portal, go to System ![]() > Setup > Defaults > Customer Portal > Enabled Pages.
> Setup > Defaults > Customer Portal > Enabled Pages.
Quotes that have been set to the Approved Stage in Simpro Premium display in the Outstanding page in the Customer Portal. Once a job has been converted to a job, the quote moves to the Actioned page in the Customer Portal.
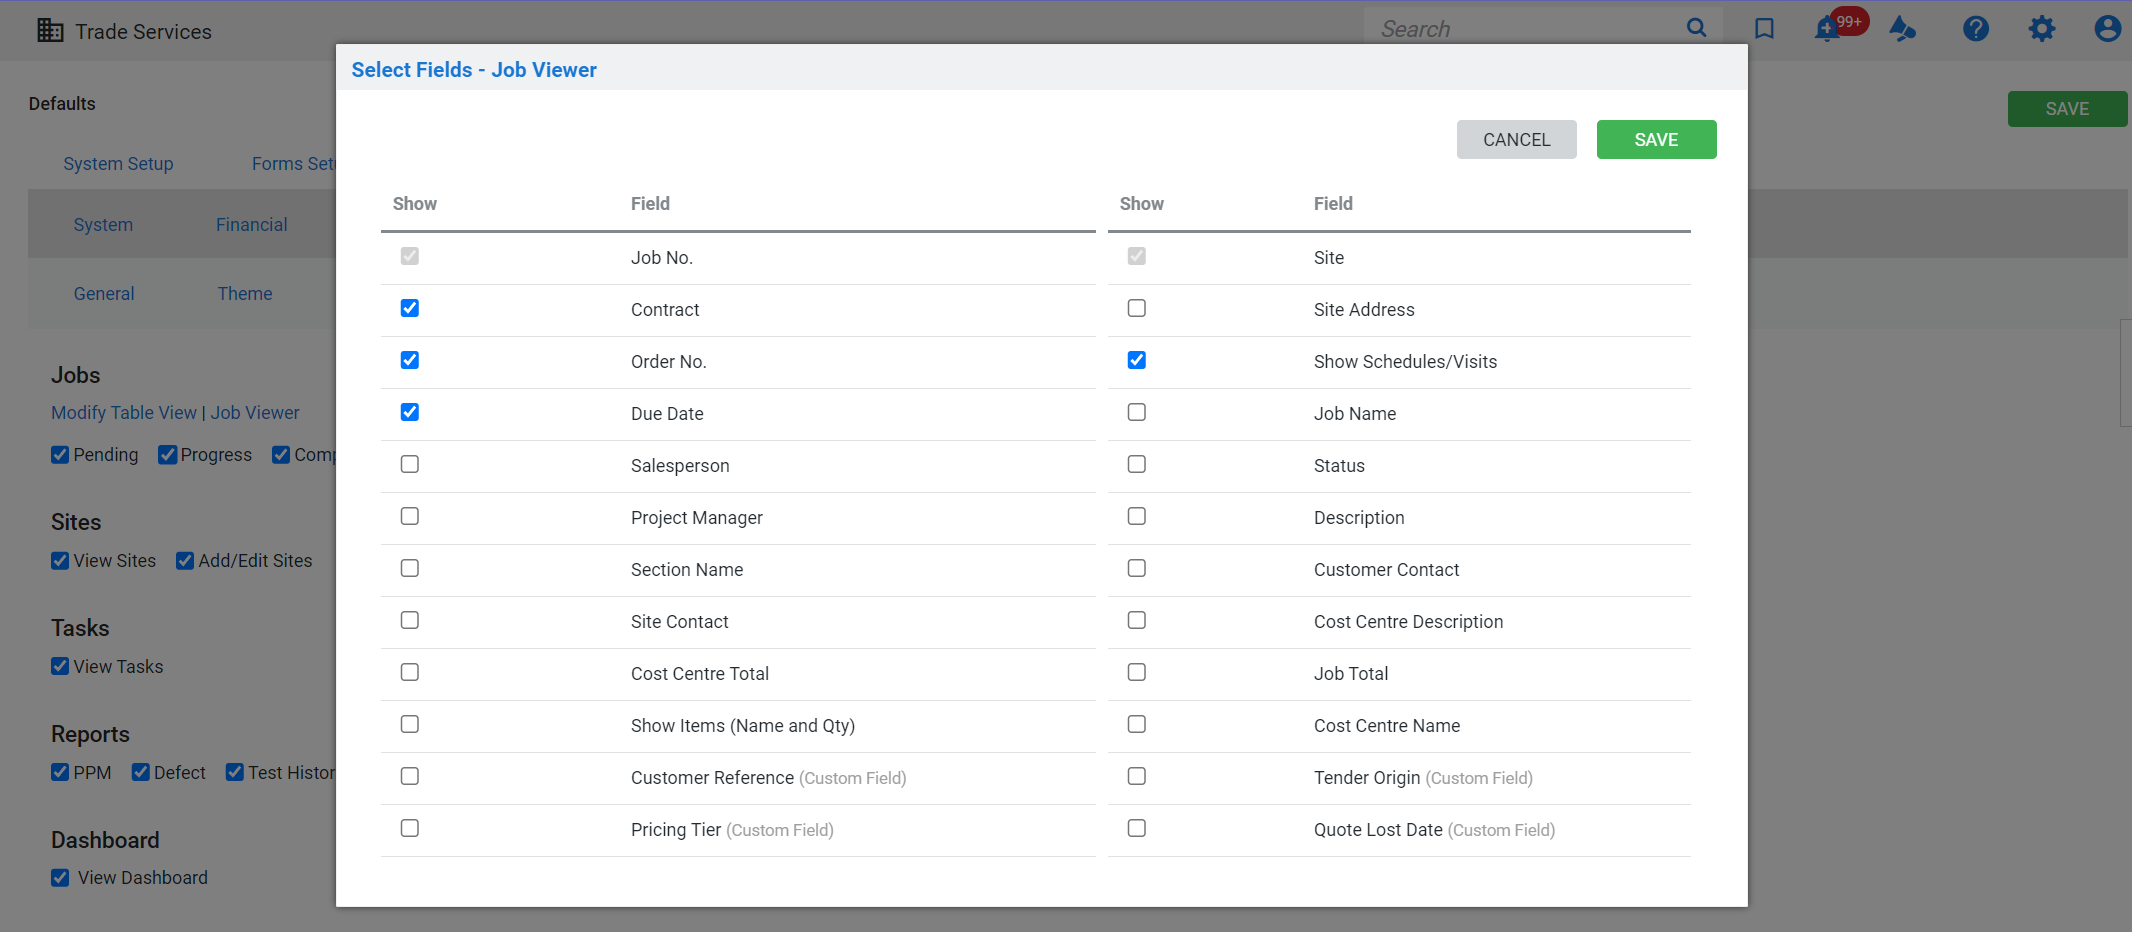
Under Enabled Pages, you can access the Quote /Job Viewer to adjust which fields are displayed in the Customer Portal.
In the Select Fields - Quote/Job Viewer pop-up window, select the fields that should be visible on the customer portal and click Save.
 Enable online payment
If you have activated Simpro Premium Payments and want your customers to be able to pay invoices through the customer portal, you need to first enable this option. See Use Integrated Payments in the customer portal.
 Adjust email settings
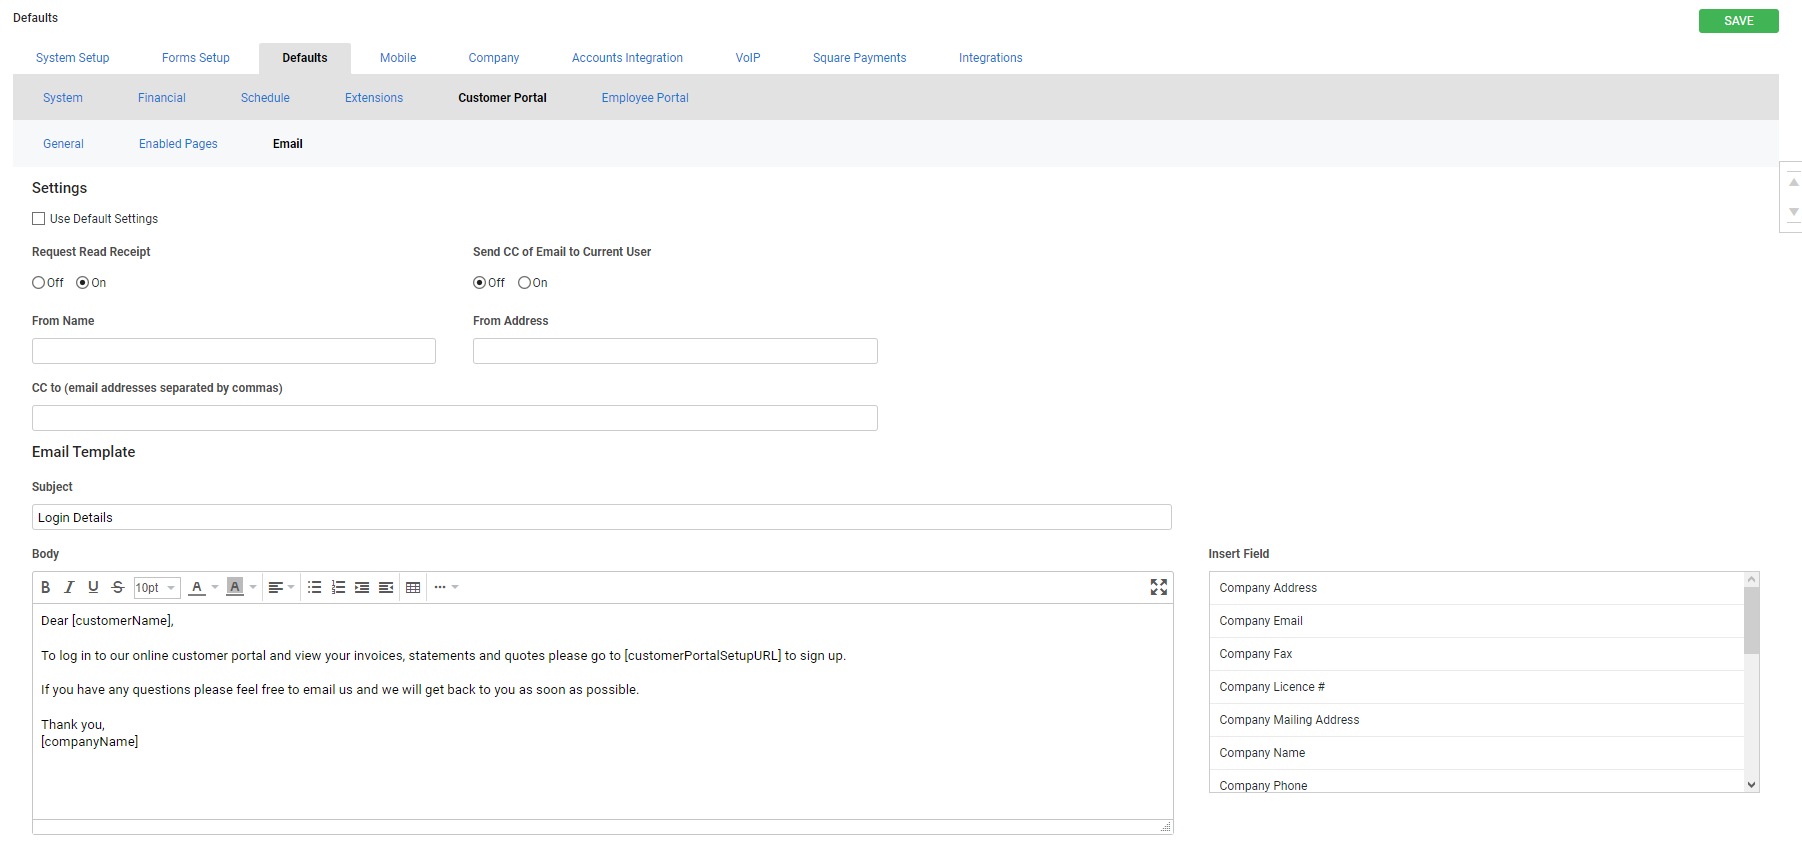
To adjust the settings and template of the email used to send customers their portal login details, go to System ![]() > Setup > Defaults > Customer Portal > Email.
> Setup > Defaults > Customer Portal > Email.
Select Use Default Settings to use the system-wide email settings selected in System ![]() > Setup > Forms Setup > General > Email Setup, or adjust the read receipt and CC details as required.
> Setup > Forms Setup > General > Email Setup, or adjust the read receipt and CC details as required.
Adjust the default Email Template text as required, and click options in from the Insert Field list to personalise your message as required. Ensure the [customerPortalSetupURL] field remains in the template, to provide customers with the information they need to log in to the portal.
It is recommended that you include a link to our Customer Portal: Guide for Customers in the email to provide your customers with instructions on how to use the customer portal. If necessary, you can copy and paste only the sections that are applicable to your customer portal.
 Add your company logo
To have your company logo appear on the login page of the customer portal:
- Go to System
 > Setup > Company.
 - Underneath Company Logo, click Choose File / Browse.
- Find the image file saved on your computer and open it.
- The file name appears next to the Choose File / Browse button.
- Click Save.
Your company logo is visible on all pages in the customer portal.
 Test your customer portal
Before giving customers access to your customer portal, or after making changes to the portal settings, it is recommended to log in to your customer portal to test how it looks and works.
To test your customer portal:
- Create a customer card file for testing purposes, or open an existing customer's card file.
- Go to Profile > Settings.
- Send the setup email to register the test customer, or use previously created login details.
- Click Finish.
- Click the logout icon in the top right of the screen to log out of Simpro Premium.
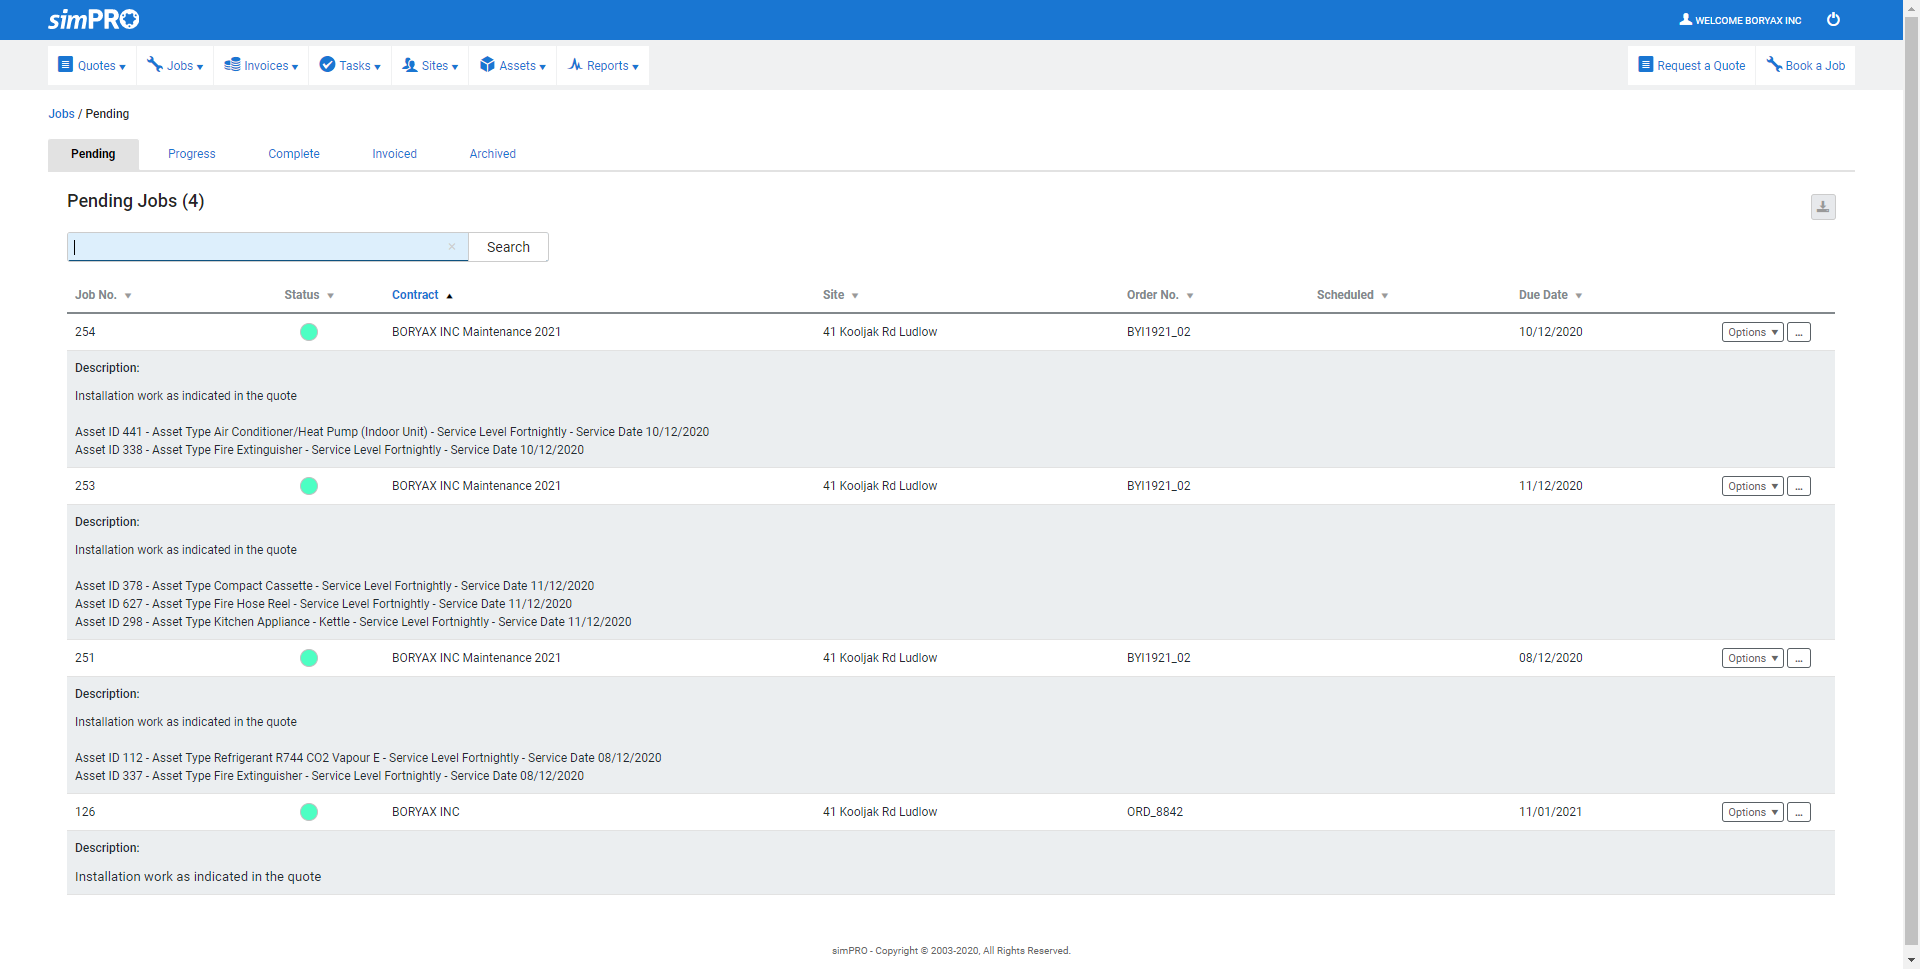
- In the browser's address bar at the top of the screen, in your build address, such as yourbuild.simprosuite.com, change /staff to /customer and delete any text to the right. See screenshot above for reference.
- Press Enter on your keyboard.
- This is the screen your customers see when they log in. Enter the Username and Password.
- Click Login.
This is your customer portal. While it looks very similar to your regular Simpro Premium build, notice several key differences, such as the Request a Quote and Book a Job buttons in the top right corner if selected in Enabled Pages.
Test various functions of the portal to see how your customers view information and the features available to them. You may also wish to work through the Customer Portal: Guide for Customers to understand the steps a customer follows to use the system.
To return to your Simpro Premium build, log out of the build and change the URL in your browser's address bar from /customer to /staff again.
 Give a customer access to the portal
 Set up customer login details
To set up a customer portal login for a new customer:
- Access or create a customer with a valid email address entered in the Profile > Details tab.
- Go to the Settings tab and click Send Setup Email > OK.
- If the customer needs the email to be resent, click Would you like to resend? > OK.
- After you fill in other details on the customer card, click Save and Finish > Send Login Setup.
- Click OK to send an email to your customer with steps to set up access to the customer portal.
Note that to gain access to the customer portal, your customer must follow the instructions sent in the setup email.
After the initial account set up, customers can manage their passwords from the customer portal or contact the Simpro Premium client to send a password reset email from the staff portal.
To reset password from the customer portal:
- Log into the customer portal using the customer's Username and Password, as set up earlier.
- Hover over the customer's name in the top right corner and click Preferences.
- Click Change Password.
- Update the password as required and click Save.
 Manage customer logins
If your customer has set up their login details for the customer portal, you can manage their access in the Settings tab.
- Open a customer that has a username and password.
- Under Username > Options:
- Reset Password: This sends an email to the customer’s listed email address with a link to set up their username and password.
- Disable Access: If you select this option, next time the customer attempts to log in, an error message displays.
 View a log of a customer's portal use
If you would like to know how frequently - or infrequently - a customer is using the customer portal, you can view their usage log. This provides details of login times, along with times certain activities were performed, such as booking a quote through the portal.
To view a log of a customer's portal use:
- Go to People
 > Customers.
 - On the customer, click Options > View > Customer Portal.
- When you have finished viewing the log, click the
 icon in the top right corner to close the window.
 View quotes and jobs created in the customer portal
If you have enabled the feature, customers can request quotes and book jobs through the customer portal. When they do this, you receive an alert in Simpro Premium, and an email if enabled under the customer portal email settings.
Alerts can be found under the red Alerts icon at the top of the screen.
To view quotes and jobs created in the customer portal:
- When you receive an alert, click the red alerts icon at the top right of the screen.
- View new quotes or jobs under the Quotes and Jobs headings.
- If a quote or job was created in the customer portal, its Alert column states 'New quote / job created through customer portal'.
- Click the quote or job number to open it, view details, and complete or schedule it as usual.
 Walk Me Through
Need additional help?
Try Walk Me Through, our step-by-step guidance tool, to set up the customer portal and send login details.
In Simpro Premium, go to Help ![]() > Walk Me Through and search Customer Portal or Login Details.
> Walk Me Through and search Customer Portal or Login Details.
Learn more in How to Use Walk Me Through in Simpro Premium.
