Last Updated: December 12 2025
Overview
The Forms Setup tab is located under System ![]() > Setup > Forms Setup. In the General page, you can set up the default page layout, PDF viewer options, and email template settings for all forms in Simpro Premium. The basic form display types are listed in Basic Form Display Types.
> Setup > Forms Setup. In the General page, you can set up the default page layout, PDF viewer options, and email template settings for all forms in Simpro Premium. The basic form display types are listed in Basic Form Display Types.
To adjust settings for a specific form, simply click the form in the menu to the left. See Forms Setup to access setup information for each type of form in Simpro Premium.
 Required setup
In order to view content or perform actions referred to in this article you need to have the appropriate permissions enabled in your security group. Go to System![]() > Setup > Security Groups and access your security group to update your permissions. The relevant security group tab and specific permissions for this article can be found here:
> Setup > Security Groups and access your security group to update your permissions. The relevant security group tab and specific permissions for this article can be found here:
 Page Setup sub-tab
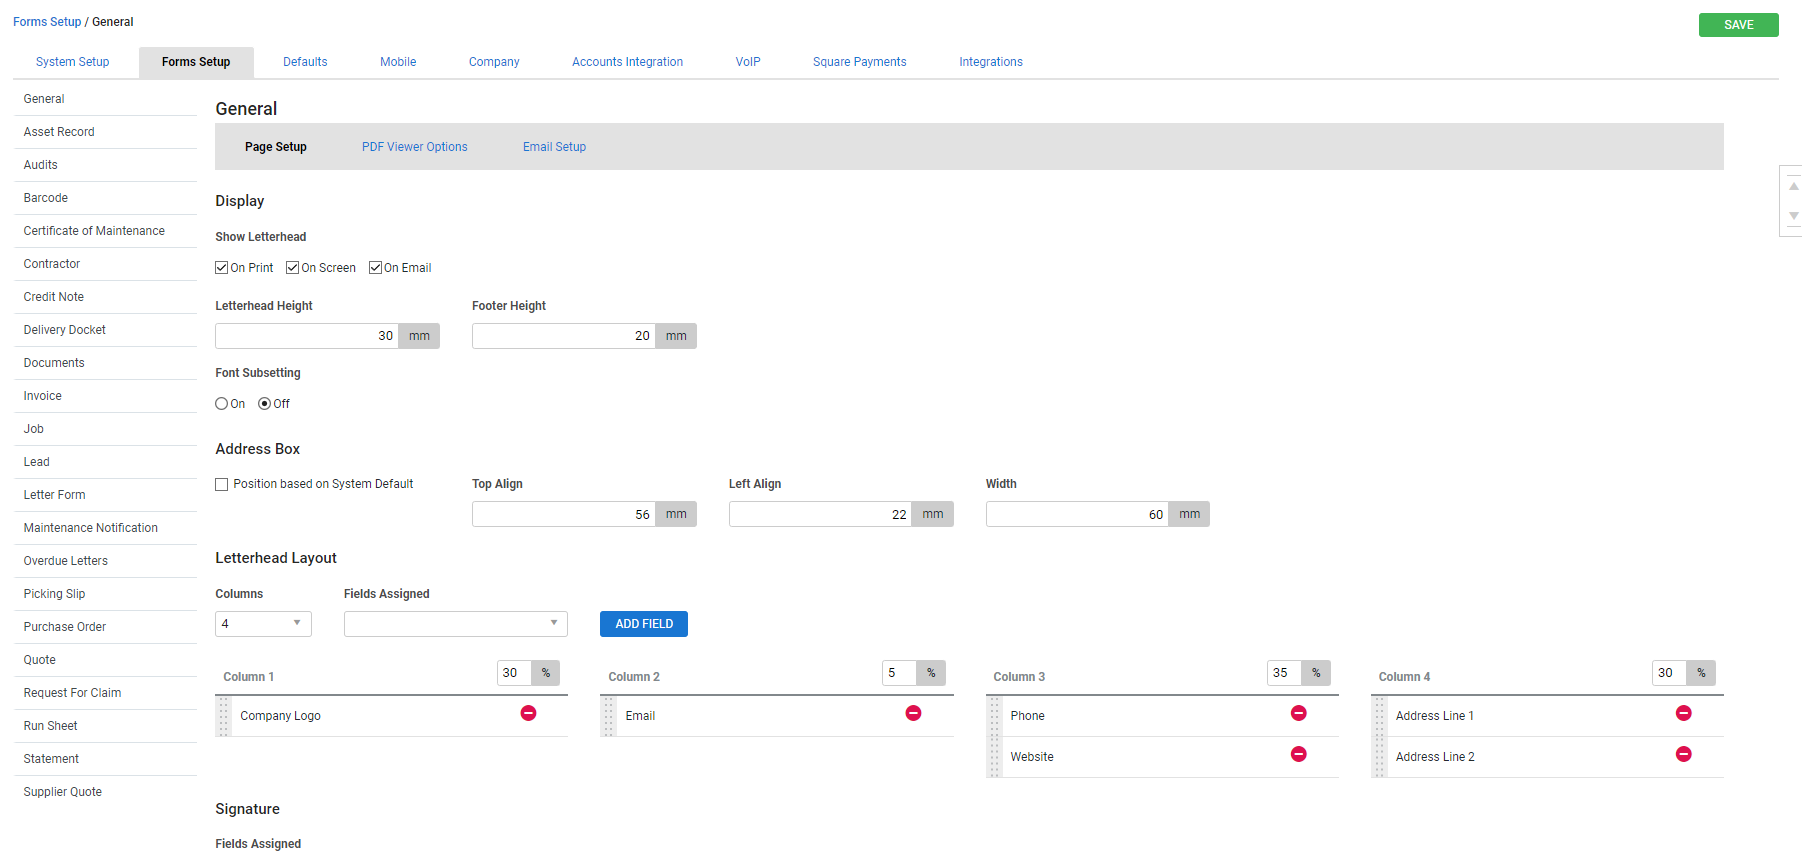
Use the options under the Page Setup sub-tab to control form layout.
The options available are:
| Show Letterhead | Select the options to choose if you want the letterhead to be visible on screen, in print or in emails. You can also enter the Letterhead Height and Footer Height below. |
| Font Subsetting | This is enabled by default. You would only need to turn this off if you need to edit your PDFs outside of Simpro Premium. |
| Address Box | Select whether the address box should have its Position based on System Default, or set the alignment and width manually. The default setting suits window-faced envelopes. |
| Letterhead Layout |
Adjust how the letterhead appears on your form. You can add one to four columns to a letterhead, and assign each column a percentage of the available width. Assign and manage fields for each column, and use the drag handles to reposition fields. |
| Signature |
Select fields such as the Logged-In Employee Name, Company Name, and Company Email to display at the bottom of letter forms. Learn more in How to Set Up Letter Forms. If you have uploaded a PNG or JPEG image of each employee's signature in their relevant card file and selected it as the Default image, the form displays this signature when you add the Logged-In Employee Signature field. Learn more in Add attachments. |
If you have uploaded your company letterhead as a PDF Background in the System ![]() > Setup > Company, adjust the letterhead layout settings as required to avoid overriding or duplicating information displayed.
> Setup > Company, adjust the letterhead layout settings as required to avoid overriding or duplicating information displayed.
 PDF Viewer Options sub-tab
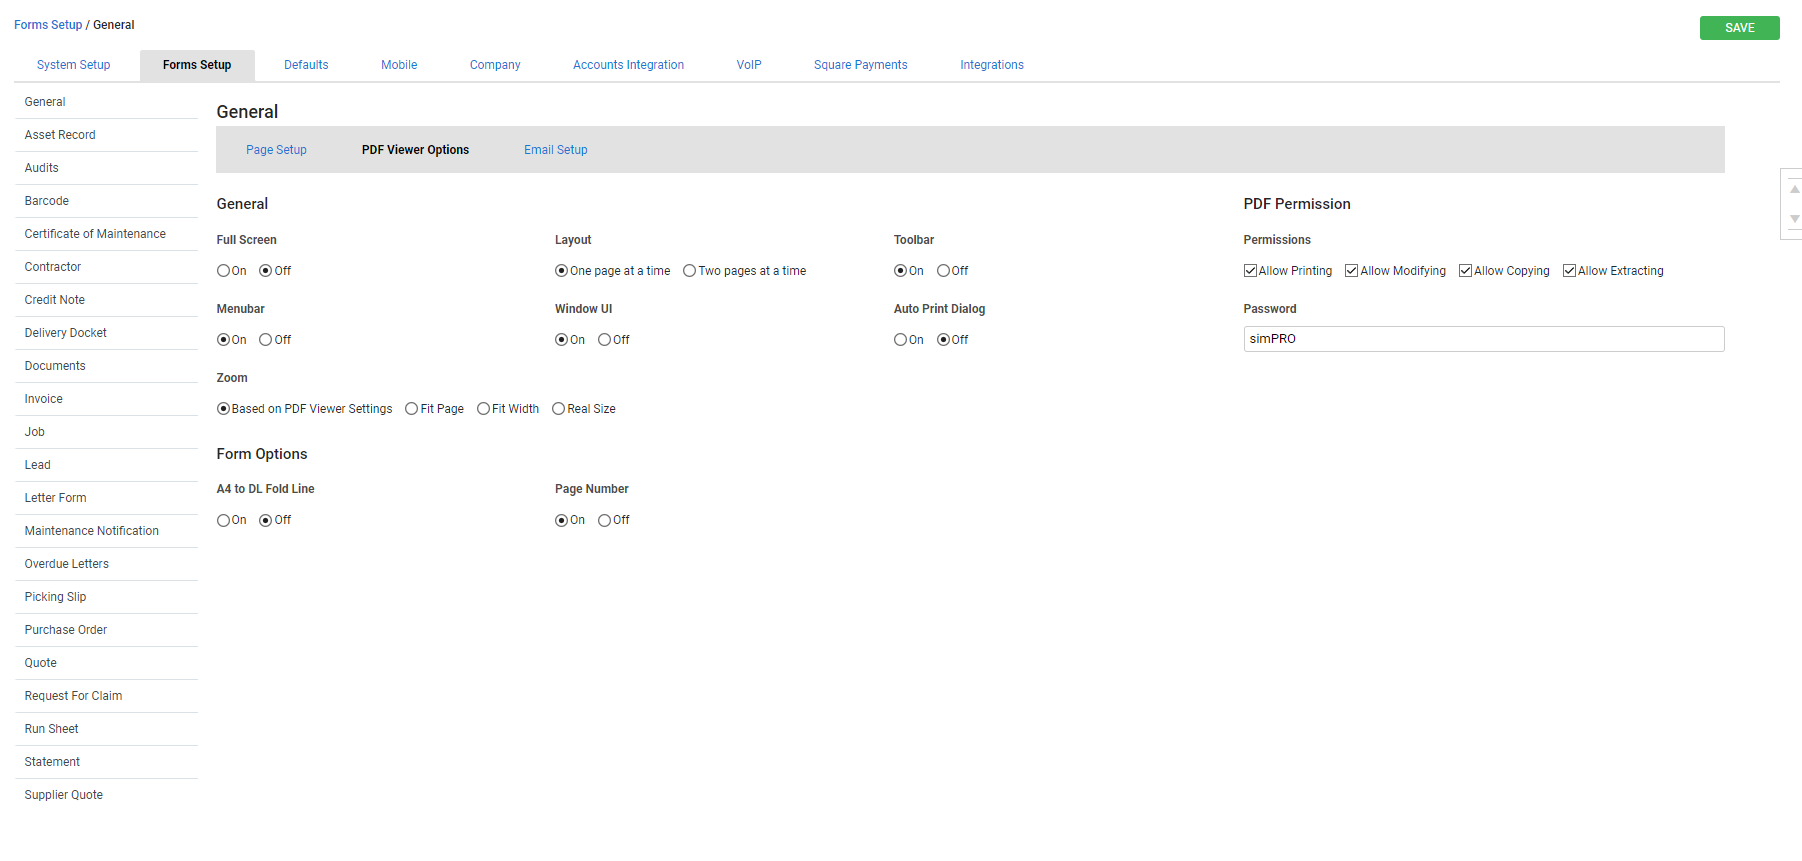
Use the options under the PDF Viewer Options sub-tab to control how form PDFs are viewed in Simpro Premium.
The options available are:
| General | Adjust the basic settings of Simpro Premium's PDF Viewer, such as Full Screen, Layout, Toolbar and Zoom. |
| Form Options | Choose whether to print a DL fold line, and whether the Page Number displays. |
| Select if you wish to Send Email With Company Logo. | |
| PDF Permission | Limit access to PDFs by setting a password to print, modify, copy or extract. |
 Email Setup sub-tab
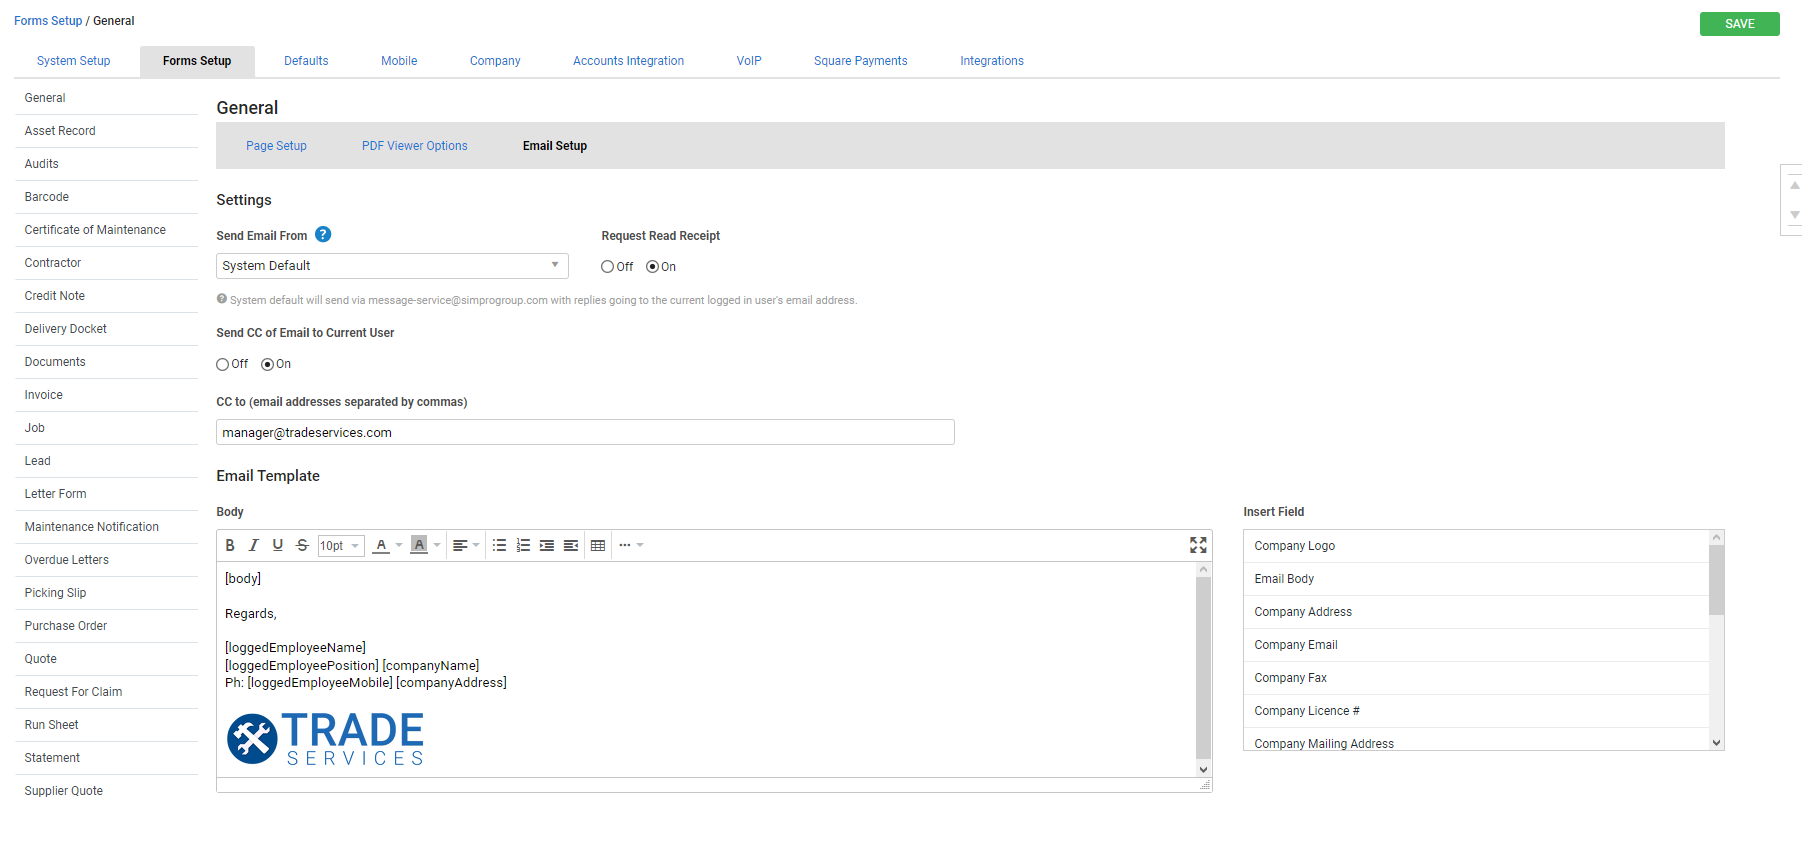
Use the Email Setup sub-tab to apply system-wide settings to all emailable forms. If you wish to adjust email template settings for an individual form, for example in System ![]() > Setup > Forms Setup > Invoice > Email, these default settings are overridden.
> Setup > Forms Setup > Invoice > Email, these default settings are overridden.
If you need to adjust an email template of a form for an individual customer, you can make changes to the email Subject and Message when sending the email from the Forms tab. The original template remains the same.
The options available are:
| Send Email From |
System Default: The From Name and From Address fields are not available to edit when sending an email. Emails send from message-service@simprogroup.com. Replies to an email is delivered to the email address of the user logged in when the email was sent. Use Logged in User's Email Details: Emails send from the logged-in user's email address defined in their employee / contractor card. The company email address is used if there is no email saved in their employee / contractor card. Manually Specified Below: Add a From Name and From Address for sending emails. Ensure your SPF record is set up first. |
| Request Read Receipt | Choose whether to request and receive read receipts for sent emails. |
| Send CC of Email to Current Logged In User | Choose whether to send a copy of the email to the logged-in user. |
| CC to | Add any email addresses you want to automatically receive a copy. This is the default Cc. You can also select additional Cc in leads / quotes / jobs / invoices in the Forms tab. |
| Email Template | Create a template to apply to all emails sent through Simpro Premium, using insert fields to automatically generate details. The [body] field must be used if you have customised text in each individual form's Email Template in Forms Setup, and you can also insert other fields such as the sender's name and role, images and hyperlinks. This template applies regardless of whether email signatures have been set up on individual forms, so adjust settings accordingly. |
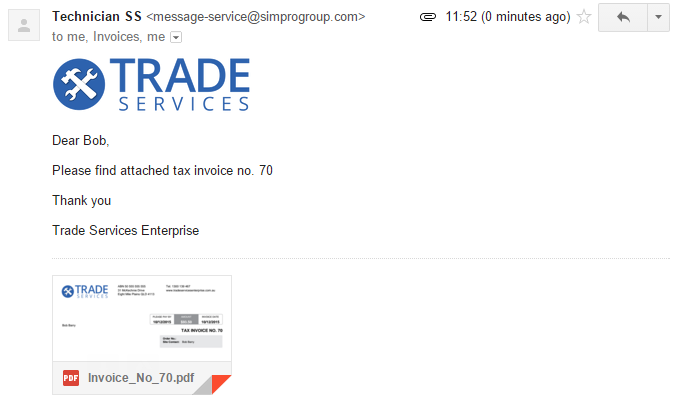
Below is an email sent using the email template in the screenshot above.
If you have a multi-company build, enabling an email signature applies it across all companies. To make each company display its own logo in email signatures, insert the Company Logo tag.
When using the insert field Company Logo the logo is inserted using the same size as the uploaded file. To adjust the size of the inserted logo, adjust and re-upload the logo file in System ![]() > Setup > Company. Learn more in How to Set Up Company Information.
> Setup > Company. Learn more in How to Set Up Company Information.
 Walk Me Through
Need additional help?
Try Walk Me Through, our step-by-step guidance tool, to set up forms.
In Simpro Premium, go to Help ![]() > Walk Me Through and search General Form Setup.
> Walk Me Through and search General Form Setup.
Learn more in How to Use Walk Me Through in Simpro Premium.


