Last Updated: December 12 2025
Overview
Create employees in Simpro Premium to manage their details and schedule them to jobs.
You can also give your employees access to Simpro Mobile, the employee portal, or Simpro Premium itself so they can view their schedules and update their jobs, as well as manage their team. Learn more in Simpro Mobile, and How to Set Up the Employee Portal.
After you have created your employees, learn how to manage them from the employee table. Learn more in How to Manage Employees. To learn how to export employees in bulk, see How to Export Employees.
 Required setup
In order to view content or perform actions referred to in this article you need to have the appropriate permissions enabled in your security group. Go to System![]() > Setup > Security Groups and access your security group to update your permissions. The relevant security group tab and specific permissions for this article can be found here:
> Setup > Security Groups and access your security group to update your permissions. The relevant security group tab and specific permissions for this article can be found here:
 Create an employee
To create an employee, go to People ![]() and click Create New Employee. Alternatively, go to People
and click Create New Employee. Alternatively, go to People ![]() > Employees > Create Employee. Once you have entered all relevant information, click Finish to create the employee in Simpro Premium.
> Employees > Create Employee. Once you have entered all relevant information, click Finish to create the employee in Simpro Premium.
 Enter details
To enter employee name, employment and contact details:
- Create or access the employee as normal.
- Enter the Employee Name and Position.
- Upload an employee profile photo, if required.
- The image must be either a JPG or PNG. You can Crop Photo to adjust the uploaded image, as required.
- This image appears on the service dashboard, when a technician has updated their mobile status.
- When you log into an account with an uploaded profile photo, this photo replaces the Account icon in the System
 menu.
menu. - You can view the profile images in the Employee table by modifying the table view.
- If you have email notifications for customers that trigger before or after the scheduled date, you can add the scheduled technician's details, including their profile picture, to these emails.
- AU / NZ / US: Click Search Address and enter the required address. Choose from the suggestions list to populate the Street Address, Suburb, State / Province and Postcode.
- Alternatively, enter the Street Address details manually.
- If your site does not have a street address, such as a sign on the side of a road or a structure in the middle of a large park, you can enter the longitude and latitude of the site, for example -27.580695, 153.129879, and Simpro Premium will pin the site to that exact location on the map.
- UK: Enter the Street Address details manually. Enter the Postcode, then click outside the text box to generate a selection of addresses.
- IE: Enter the Street Address and Eircode manually.
- To record international addresses, you can select the required country and enter in the appropriate address manually.
This is used for calculating travel distance to jobs. - Select the employee's Date of Commencement and Date of Birth.
- If you have integrated Simpro Premium with Simtrac, click Connect to Simtrac to log in to Simtrac and register a vehicle to the employee. Learn more in How to Integrate Simtrac and Simpro Premium.
- Enter Primary Contact Details as applicable.
- It is mandatory to enter an Email address.
- Click Save and Finish.
 Enter custom information
Use the Custom sub-tab to store additional information under custom fields created in System ![]() > Setup > Custom Fields. You can then search using these custom fields in local and global searches.
> Setup > Custom Fields. You can then search using these custom fields in local and global searches.
Learn more in How to Use Custom Fields.
 Adjust employee settings
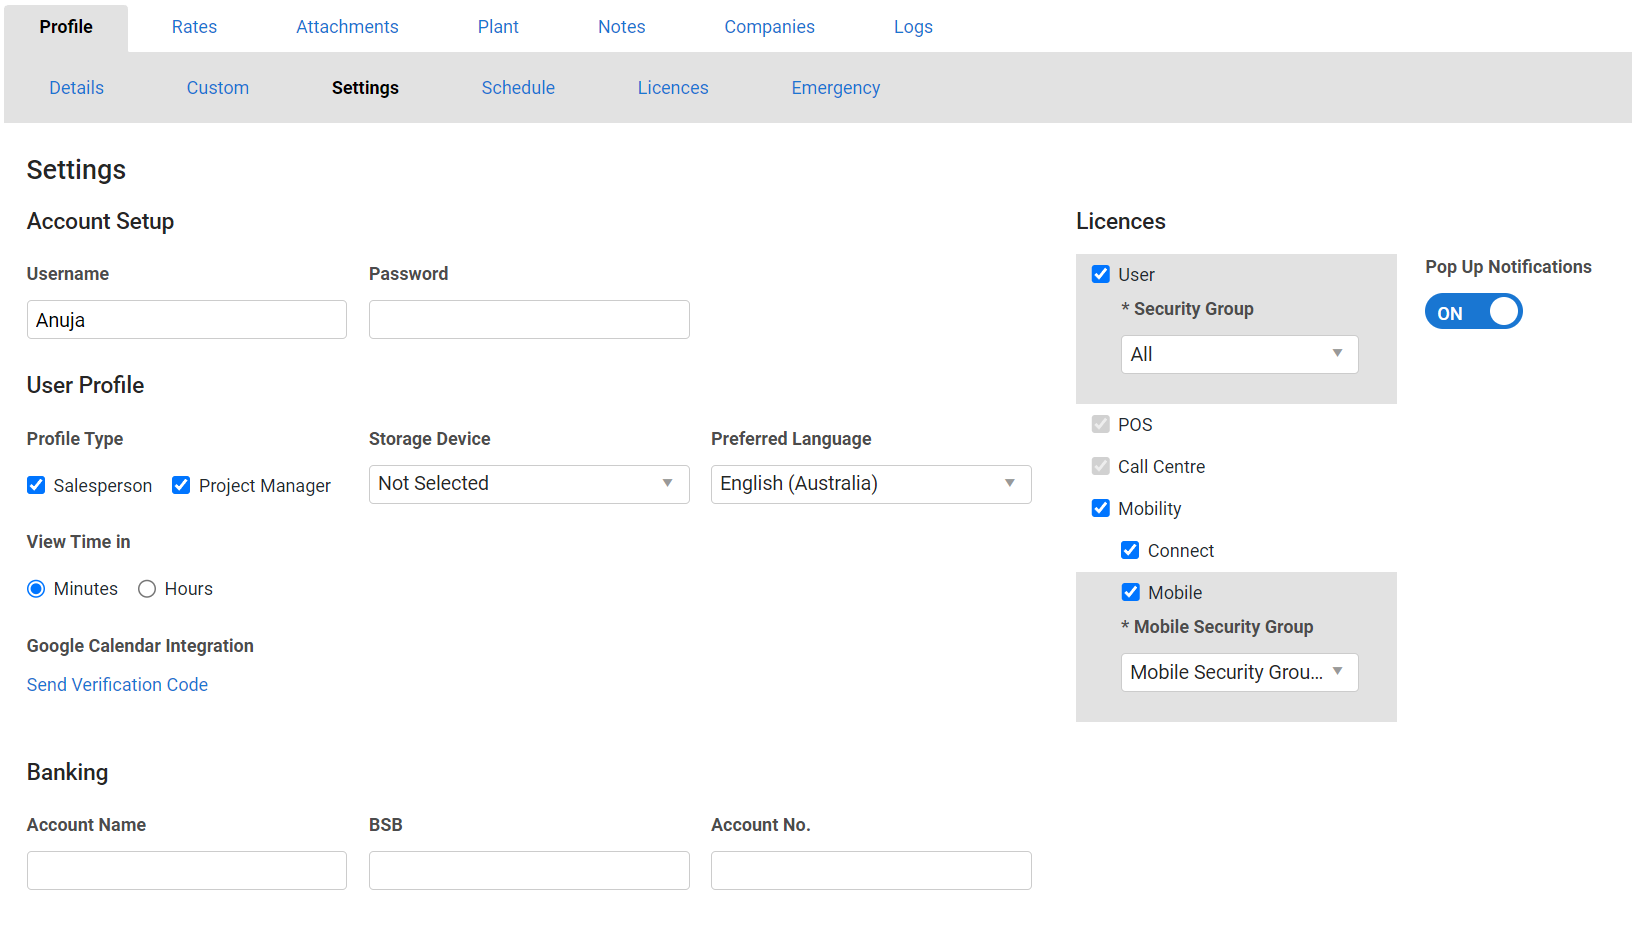
Go to Settings to adjust account, user and banking settings for an employee.
To enable access to log in to Simpro Premium, the employee portal, Simpro Mobile:
- Access the employee, then go to Profile > Settings > Account Setup.
- Enter a Username and Password.
- Passwords must be at least eight characters long and include one number, one lowercase letter, one special character and one capital letter.
- Providing an employee a username and password also grants them access to the employee portal. Learn more in How to Set Up the Employee Portal.
- Toggle on Pop Up notifications to be notified of any important events that are triggered in Simpro Premium. Learn more in How to View Pop up Notifications.
- Select the applicable Licences:
- Select User to enable access to Simpro Premium.
- Select Customer Hub to enable access to the Customer Hub. Learn more in How to Use the Customer Hub.
- Select Mobility to enable access to Simpro Mobile.
Select POS and / or Call Centre to enable access. - Select Takeoffs to enable access to Simpro Takeoffs. Learn more in About Simpro Takeoffs.
- All employees with a username and password can log in to the employee portal regardless of licences.
- If the employee has a user licence, select a Security Group. Learn more in How to Set Up Security Groups.
- If the employee has a Mobility licence, select a Mobile Security Group. Learn more in How to Set Up Simpro Mobile Security Groups.
- Click Save and Finish.
If you have given an employee access to Simpro Premium, Simpro Mobile or the employee portal, you can adjust their account settings under User Profile.
To adjust user profile settings:
- Access the employee, then go to Profile > Settings > User Profile.
- Select if the employee is a Salesperson or Project Manager.
- Select a Storage Device if applicable.
- Select whether the employee wishes to View Time in Minutes or Hours.
- Select the Preferred Language.
- Click Send Verification Code to integrate with Google Calendar. Learn more in Google Calendar Integration.
- Click Save and Finish.
Go to Settings > Banking to enter banking information for an employee for your reference.
 Set schedule availability
You can set an employee's available hours for individual days, weekends, or all weekdays, as well as assign them to cost centres![]() US: Cost Center. A method for separating operational costs of the business for reporting and financial management., zones
US: Cost Center. A method for separating operational costs of the business for reporting and financial management., zones![]() A designated area or territory that can assist in scheduling and reporting. and teams
A designated area or territory that can assist in scheduling and reporting. and teams![]() A group of employees, contractors and / or plant items that can be scheduled as one unit.. Employees cannot be scheduled to a job or quote unless they are assigned to the same cost centre and / or zone as the job / quote.
A group of employees, contractors and / or plant items that can be scheduled as one unit.. Employees cannot be scheduled to a job or quote unless they are assigned to the same cost centre and / or zone as the job / quote.
Learn more about cost centres in How to Use Cost Centres.
Learn more about zones in How to Use Zones.
Learn more about teams in How to Create Teams.
To set schedule availability:
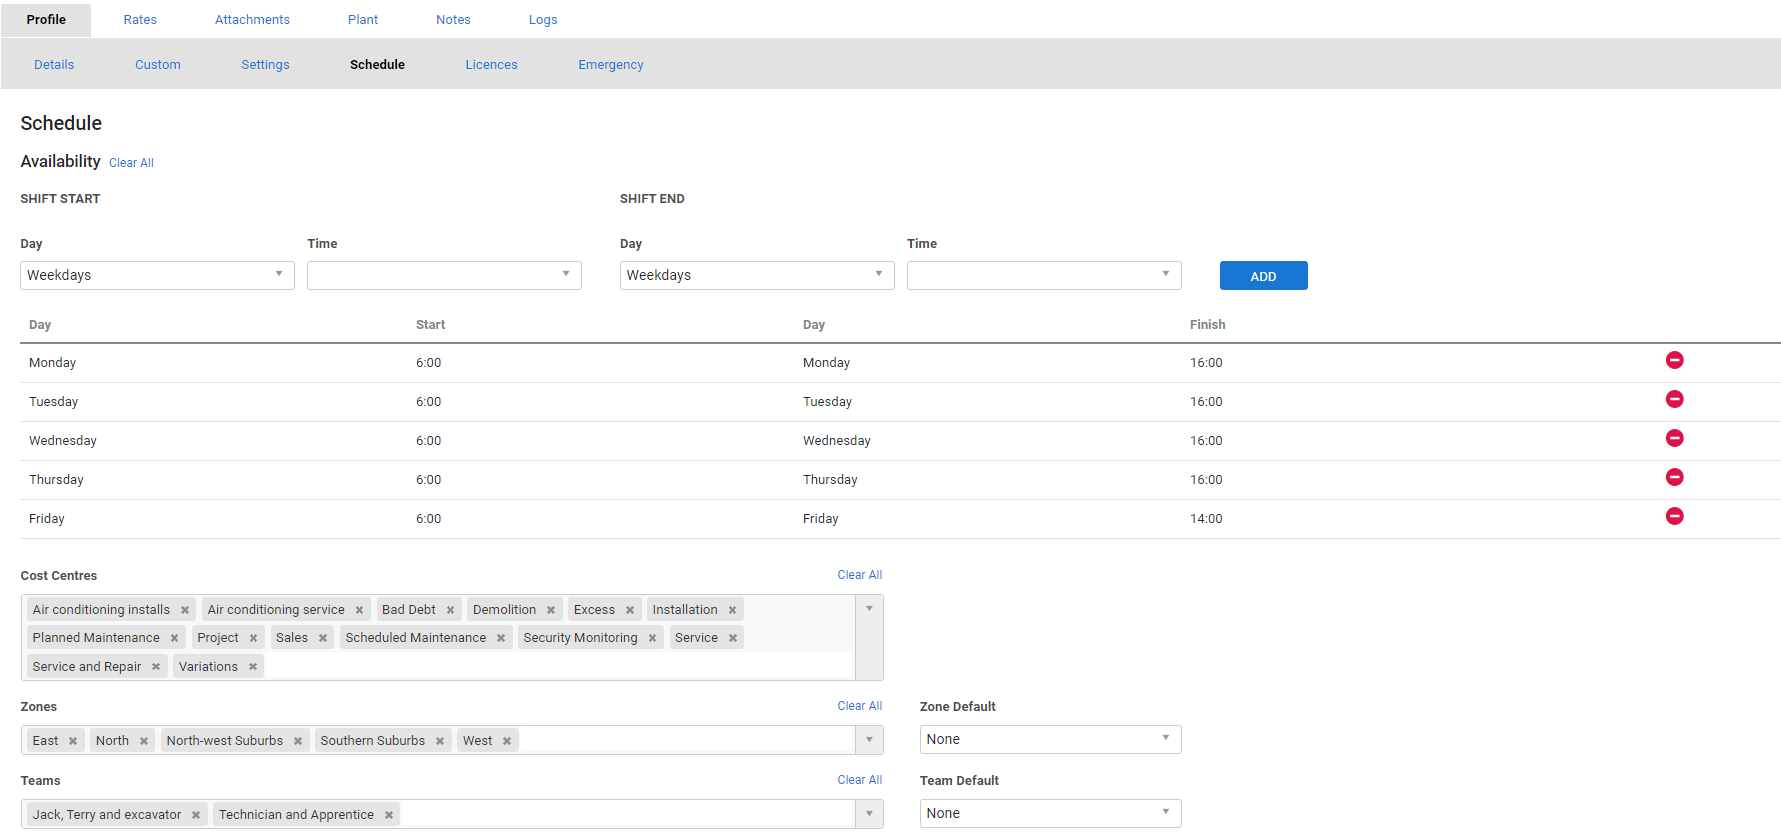
- Access the employee, then go to Profile > Schedule.
- Under Shift Start, select the Day or days you wish to schedule for, then select a starting and ending Time.
- Click Add.
- Repeat as necessary until complete.
- Select from the Cost Centres, Zones and Teams drop-down lists as required. Alternatively, select Add All.
- Note that a Cost Centre must have an Income Account selected before it can be added to an employee's schedule availability. Learn more about creating income accounts in How to Set up Chart of Accounts. Learn more about assigning accounts to cost centres in How to Use Cost Centres.
- Select a Zone Default and Team Default if required. When the employee views the schedule, the schedule filters for employees assigned to the default zone and default team.
- Click Save and Finish.
To remove available hours for a specific day, click the ![]() icon for the day, or alternatively, click Clear next to Availability to remove all available hours.
icon for the day, or alternatively, click Clear next to Availability to remove all available hours.
To edit available hours for a specific day, select the Shift Start / End Day and Time, then click Add, and the existing shift is adjusted.
Click the ![]() icon to remove cost centres, zones or teams from a resource, or alternatively, click Clear All.
icon to remove cost centres, zones or teams from a resource, or alternatively, click Clear All.
Employees can still be scheduled outside of their available hours.
 Add licences
In the Licences sub-tab, enter any relevant licences that the employee holds, such as licences for operating machinery, site inductions, drivers licence, insurance, then click Add to keep these details for reference.
Add details, such as the licence name and reference, expiry date, a description of the licence, and any attachments.
When a licence expiry date is approaching, a warning will display for the relevant employee in Simpro Mobile and anyone with the relevant security permissions will receive an alert in Simpro Premium. Learn more in How to View Alerts. You can also set up a notification to be alerted a specified number of days prior to the licence expiry. Learn more in How to Set Up Notifications.
If you do not want employees to be scheduled if their licence has expired, select Critical to make this a critical licence. Simpro Mobile is not affected by critical licences, and employees can still schedule themselves when their licence is expired.
When you add a new licence to an employee, it is available to select and add to other employees.
Go to Reports ![]() > View Reports > Technicians > Licences to view the Licence Matrix Report to quickly see a list of all employees and / or contractors who hold certain licences.
> View Reports > Technicians > Licences to view the Licence Matrix Report to quickly see a list of all employees and / or contractors who hold certain licences.
Remove licences
To remove a licence from an employee, click the ![]() icon. The licence is only removed from the drop-down list when it has been removed from all employees.
icon. The licence is only removed from the drop-down list when it has been removed from all employees.
 Set a pay rate and bill rates
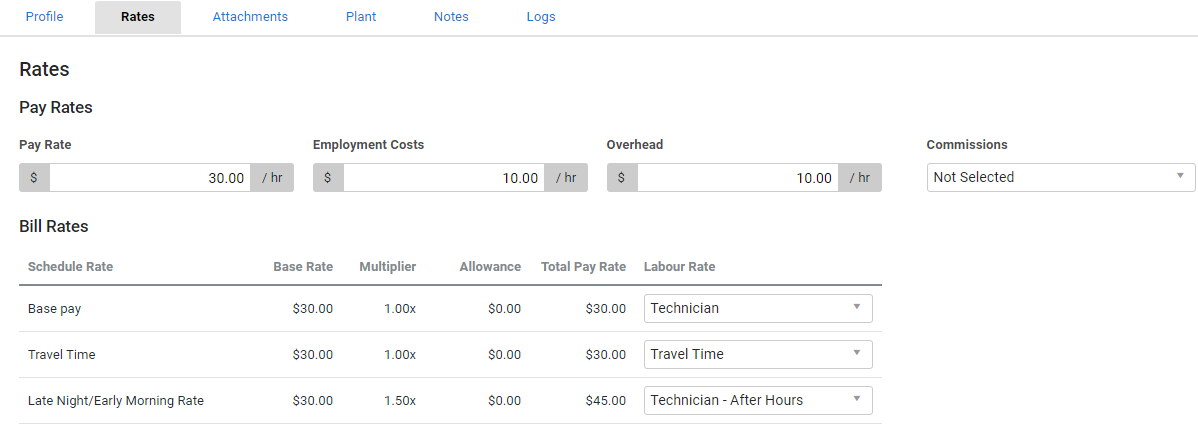
If your employees are paid by the hour, go to Rates, then enter the applicable Pay Rate, Employment Costs, Overhead, and Commissions and click Save or Finish.
| Pay Rate | This is the hourly rate that you pay your employee. |
| Employment Costs |
Employment costs, also known as labour burden costs, are the direct employment expenses for this employee. This may include sick leave, public holidays, site allowances, vehicle expenses, and other costs associated with this employee. |
| Overhead |
Overhead is the corporate cost distributed to this employee. This may include rent, marketing, insurance, office staff wages, shared vehicles, and other costs not directly associated with the employee. |
| Commissions | Select the applicable commission tier. You can set commissions for employees who are assigned the salesperson profile. Learn more in How to Set Up and Manage Commissions. |
| Base Rate | Lists the Pay Rate or the Pay Override entered under System |
| Multiplier | The amount that the Pay Rate is multiplied by when this Schedule Rate is applied. |
| Allowance | Indicates the Hourly Allowance entered under System |
| Total Pay Rate | The Pay Rate or Pay Override multiplied by the Multiplier, plus the Hourly Allowance. |
We recommend that you consult your accountant when entering employee rates.
To ensure that employee labour is calculated correctly from the schedule, you also need to set up labour rates and schedule rates. Learn more in How to Create Labour Rates and How to Create Schedule Rates.
Under Bill Rates, select the applicable Labour Rate for each Schedule Rate, then click Save or Finish.
The Allowance column is the amount added to the pay rate, entered as the Hourly Allowance in System ![]() > Setup > System Setup > Labour > Schedule Rates.
> Setup > System Setup > Labour > Schedule Rates.
 Add attachments
Go to Attachments to add, organise and download employee attachments for internal reference only. Learn more in How to Use Attachments.
You can also use attachments to add an employee signature to:
- The Employee Contact Detail block in a quote / job detail form. Learn more in How to Use the Quote / Job Detail Form.
- The Signature area using the Logged-In Employee Signature field in your General Forms Setup. Learn more in Page Setup sub-tab.
To display an employee signature in these areas:
- Access the card files of the relevant employee/s.
- Click the Attachments tab.
- Upload a PNG or JPEG image of the signature and select Default image to ensure the correct image is used by the forms.
- Click Save and Finish.
 View plant items
Go to Plant to view any plant items![]() Equipment that your business owns and maintains, such as vehicles, mobile devices, machinery, specific tools, etc. that have been checked out to the employee. Learn more about plant items in How to Create Plant Items.
Equipment that your business owns and maintains, such as vehicles, mobile devices, machinery, specific tools, etc. that have been checked out to the employee. Learn more about plant items in How to Create Plant Items.
The Plant tab only appears after you have saved the employee.
 Add employee notes
Use employee notes to maintain a running record of any correspondence logged against the employee, and assign other employees to follow up correspondence if required.
To add a note:
- Access the employee, then click Notes.
- Click Create Note.
- Enter a Subject.
- Select a Reference and enter a No. if required.
- Enter the Note.
- Select a Follow Up date if required and assign an employee to follow up the note.
- If you add a Follow Up date, the note appears in the assigned employee’s Reminders section on the Simpro Premium dashboard and under the employee's Alerts.
- Click Save at the bottom of the note.
- Click Save and Finish.
The Notes tab only appears after you have saved the employee.
 View Logs
The information displayed on the Logs tab details all the actions and changes performed for the selected record in Simpro Premium. This includes actions such as schedule, job, quote, order, stock, or invoice modifications and creating customer notes. You can use this for accurate and comprehensive auditing.
The details displayed include:
| Message | A short description of the update performed on the record. |
| Date & Time | Date and timestamp of when the action was taken. |
| ID | The Simpro Premium ID of the user who performed the action. |
| Name | Name of the user who performed the update on the record. |
| Event |
The type of action performed.
|
 Assign companies
If you have a multi-company build, employees can be shared between companies. Click the Companies tab and click any Available Companies to assign them, then click Save to update your changes. Learn more in Multi-Company.
You can also select a Default Company as the company that the employee most often works for.
 Walk Me Through
Need additional help?
Try Walk Me Through, our step-by-step guidance tool, to create employees.
In Simpro Premium, go to Help ![]() > Walk Me Through and search Employees.
> Walk Me Through and search Employees.
Learn more in How to Use Walk Me Through in Simpro Premium.
 Learn more in the Learning Toolbox
For additional training, complete an interactive material in the Simpro's Learning Toolbox. Learn more in About Simpro's Learning Toolbox.


