Last Updated: January 07 2026
Overview
If you use the Sage desktop accounting package, Line 50, you can send your Simpro Premium data to Sage using the accounting link software, Sage Link.
What data can be transferred?
Customers and suppliers can be transferred from Simpro Premium to Sage, or from Sage to Simpro Premium.
Contractors can only be transferred from Simpro Premium to Sage. In Sage, they are created as suppliers.
Financial transactions, including customer invoices, credit notes, payment receipts, supplier invoices, supplier credit notes, and contractor invoices, can only be transferred from Simpro Premium to Sage.
 Required setup
In order to view content or perform actions referred to in this article you need to have the appropriate permissions enabled in your security group. Go to System![]() > Setup > Security Groups and access your security group to update your permissions. The relevant security group tab and specific permissions for this article can be found here:
> Setup > Security Groups and access your security group to update your permissions. The relevant security group tab and specific permissions for this article can be found here:
 Install the Sage accounting link
To install the accounting link for Sage, you need to:
- contact Jalco via sagelink@jalco.co.uk, who can provide you with a link for the installer and the appropriate Licence Key.
- obtain an activation key to enable 3rd Party Integration in Sage. In Sage, go to Tools > Activation and follow the instructions.
If you are using a multi-user system you must run the 3rd Party Activation process on each installation of your Sage software.
Download and run the installer
To begin installing the accounting link:
- Download and run the installer from the location provided by Jalco. If you receive a security warning, click Run.
- Follow the steps in The InstallShield Wizard.
- It is recommended that you do not change the destination folder. However, if you need to install the software in a different location, click Change and select an alternate folder.
- Once the destination folder has been selected the installation commences. This may take several minutes. Once the installation is complete, click Finish.
- Copy the licence file provided by Jalco into the destination folder you have chosen during your software installation.
- Licence files are suffixed with the .Lic extension.
If you use multi-company, you need to install Sage Link multiple times. One Simpro Premium company links to one Sage company. Once the install wizard has run for the first time, the resulting folder and files can be replicated.
 Prepare your Simpro Premium data for Sage
Before using the Sage Link, make sure the following Simpro Premium data is optimised for Sage:
- default accounts
- cost centres
- payment methods
- tax codes
Default accounts
To prepare your default accounts, go to System ![]() > Setup > Defaults > Financial and make sure the following account numbers are filled in correctly:
> Setup > Defaults > Financial and make sure the following account numbers are filled in correctly:
| Income Account | This is your default sales nominal code. |
| Deposit Account | This is the nominal code for your default bank account. |
| Expense Account | This is your default purchase account. |
| Retention Asset Account | Enter this account number only if you use retention. This is your retention asset account. |
| Retention Liability Account | Enter this account number only if you use retention. This is your retention liability account. |
| Finance Charge Account | Enter this account number only if you use finance charges. |
| Freight Account | This is your delivery charge account (purchases). |
| Restocking Fee Account | This is your returns charge account (purchase credit notes). |
| CIS Tax Suffered Account | This account is for CIS deducted on sales invoices. This must be a nominal account which has a type of bank account. |
| CIS Liability Account | This account is for CIS deducted from contractor invoices. |
Cost centres
To prepare your cost centres, go to System ![]() > Setup > Accounts > Cost Centres and enter an Income Account No. (Sales Nominal Account - P& L Account) and Expense Account No. (Purchase Nominal Account - P&L Account) for each cost centre. Transactions created within the cost centre are transferred to the relevant Sage nominal codes specified. This helps break down your sales and purchases within your profit and loss.
> Setup > Accounts > Cost Centres and enter an Income Account No. (Sales Nominal Account - P& L Account) and Expense Account No. (Purchase Nominal Account - P&L Account) for each cost centre. Transactions created within the cost centre are transferred to the relevant Sage nominal codes specified. This helps break down your sales and purchases within your profit and loss.
If a cost centre is only used for sales, leave the Expense Account No. blank. If a cost centre is only used for purchases, leave the Income Account No. blank. Sage Control Accounts should not be used as posting accounts within Simpro Premium. The relevant Control accounts are automatically updated as part of the data transfer.
Learn more in How to Use Cost Centres.
Payment methods
To prepare your payment methods, go to System ![]() > Setup > Accounts > Payment Methods and enter an Account Number (Nominal Code) for each payment method.
> Setup > Accounts > Payment Methods and enter an Account Number (Nominal Code) for each payment method.
Learn more in How to Use Payment Methods.
Tax codes
To prepare your tax codes, go to System ![]() > Setup > Accounts > Tax Codes and make sure that your tax codes match the corresponding VAT codes in Sage.
> Setup > Accounts > Tax Codes and make sure that your tax codes match the corresponding VAT codes in Sage.
If you have multiple currencies enabled, you must have all the corresponding currencies enabled in Sage, and a separate bank account for each currency.
Accounting categories
If you use departments in Sage, you can link these to accounting categories in Simpro Premium. In Sage, your departments are identified by a Reference, which must be a number from 0 to 999, and Name. Make sure that the Accounting Category Name and Reference in Simpro Premium matches the name and reference in Sage.
Learn more in How to Use Accounting Categories.
 Run Sage Link for the first time
When you log in to the software for the first time, both the username and password is 'SUPERVISOR'. Once the software has loaded you can create additional logins for users.
Enter settings
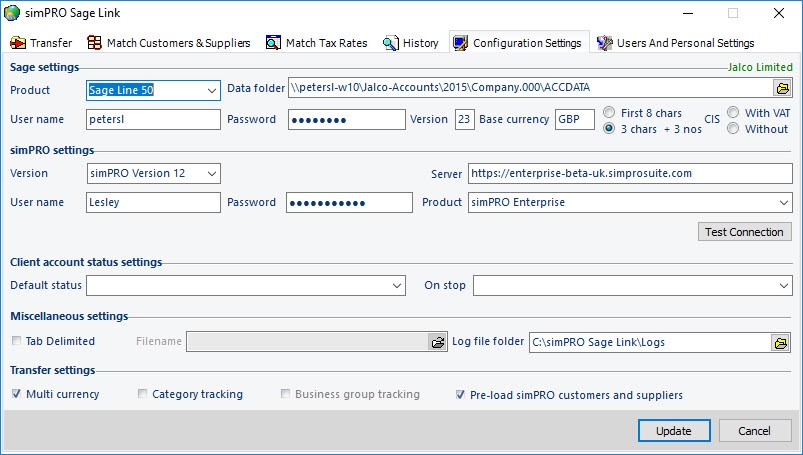
Adjust your accounting link settings in the Configuration Settings tab. First, enter your Sage settings:
| Product | Select your Sage product from the drop-down. |
| Data Folder | Choose the folder where your Sage data is located. If you are not sure of this, go to the Help page in Sage and look for your data directory. |
| Username |
Enter your Sage username. You cannot be logged in to Sage while using the Sage Link to transfer data. |
| Password | Enter your Sage password. |
| Base Currency | Specify the main currency you use. |
| Version | This is the current version of Sage software. |
| Account Structure | Select how you wish account codes to be allocated within Sage. You can either use the first 8 characters of the customer / supplier name, or use the first 3 characters followed by 3 numerics. |
Then enter your Simpro Premium settings:
| Version | Select your Simpro Premium version from the drop-down. Sage Link only works with Version 11 or above. |
| Server | Enter your company build URL. You can copy and paste this from the address bar when you are logged into Simpro Premium. |
| Username | Enter your Simpro Premium username. |
| Password | Enter your Simpro Premium password. |
| Product | Select your Simpro Premium product. |
If you are using a multi-company build, you are required to select which company you are transferring data from in the Transfer tab.
To test that your settings are correct, click Test Connection to make sure that Sage Link is able to connect to both your Simpro Premium and Sage datasets.
Then enter your client account status settings:
| Default Status | Select the default status that is applied to customers created in Sage. |
| On Stop | If you have customers on stop in Simpro Premium, select the default status that is applied to those customers in Sage. |
Enter miscellaneous settings:
| Tab Delimited export | If you do not wish to transfer your data directly into Sage, select this check box to export your Simpro Premium data as a tab delimited file, which you can then import into Sage. |
| Log file folder |
This is set automatically, but you can select a different folder if needed. Log files are produced automatically when data is loaded / transferred, and you can see the information stored within these files in the History tab in Sage Link. However, if you are seeking help from Simpro Support, you may be asked to send copies of the logs. |
Under Transfer settings, select the Multi currency if you have multiple currencies enabled in Simpro Premium. Select Category tracking if you have accounting categories in Simpro Premium that links with Sage departments.
If you have a large amount of records in your systems, clear the Preload Simpro Premium Customers and Suppliers check box so that the Match Customers & Suppliers tab does not display.
 Create users
After you have finished entering your settings, create more users so that your employees can log in and use Sage Link.
To create users:
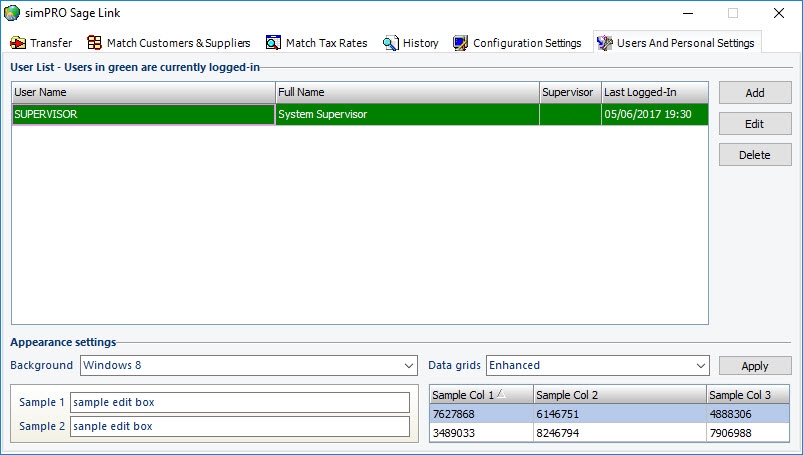
- Go to the Users And Personal Settings tab.
- Click Add.
- Enter the user's Full name.
- Enter the user's Login name. They use this as their username when they log in.
- Enter the user's Password. To make the characters visible as you type, select the Show check box.
- Enter the password again next to Retype.
- If you want this user to be able to create and manage other users, select the Supervisor check box.
- Click Update.
In the Users And Personal Settings tab, you can also update the background colours and appearance of data grids. Select from the Background and Data grids drop-down lists and click Apply.
 Match data records
Before you start transferring transactions from Simpro Premium to Sage, make sure that your data records match in both systems.
To match customers and suppliers:
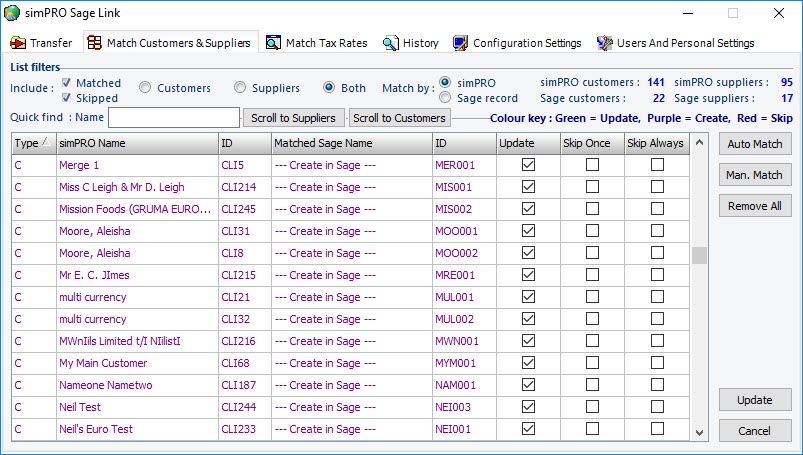
- Go to the Match Customers & Suppliers tab.
- Filter the list of data:
- Select the check boxes to include Matched and Skipped data.
- Select if you want to match Customers, Suppliers, or Both.
- Next to Match by, select Simpro Premium record if you want to retrieve Simpro Premium data to match with Sage, or select Sage record if you want to retrieve Sage data to then match with Simpro Premium.
- If you have records in both systems, click Auto Match to find matching records.
- Alternatively, click the Match Sage Name column and select the matching record from the drop-down.
- If no match is found, you are prompted to create a record in either Sage or Simpro Premium.
- To search for and match a specific customer / supplier, click Man.Match. Then you can search for records by name or by ID. If multiple matching records are found, select the correct one from the drop-down list.
- When you have finished matching records, click Update.
Multiple customer records within Simpro Premium can be linked to a single record in Sage. This is true of suppliers / contractors as well.
When Simpro Premium records are matched with Sage records, the following fields correspond to each other in each product:
Customers
| Simpro Premium | Sage |
|---|---|
| Company Name / Last Name, First Name | Company Name |
| Postal Address Line 1 / Street Address Line 1 | Street 1 |
| Remaining Postal Address details / remaining Street Address details | Street 2 |
| Postal Town or Town | Town |
| Postal County or County | County |
| Postal Postcode or Postcode | Post Code |
| VAT ID Number | VAT Number |
| Company Phone | Telephone |
| Alt. Phone | Telephone 2 |
| Company Fax | Fax |
| Website | Website |
| Currency | Currency |
| Payment Terms | Payment Due |
| Days from invoice date / Days after EOM | Trading Terms Text |
| On Stop | Account Status |
Suppliers
| Simpro Premium | Sage |
|---|---|
| Supplier Name or Contractor Company Name | Company Name |
| Postal Address Line 1 / Street Address Line 1 | Street 1 |
| Remaining Postal Address details / remaining Street Address details | Street 2 |
| Postal Town or Town | Town |
| Postal County or County | County |
| Postal Postcode or Postcode | Post Code |
| VAT ID Number | VAT Number |
| Work Phone | Telephone |
| Company Fax | Fax |
| Website | Website |
| Currency | Currency |
| Payment Terms | Payment Due |
| Days from invoice date / Days after EOM | Trading Terms Text |
| On Stop | Account Status |
 Match tax rates
This option is not available in Sage Link Lite.
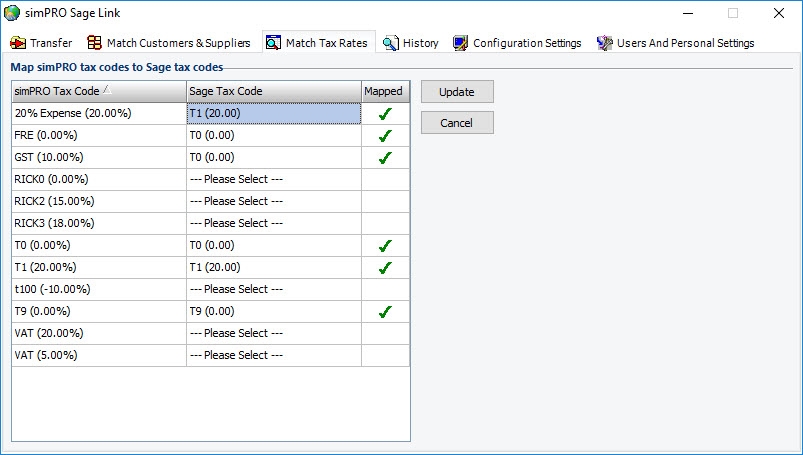
If you want to name your Simpro Premium tax codes differently to how they are named in Sage, you need to use the Match Tax Rates tab so that the correct tax codes correspond to each other in Simpro Premium and in Sage.
To match tax codes:
- Go to the Match Tax Rates tab.
- Your Simpro Premium tax codes are listed on the left. In the Sage Tax Code column, select the tax codes in Sage that you wish to match with the corresponding Simpro Premium tax codes.
- Click Update.
 Transfer data using Sage Link
It is recommended that you take a Sage back-up before transferring data from Simpro Premium to Sage.
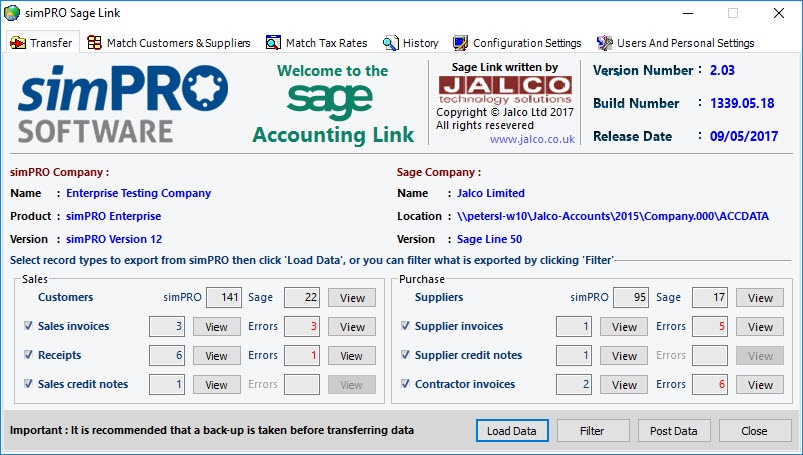
To transfer your Simpro Premium data to Sage:
- Go to the Transfer tab.
- Click the check box next to each transaction type that you wish to transfer.
- Click Load Data. You then see the number of transactions available to transfer, as well as any errors. Click the View button next to a transaction to view the details, or click View next to an error to display and amend the error.
- Any uncorrected errors are not included in the transfer of data to Sage.
- Click Filter if you want to ensure that only certain information is included in the transfer:
- You can choose to only transfer transactions within a specific date range, or only transfer transactions related to a specific customer / supplier / contractor. When you have selected the filters, click Filter.
- When you have finished amending errors and applying filters, click Post Data to send the data to Sage.
Any errors that occur during the transfer are displayed once all transactions are complete. The error list can be printed if required.
 Common errors
The most common errors you may encounter while posting are:
| Duplicate records | A matching record already exists in Sage. Supplier invoices with the same invoice number do not count as duplicates and can be transferred. |
| Invoice number not found | A sales receipt has been entered into Simpro Premium against an invoice number and the invoice has not be transferred to Sage. |
| Exchange rates not defined | A foreign currency transaction has been created in Simpro Premium but exchange rates have not been set up in Sage. |
| Header record not written | A foreign currency receipt has been entered against the wrong currency bank account in Simpro Premium. |
 View transaction history
To view a history of transactions sent using Sage Link, go to the History tab.
You can see the individual transactions sent, along with the date and time, the user who sent the transactions, and whether there were any errors.
You can also see a history of actions made in Sage Link, such as users logging in or changes made to settings.
 Tax rates applied in accounting link
Simpro Premium and Sage apply different rounding conventions to transactions. So, it is possible that the Sub Total and / or Tax Amount of certain transactions in Sage may differ by a few cents when compared to the same transactions in Simpro Premium. The only figure that must match between Sage and Simpro Premium is the Total.
