Last Updated: December 18 2025
OverviewIntegrate Simpro Premium with your NetSuite accounting package to post transactions and card file information directly from Simpro Premium into NetSuite through the accounting link. Before you begin posting your Simpro Premium transactions to NetSuite, you need to set up your Simpro Premium data and enable the NetSuite accounting link. Learn more in Set Up Simpro Premium for the Accounting Link.
The Simpro Premium and NetSuite account integration is only compatible with versions of NetSuite that do not include any customisations. Using the accounting integration with a customised version of NetSuite can cause inaccurate accounts including the loss of data.

Note that to use the NetSuite Integration you must have completed the Oracle NetSuite RESTapi Umbrella Beta Program Recruitment Form. Simpro Premium cannot be connected to NetSuite builds that are not on the RESTapi Beta Program. Use the information banner in NetSuite to access and complete the form.
 Required setup
In order to view content or perform actions referred to in this article you need to have the appropriate permissions enabled in your security group. Go to System![]() > Setup > Security Groups and access your security group to update your permissions. The relevant security group tab and specific permissions for this article can be found here:
> Setup > Security Groups and access your security group to update your permissions. The relevant security group tab and specific permissions for this article can be found here:
Before performing the steps detailed below, ensure that this part of your build is set up correctly. The relevant steps to set up the features and workflows detailed in this article can be found here:
 Map NetSuite accounts
Before using the accounting link you must map your financial accounts, chart of accounts and cost centres in Simpro Premium with your items and accounts in NetSuite. Learn more in How to Set Up Financial Defaults, How to Set up Chart of Accounts and How to Use Cost Centres.
When mapping accounts you need to locate the relevant Item number from NetSuite. You can find Item numbers in NetSuite under List > Accounting > Items. This is used for income accounts. You will also need to locate the relevant expense account. You can find account numbers under List > Accounting > Accounts.
 Import customers and vendors from NetSuite
If you have integrated your new Simpro Premium build with NetSuite and all of your contacts are set up in NetSuite, you can use the accounting link to perform an initial import of your NetSuite customers and vendors into Simpro Premium.
To import customers and vendors from NetSuite:
- Go to Utilities
 > NetSuite > Import.
- If you are not connected to your NetSuite account, click Connect to NetSuite and log in / Authorise. You are brought back to Simpro Premium and the Transfer tab appears.
- Click the IMPORT CUSTOMERS or IMPORT VENDOR button.
- Once the relevant card files are imported the buttons are greyed out.
AU, NZ, UK, DK, IE only: If you use Simpro Premium outside of the United States, the term 'supplier' is used instead of 'vendor'.
The initial import does not import any archived cards or cards marked as inactive.
 View Simpro Premium transactions to export
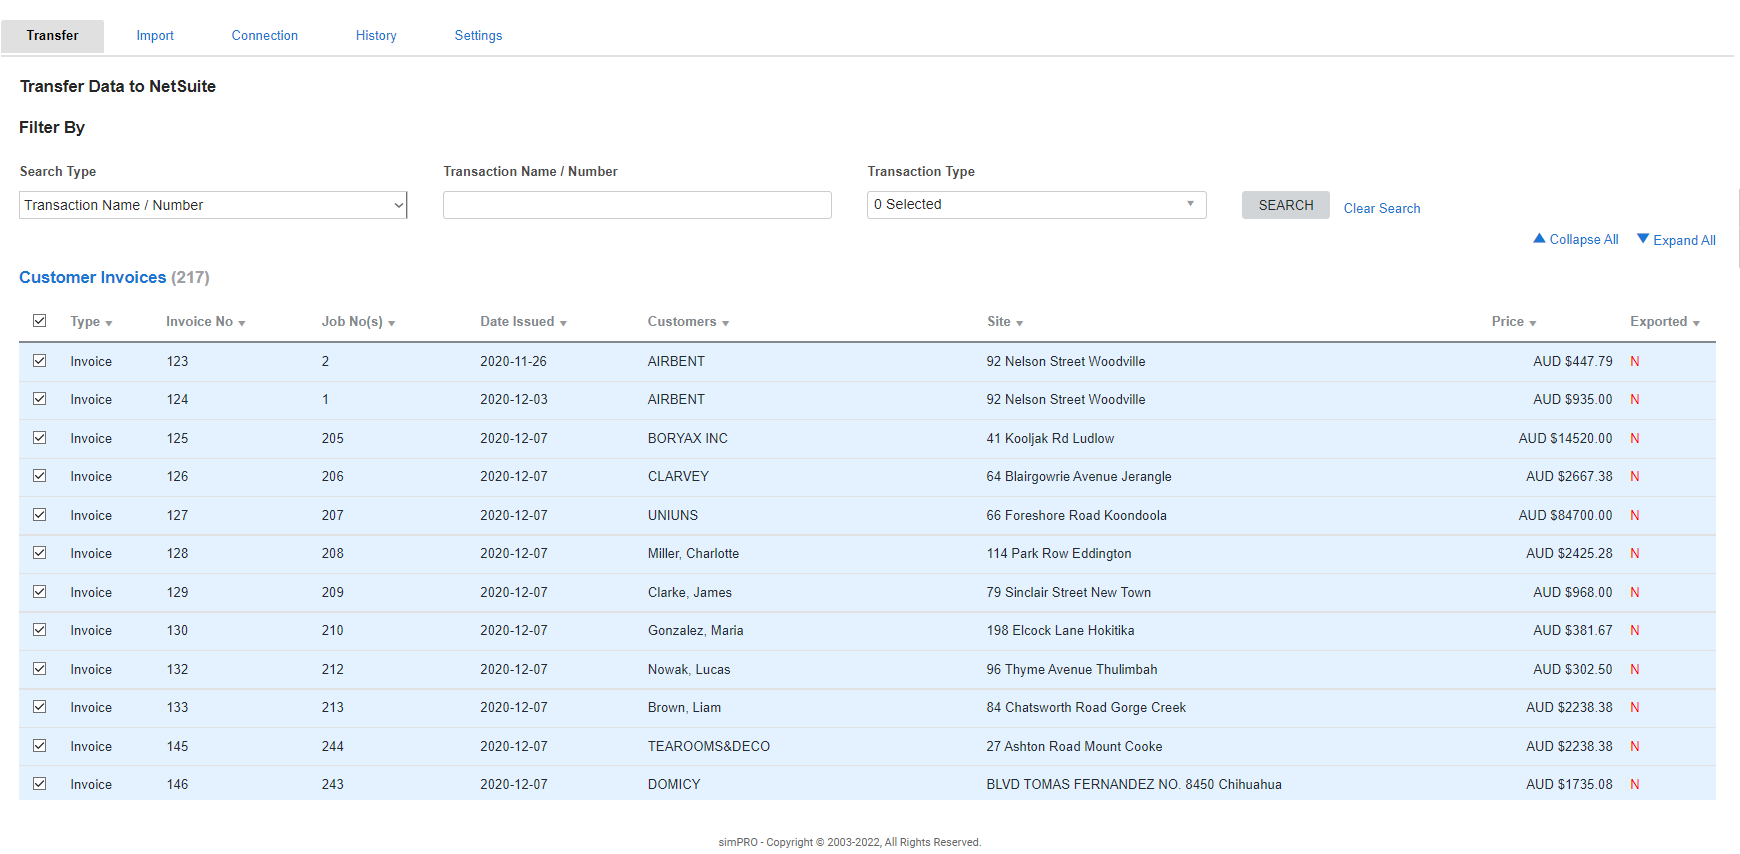
To view and search for Simpro Premium transactions to be exported to NetSuite, go to Utilities ![]() > NetSuite > Transfer. Your transactions are then organised according to their transaction type.
> NetSuite > Transfer. Your transactions are then organised according to their transaction type.
To collapse the transaction type tables and view only the headings, the number of transactions per type, and the footer options, click Collapse All. To view all transactions within each transaction type table, click Expand All.
You can also filter your transactions by selecting from the following Search Types, then clicking Search:
| Transaction Name / Number | Filter transactions by the Transaction Name / Number and the Transaction Type. You can enter an invoice or payment number, or customer, vendor, or contractor name in the Transaction Name / Number field. |
| Date Range | Filter transactions according to the Date Range in which they were created, as well as the Transaction Type. |
| Transaction Type | Filter transactions by their type, such as Customers, Customer Invoices / Credits, Customer Payments, Vendor and Contractors, or Vendor Invoices, Vendor Credits and Contractor Invoices. |
If a transaction has not yet been exported to NetSuite, it has a red N in the Exported column.
If it has successfully posted to NetSuite, it has a green Y in the column, and only appears if you search them using the filter options.
 Export Simpro Premium transactions to NetSuite
New transactions that you create in Simpro Premium appear in the accounting link if they are able to be transferred to NetSuite.
To transfer data to NetSuite:
- Go to Utilities
 > NetSuite.
- If you are not connected to your NetSuite account, click Connect to NetSuite and log in / click Authorise. You are directed to Simpro Premium and the Transfer tab appears.
- In the Transfer tab, select the transactions that you need to send to NetSuite.
- To send all, select the Select All check box at the bottom of the page.
- Click Process Selected.
The data then transfers in the background, so you can exit the page and continue with other work in Simpro Premium. To return to the tab, go to Utilities ![]() > NetSuite.
> NetSuite.
When the transfer is complete, the Connection tab lists the status of each transaction as Successful or Failed.
If an item has failed to transfer:
- An error message appears explaining why the item failed to transfer.
- The item is not marked as exported.
- The item remains available to export from the Transfer tab until the error is fixed and it has transferred successfully.
 Mark data as exported
You may need to mark specific transactions as exported without actually sending them to NetSuite, for example, to prevent creating duplicate transactions in NetSuite.
To mark transactions as exported:
- Go to Utilities
 > NetSuite > Transfer.
- If you are not connected to your NetSuite account, click Connect to NetSuite and log in / click Authorise. You are directed to Simpro Premium and the Transfer tab appears.
- In the Transfer tab, select the transactions that you wish to mark as exported without sending to NetSuite.
- To mark all transactions, select the Select All check box at the bottom of the page.
- Click Mark as exported > OK.
 Review transaction history
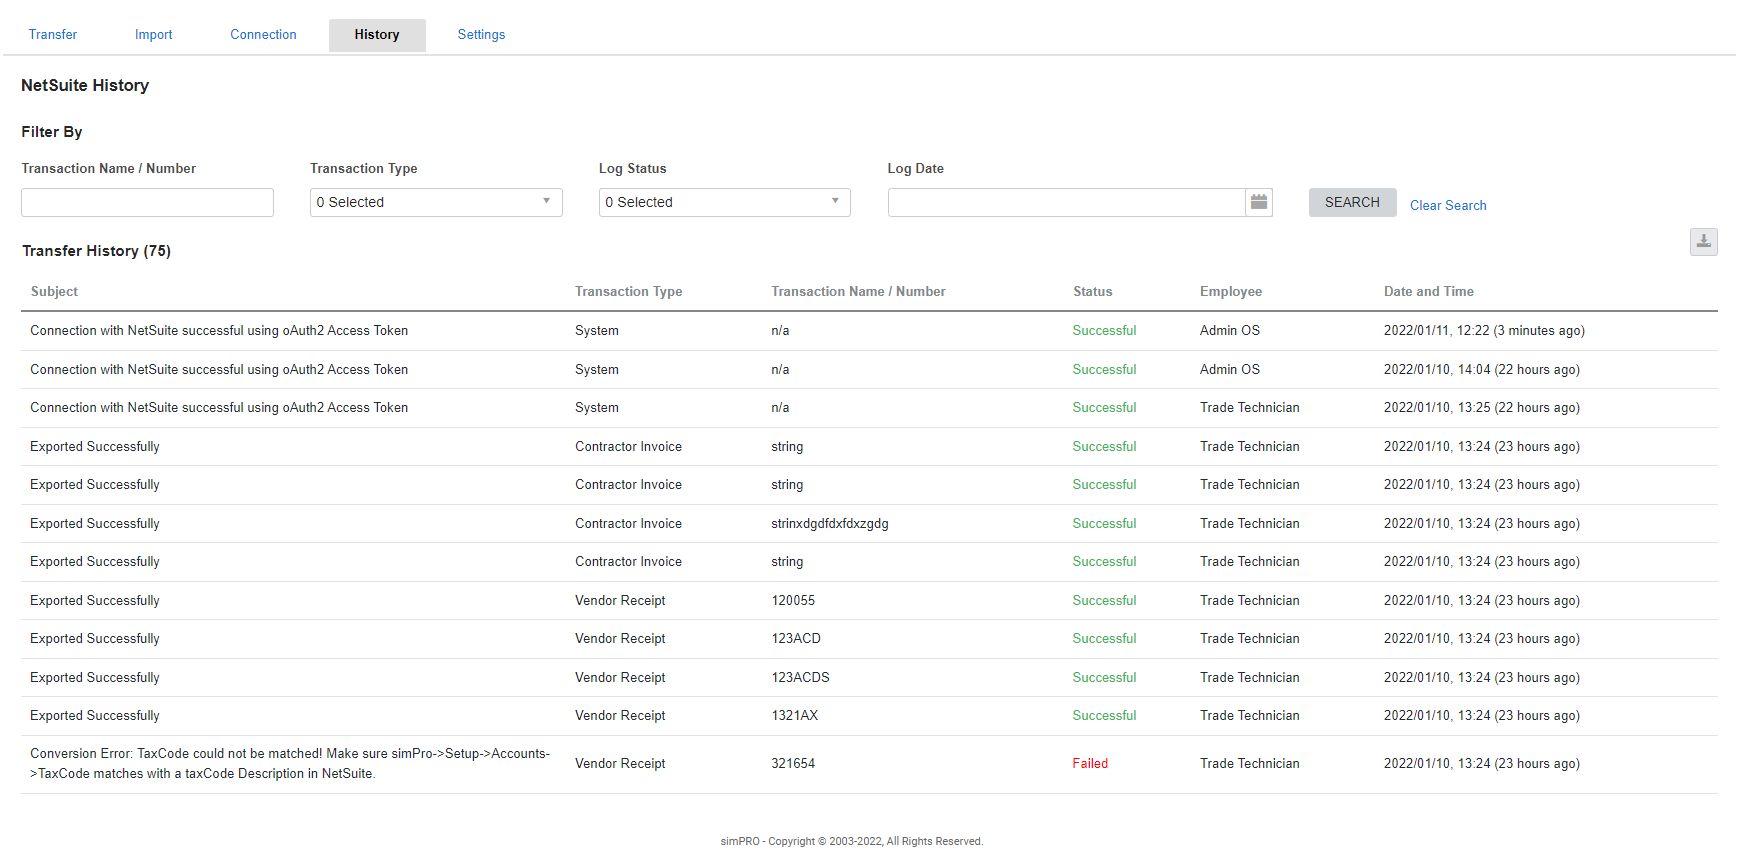
To access the NetSuite accounting link history, go to Utilities ![]() > NetSuite > History.
> NetSuite > History.
A log entry is created here when you:
- Open the accounting link connection
- Send card files or transactions to NetSuite
- Import payments from NetSuite
- Mark transactions as exported.
The log entry then details the Subject, Transaction Type, Transaction Name / Number, Status, the Employee who performed the action, and the Date and Time.
You can then filter results by entering the Transaction Name / Number, or selecting the Transaction Type, Log Status, or Log Date, then clicking Search.
 Common errors
 Contacts (customers, vendors, and contractors)
The following errors can occur when posting contacts, including customers, vendors, and contractors to NetSuite:
| First Name and Last Name are mandatory fields | If the card is an individual, then you must have both the First Name and Last Name fields completed before you can transfer the card into NetSuite. |
| Company Name is a mandatory field | If the customer is a company, you need to complete the Company Name field. |
| Customer / Vendor / Contractor status response from NetSuite is invalid |
Although it is possible a customer, vendor, or contractor transfer was successful, there was no valid response from NetSuite. You can verify whether or not the contact has posted successfully by accessing NetSuite. If it has, you can mark data as exported. If it has not, try to post the transactions again. If the problem persists then please contact Simpro Support. |
| Duplicate found. Customer Invoice could not be posted to NetSuite |
There is already an invoice in NetSuite with the same invoice number. You can verify whether the invoice was already posted from Simpro Premium previously, or manually entered into NetSuite using the same numbering as Simpro Premium. |
AU, NZ, UK, DK, IE only: If you use Simpro Premium outside of the United States, the term 'supplier' is used instead of 'vendor'.
 Invoices, credits, vendor invoices, vendor credits, or contractor invoices
The following errors can occur when posting invoices, credits, vendor invoices, vendor credits, or contractor invoices to NetSuite:
| The Tax Type field is mandatory | You may need to verify whether the account code is correct in Simpro Premium, that is, whether it is specified in System |
| Account code '####' is not a valid code for this document | Either an account specified for the transaction does not exist, has been entered incorrectly, or is the wrong account type. For example, posting a sales invoice to an expense account as opposed to an income account. |
AU, NZ, UK, DK, IE only: If you use Simpro Premium outside of the United States, the term 'supplier' is used instead of 'vendor'.
 Learn more in the Learning Toolbox
For additional training, complete an interactive material in the Simpro's Learning Toolbox. Learn more in About Simpro's Learning Toolbox.

