Last Updated: December 15 2025
How to Create a Job
Overview
Using the Service module in Simpro Mobile, you can efficiently create new service jobs in the field and start your work immediately.
 Required setup
Before performing the steps detailed below, ensure that this part of your build is set up correctly. The relevant steps to set up the features and workflows detailed in this article can be found here:
In order to view content or perform actions referred to in this article you need to have the appropriate permissions enabled in your security group. Go to System![]() > Setup > Security Groups and access your security group to update your permissions. The relevant security group tab and specific permissions for this article can be found here:
> Setup > Security Groups and access your security group to update your permissions. The relevant security group tab and specific permissions for this article can be found here:
 Create a Service Job
Follow the instructions below to create a quote or job in the Service module:
- Access the Service module.
- Tap the add
 icon > New Job.
- All jobs created in the Service module are Service jobs.
- If you are using Multi-Company and are assigned to more than one company, select the relevant Company and tap OK.
- Tap the Customer field to search and select an existing customer or customer contract, then tap ADD. To change the selected customer, tap the customer name and tap Remove.
Alternatively to create a new customer, tap the add icon and follow the steps below:
- Select if the customer is an Individual or a Company and enter the First name / Last name or Company name accordingly.
- Enter the required details in the Contact and Address sections.
- Tap CREATE to add this new customer to your list of customers.
- Tap the Site field to search and select an existing site, and then tap ADD. To change the selected site, tap the site name and tap Remove.
- Alternatively, tap the add
 icon to create a new site.
 - Enter the Site name and select a relevant zone.
- Next, enter the required details Address section.
- Select Site Address is same as CUSTOMER NAME Company Address to copy the customer address to the site address.
- Tap CREATE to add this new site to your list of customer sites.
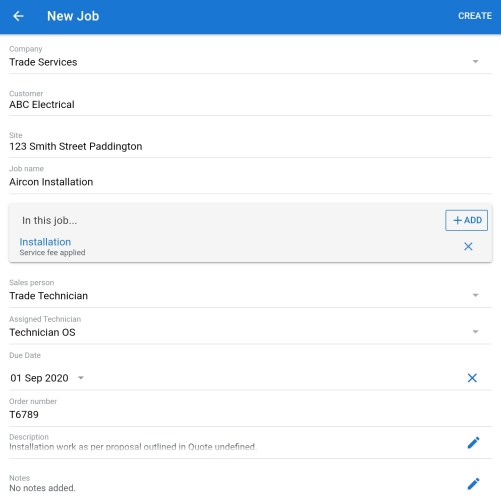
- Enter the Job name for internal reference and tap ADD to select a cost centre.
- Tap CHOOSE to select the relevant cost centre. You can rename the cost centre and enter a work Description or use Insert Script to add a pre-written script, if required. And, tap ADD.
- Select a Sales person to receive commission or monitor the job, if required.
- Next, select an Assigned Technician. By default the technician creating the job is selected in this field.
- Once the job is created, it appears on the assigned technician’s Schedule in the Service module on the Due date. Alternatively, the assigned technician can access the job using FIND A JOB or by changing the date on the schedule. If no Due date is selected, the job does not appear on the schedule.
- Note that a technician can only select an Assigned Technician if they have a Mobility licence and a User licence selected on their employee card in Simpro Premium.
- Select a Service Fee, if required and a Due Date.
- Enter an Order Number for internal reference.
- Tap to enter a Description manually or use Insert Script to add a pre-written script, if required. And, tap DONE.
- Tap to add Notes and tap DONE.
- Tap CREATE to complete creating the new job.
Learn more in How to Complete a Scheduled Job and How to Manage Schedule in Service Module.
 Learn more in the Learning Toolbox
For additional training, complete an interactive material in the Simpro's Learning Toolbox. Learn more in About Simpro's Learning Toolbox.
