Last Updated: December 08 2025
How to Invoice a Job
Overview
The invoices and payments feature in Simpro Premium Mobile enables technicians to add and edit billable items, create an invoice, email it to customers / site contacts, and receive a payment in the field.
Once technicians complete their jobs in the Service module, they can continue to invoice and apply payments in the same workflow. This ensures a streamlined process, reducing the additional time required for processing payments later in Simpro Premium.

 Required setup
Before performing the steps detailed below, ensure that this part of your build is set up correctly. The relevant steps to set up the features and workflows detailed in this article can be found here:
 Create an invoice
Invoicing in Simpro Premium Mobile enables you to update each cost centre and add / manage your billable items prior to creating the invoice.
After you tap STOP WORK AND FINISH to complete a scheduled job in the Service module, you can proceed to invoicing.
If Category Tracking is enabled in your Simpro Premium build, select the relevant accounting Category from the drop-down list. Learn more in How to Use Accounting Categories.
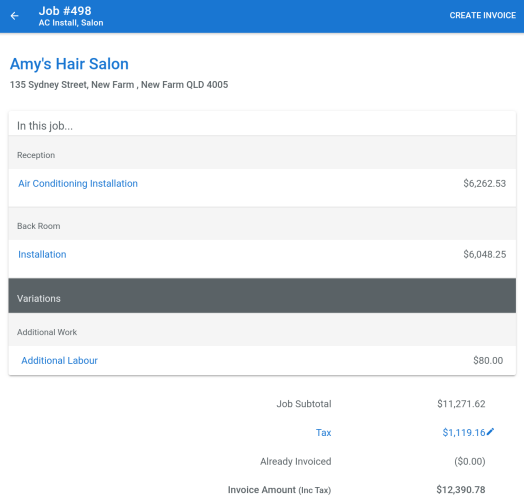
All cost centres are displayed on the invoicing page, including any variations. For a project job, the cost centres are organised into sections. You can adjust items listed in the cost centres and resolve any warnings for mismatch between the billed hours and the hours worked before billing the customer.
Note that invoicing is not available for jobs that are either open in Simpro Premium or have retentions applied.
To create an invoice:
- Tap the relevant cost centre to add, remove or adjust billable items. Note that a cost centre is not available for editing if, it is:
- Locked
- Has discounts or fees applied,
- Is partially or fully invoiced
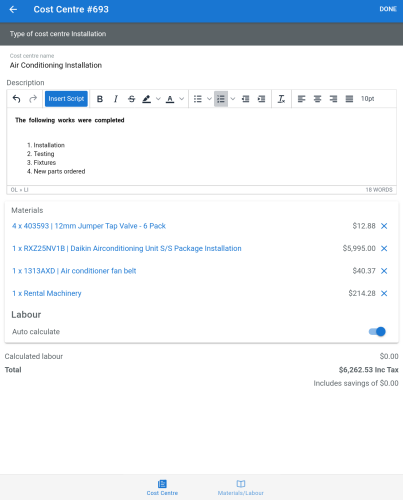
- On the Cost Centre page, update the Cost centre name as you require it to appear on the invoice.
- Tap INSERT SCRIPT to use a pre-written description or enter a cost centre Description manually. Learn more in How to Use Scripts.
- Billable materials added to the job are listed under Materials. Tap individual items to view corresponding details, apply Add-on pricing, or adjust the quantity. Tap the delete icon to remove items from being billed to the customer.
- Toggle on Auto calculate under Labour to automatically bill the customer based on the labour associated with materials.
- Toggle off Auto calculate and tap the labour rate to adjust the billable labour time manually. If there is a mismatch between the billed hours and the hours worked, tap BILL HOURS WORKED to automatically update the billed labour to match the actual hours worked.
- Tap Materials/Labour to add Pre-builds, Catalogue, Labour rates, One Off Items and Service Fees.
- Navigate to the relevant group and sub-group and add items to the cost centre, as required.
- For Catalogue items and Pre-Builds, tap View details to apply Add-on pricing, adjust quantity and ADD items. For Pre-Builds, view supporting materials, if any.
- You can View details, adjust quantities, and apply Add-on pricing to catalogue items / pre-builds. You can also view supporting materials for pre-builds, if any.
- Next, go back and tap Cost Centre.
- To change totals and subtotals:
- To adjust the tax rate, tap the edit icon next to Tax to change the tax rate as required.
- To add a discount or fee, tap the edit icon next to Discount/Fee and tap Adjust Price. Enter the Discount / Fee, tap Update and the discount / fee is calculated and applied to the subtotal.
- To directly adjust subtotal, tap the edit icon next to Subtotal, enter a new subtotal and tap Update.
- To directly adjust the total, tap the edit icon next to Total (Inc Tax), enter the new Total, and tap Update.
- Note that if you alter the Subtotal or Total after applying a Discount/Fee the Discount/Fee percentage is applied to the new Subtotal rather than the Discount/Fee value. If you intend to adjust the totals and apply a Discount/Fee that equals a certain value you must change the Totals first.
- Tap Done to confirm all updates to the cost centre. You can continue to update other cost centres, if required.
- Next, tap CREATE INVOICE.
- Note that the invoice created is a tax invoice for the entire or remaining price of the job.
- Partial invoicing or invoicing per item is not currently available in Simpro Premium Mobile.
 Invoice components
The invoice page displays the following:
- Invoice number
- Customer name
- Job number
- Description
- Note that the Work Completed notes that you enter in the job card are saved as a script. Tap Insert Script to populate the same notes as Description on the invoice.
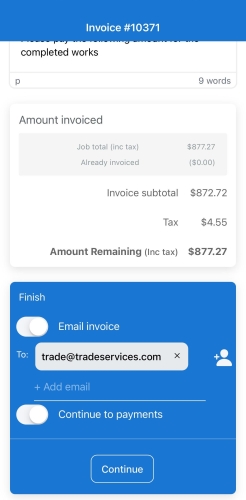
- Amount Invoiced section details the different components of the Invoice amount including the Already Invoiced and Tax figures.
Toggle on Continue to payments on the invoice page. If you choose to toggle on Email Invoice, a copy of the invoice is sent to the customer after the payment is processed. All customer invoice contacts are auto-populated as email recipients. You can also select any additional customer / site contacts or manually enter their email addresses. Tap Continue to begin processing payments for the invoice. Learn more in How to Apply Payments.
 Learn more in the Learning Toolbox
For additional training, complete an interactive material in the Simpro's Learning Toolbox. Learn more in About Simpro's Learning Toolbox.


