Last Updated: January 05 2026
Overview
After the works on a job have been completed, you can record the works performed in the job card in Simpro Premium. Technicians can fill out job cards through the job schedule in Simpro Premium, using Simpro Mobile, or alternatively, through the employee portal. Learn more in How to Set Up the Employee Portal.
You can also approve job cards with the appropriate security group permissions.
US only: If you use Simpro Premium in the United States, the term 'work order' is used instead of 'job card'.
The job card is not the job itself. Changes made on the job card do not affect the job until the job card is approved.
 Required setup
In order to view content or perform actions referred to in this article you need to have the appropriate permissions enabled in your security group. Go to System![]() > Setup > Security Groups and access your security group to update your permissions. The relevant security group tab and specific permissions for this article can be found here:
> Setup > Security Groups and access your security group to update your permissions. The relevant security group tab and specific permissions for this article can be found here:
Before performing the steps detailed below, ensure that this part of your build is set up correctly. The relevant steps to set up the features and workflows detailed in this article can be found here:
 Access, print, or email individual job cards
You can access, print, and email individual job cards in the following areas of Simpro Premium:
- The schedule Day / Week View
- In the Schedule tab of a job
- The employee / contractor portal
- In the field using Simpro Mobile as an electronic runsheet and job card. Learn more in Simpro Mobile.
When you select to print a job card, a PDF is generated in a new browser tab.
When you select to email a job card, the job card is automatically emailed to the email address entered in the employee / contractor card file and a confirmation message appears. Click OK to close the message.
To use a Form Builder template for job cards listed in the Template drop-down, that are not marked as (PDF):
- Click View to open the form in an edit mode.
- Click Edit to make changes to the form, as required
- Click Finish > Finish & Close.
 In the schedule Day / Week View
To access, print, or email a job card in the schedule:
- Go to Schedules
 > Day View / Week View.
 - Right-click the job schedule block.
- Hover over Job Card.
- Click View / Print / Email Job Card.
 In a job
To access, print, or email a job card in a job that has already been scheduled to a technician:
- Access the job and cost centre, then click the Schedule tab.
- Under Scheduled Resources, click Options on the schedule.
- Hover over Job Card.
- Click Open / Print / Email Job Card.
To use a Form Builder template for job cards listed in the Template drop-down, that are not marked as (PDF):
- Click View to open the form in an edit mode.
- Click Edit to make changes to the form, as required
- Click Finish > Finish & Close.
Alternatively, you can access the job card within the job schedule tab. This is useful to create or adjust the schedule block.
To access, print, or email a job card within the job schedule:
- Access the job and cost centre, then click the Schedule tab.
- If the technician has already been scheduled, click the schedule under Scheduled Resources.
- If the technician has not been scheduled, click the
 icon next to the technician's name and click and drag to create a schedule block.
 - Right-click the schedule block.
- Hover over Job Card.
- Click View / Print / Email Job Card.
Print or email a generic job card within a job
Once jobs are raised in Simpro Premium, you can print out generic job cards that have not yet been assigned or scheduled. This allows technicians to coordinate with each other and decide who is assigned to which jobs and when, which means you can generate jobs more quickly. The technicians can then use this job card to see what they are required to do for the job.
This is particularly useful for small service teams that complete jobs without a high level of urgency.
To print or email generic job cards within a job:
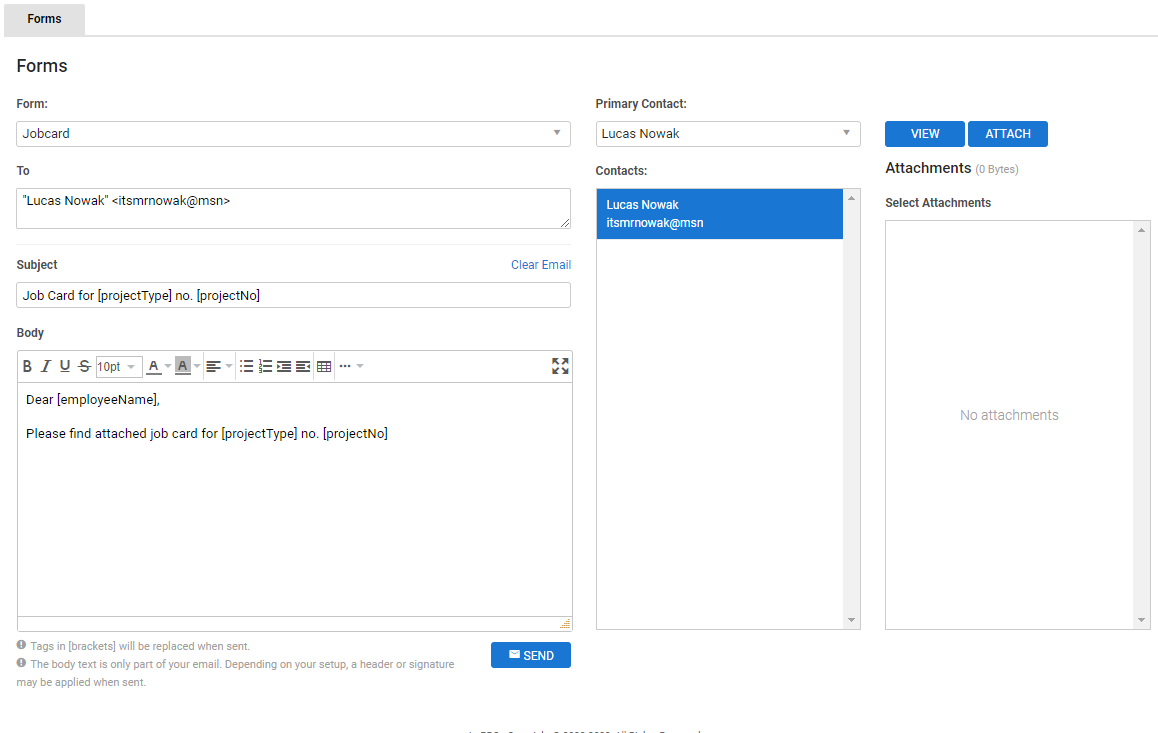
- Create or access the job as normal, then go to Details > Forms.
- Select Jobcard as the Form. A new job card Forms window appears.
- Click View to generate a PDF preview of the job card.
- You can print the job card PDF in the new preview tab.
- To email the job card, return to the Simpro Premium browser tab, select a Primary Contact to address the email to, and click to add additional Contacts as required.
- Alternatively, you can manually enter email addresses and separate them with a comma.
- Adjust the default Subject and Body if required. The default is set up in System
 > Setup > Forms Setup > Job > Email Set Up > Job Card.
- Alternatively, click Clear Email to enter a new Subject and Body.
- Click Send > OK > OK.
- Click the
 icon to return to the job.
Learn more in How to Set Up Job Card Forms.
 In the employee / contractor portal
To access a job card in the employee / contractor portal:
- Access the portal as normal.
- If the job is scheduled for today, click the job under Todays Jobs.
- If the job is not scheduled for today, go to Jobs
 > Search, then locate and click the job.
You can also print or email multiple job cards at once in the employee / contractor portal.
 Batch print or email job cards
Print and email multiple job cards at once after technicians are assigned or scheduled to jobs. You can batch print or email job cards in Simpro Premium, in the employee / contractor portal, and in Simpro Mobile.
When you are printing or emailing job cards, jobs are included if they are scheduled within the selected date range or if they are assigned to a technician and have a due date within the selected date range. If a job is assigned to a technician, but has no due date, it is included.
To print or email multiple job cards:
- Go to Schedules
 > Job Cards.
 - Select the Date Range.
- Select the Employee(s) / Team(s), or click Select All.
- Select the required Project Status from the drop-down list.
- Click View to display the results.
- From the footer options, you can Select All or multiple job cards at once for printing, emailing to technicians, attaching them to any job or when approving completed job cards.
When you select to print job cards, a PDF is generated in a new browser tab.
When you select to email job cards, they are automatically emailed to email addresses entered in the relevant employee / contractor card files and a confirmation message appears. Click OK to close the message.
 In the employee / contractor portal
To print or email multiple job cards in the employee / contractor portal:
- Access the portal as normal.
- Go to Schedules
 > Job Cards.
 - Select the Date Range.
- Click Print / Email Job Cards.
When you select to print job cards, a PDF is generated in a new browser tab.
When you select to email job cards, they are automatically emailed to email addresses entered in the relevant employee / contractor card files and a confirmation message appears. Click OK to close the message.
 Enter job card details
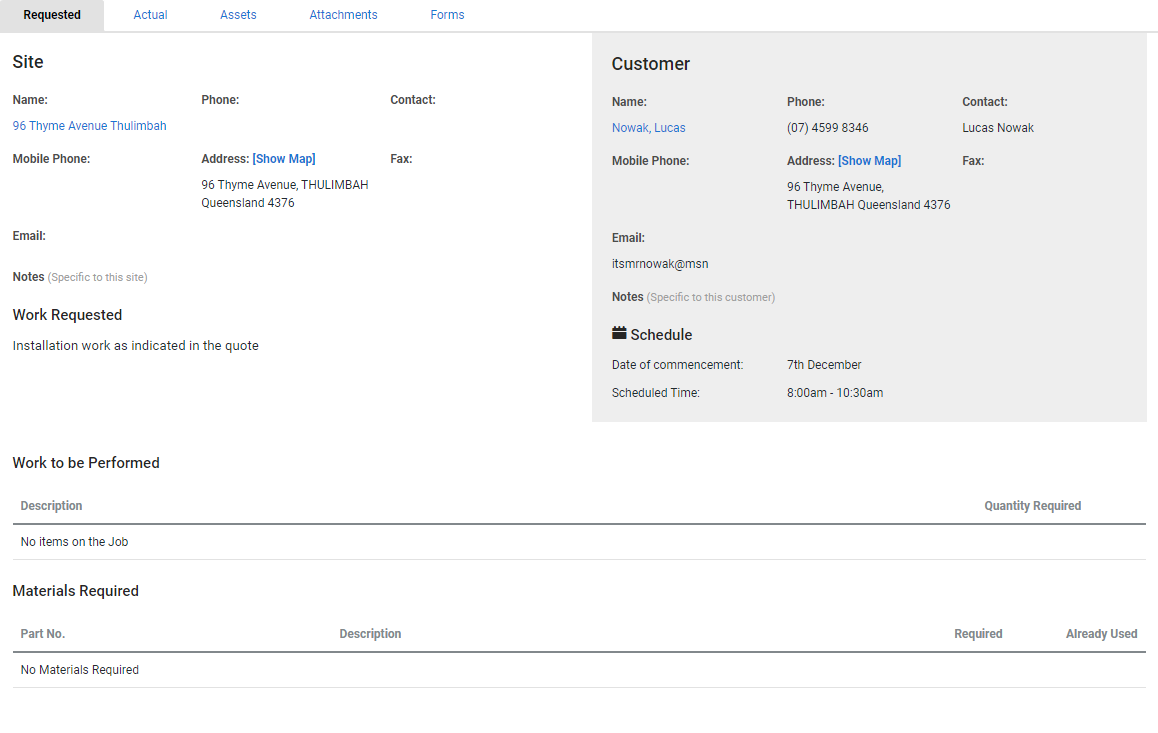
When completing a job card, you can view the job details in the Requested tab, including the Site and Customer details, the Schedule, a description of the Works to be Performed, and the Materials Required. This information details the job requirements that need to be fulfilled.
After the job is completed, you can then complete the job card to record the actual works performed. If the actual work is different from the requested work, the requested work still remains the same as you are not editing the job itself.
To enter actual job details:
- Access the job card as normal. See Access, print, or email individual job cards.
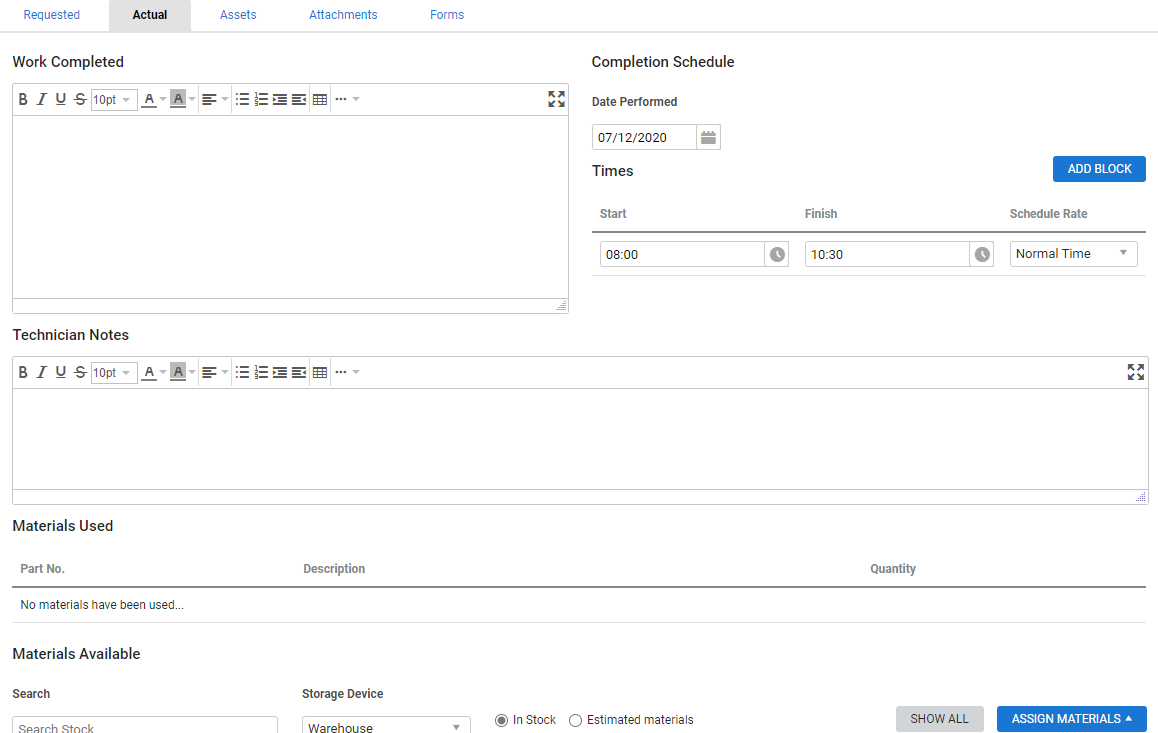
- Click Actual.
- Enter a description of the Work Completed. This appears in the job activity timeline. Learn more in How to Use the Activity Timeline.
- Select the Completion Schedule date and times if different to those in the Requested tab. This reflects in the schedule and the schedule block locks.
- Click Add Block to add another time block if necessary. For example, you may have left the site and returned later to continue working.
- If the scheduled time differs from the actual time, the original scheduled time is listed on the Requested tab for reference.
- Enter Material Notes. These appear in the job activity timeline. Learn more in How to Use the Activity Timeline.
- To assign materials, search for them under Materials Available, then enter the Quantity and click Assign Materials.
- Select In Stock to search for items that are in stock in their storage device. Select Estimated Materials to search for pre-defined items associated with the job. Note that In stock also includes items which are already assigned to the job but have not been marked as used on the job card. For example, if you have 10 items that are assigned to a job and five of them are recorded as used, plus there is one item in stock that is not assigned to the job, the total quantity of items listed under In stock is six items.
- Additional materials assigned appears in Stock > Allocated in the job and job costs update appropriately.
- Click Save to continue completing the job card.
- Alternatively, Approve a job card / Decline a job card if you have permission.
- Click Save and Finish. Use this option if you do not have permission to approve job cards.
US only: If you use Simpro Premium in the United States, the terms 'inventory' and 'inventory count' are used instead of 'stock', 'stock take', and 'in stock'.
 Test assets
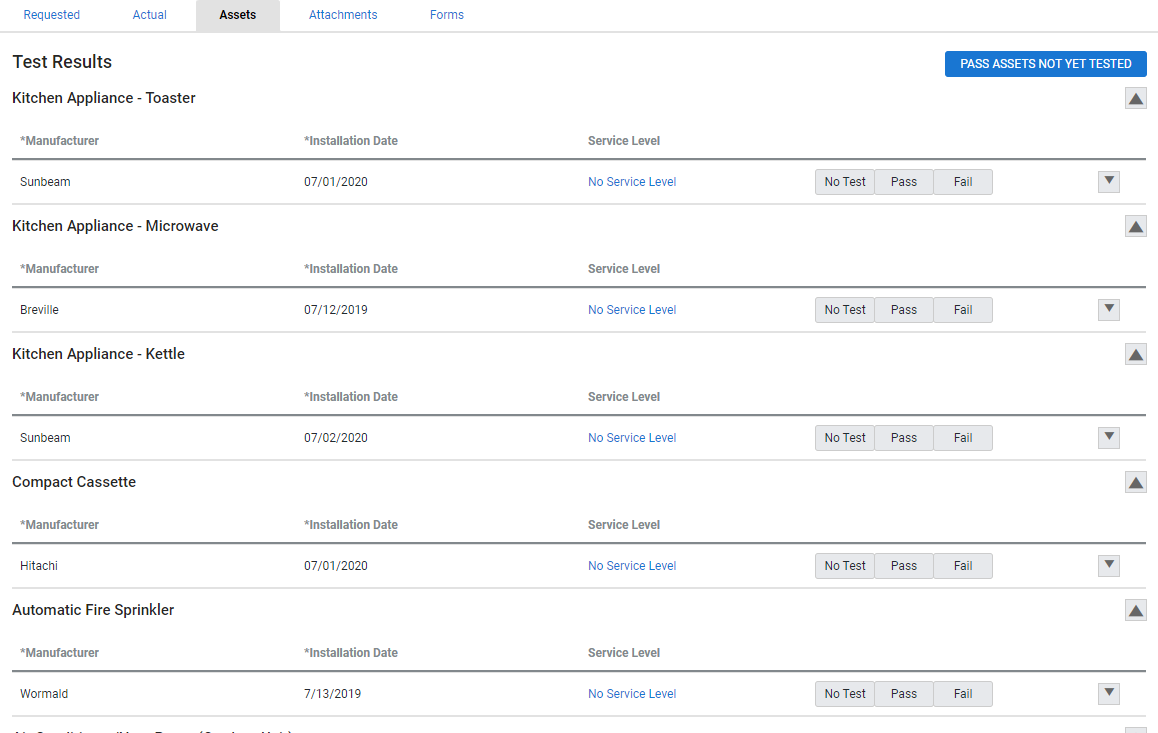
The Assets tab only appears if there are customer assets associated with the site where the job is being performed.
To record asset test results:
- Access the job card as normal.
- Click Assets.
- For each asset, click No Test / Pass / Fail as applicable.
 You can also select the relevant Service Level for the asset. If the asset failed, select the relevant Failure Points and recommendations.
- Enter Notes as required.
- You can attach images as a visual representation of the asset's condition.
- Click Save to continue completing the job card.
- Alternatively, Approve a job card / Decline a job card if you have permission.
- Click Save and Finish. Use this option if you do not have permission to approve job cards.
To pass all assets not tested, click Pass assets not yet tested.
Assets can also be tested using Simpro Mobile.
 Add attachments
Click Attachments to upload and manage relevant files for the job card, such as photos of the work performed for future reference. Learn more in How to Use Attachments.
These attachments remain in the job card, and won't appear in the Attachments tab of the job itself.
 Complete a scheduled job
Access and update a digital version of the job card in the field using Simpro Mobile. Learn more in How to Complete a Scheduled Job.
 Approve a job card
If you choose to approve job cards manually, completed job cards still pending approval appear as alerts. You can then Approve a job card / Decline a job card if you have the correct security group permissions.
Once approved, the job is updated with the details from the job card.
To approve a job card, access it as normal, then click Approve. Alternatively if you are accessing the job card from the schedule, you can right-click the job schedule block, then hover over Job Card and click Approve Job Card.
To approve job cards in bulk:
- Go to Schedules
 > Job Cards.
 - Select the Date Range.
- Select the Employee(s) / Team(s), or click Select All.
- Select the required Project Status from the drop-down list.
- Click View to display the results.
- From the footer options, you can Select All or multiple job cards at once for printing, emailing to technicians, attaching them to any job or when approving completed job cards.
 Decline a job card
You can decline a job card to reject the content added by the field user.
To decline a job card, access it as normal, then click Decline > OK. Declined job cards do not update their respective jobs until approved.
Note that when a job card is declined, most details including work completed notes, work completed, material notes, the record of schedule times and materials assigned are discarded. However, any modification made to the schedule or materials is still applied to the job.
 Learn more in the Learning Toolbox
For additional training, complete an interactive material in the Simpro's Learning Toolbox. Learn more in About Simpro's Learning Toolbox.


