Last Updated: December 12 2025
Overview
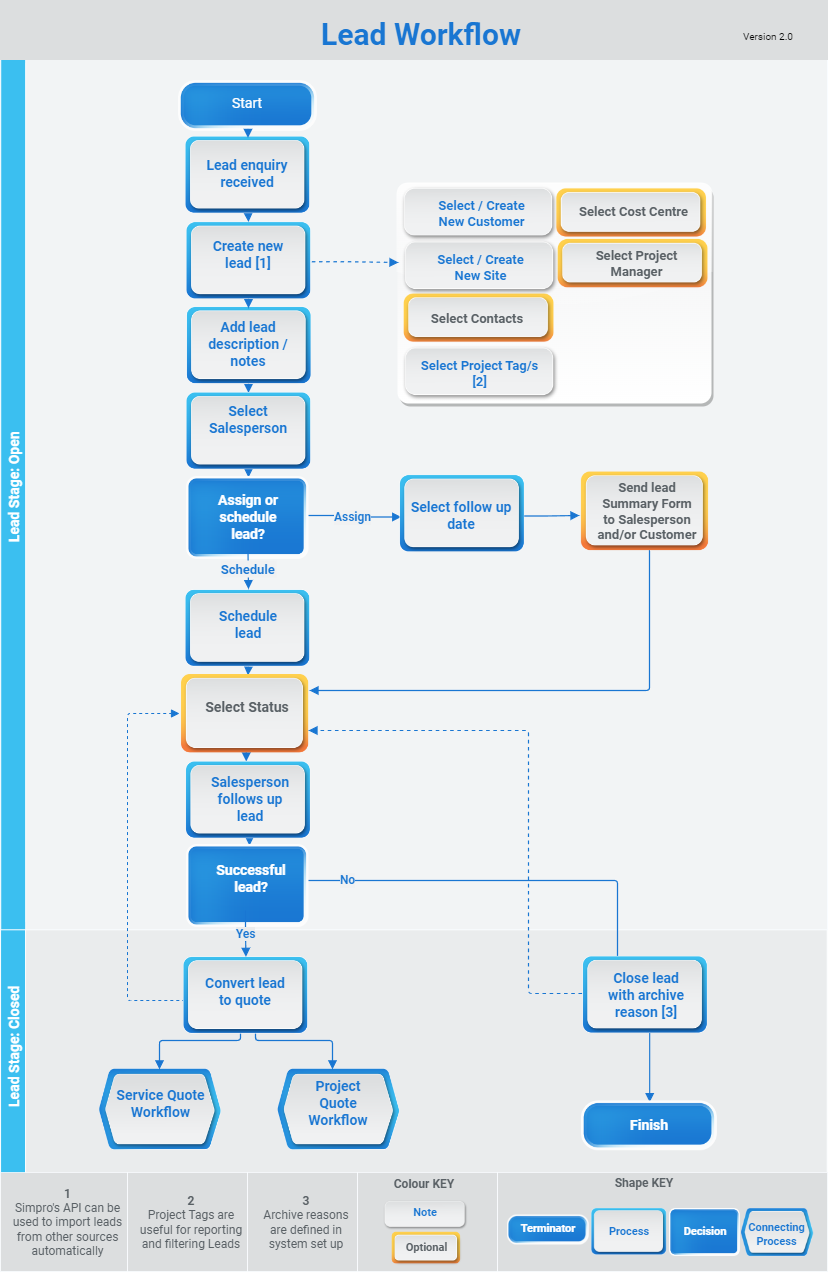
Use leads![]() A potential customer not yet associated with a quote, job, or invoice. to manage potential business opportunities. Once created, you can convert a lead if it is successful, or close a lead if it is unsuccessful. Learn more in How to Convert a Lead and How to Close a Lead.
A potential customer not yet associated with a quote, job, or invoice. to manage potential business opportunities. Once created, you can convert a lead if it is successful, or close a lead if it is unsuccessful. Learn more in How to Convert a Lead and How to Close a Lead.
To create leads in bulk, learn more in How to Import Leads.
 Required setup
In order to view content or perform actions referred to in this article you need to have the appropriate permissions enabled in your security group. Go to System![]() > Setup > Security Groups and access your security group to update your permissions. The relevant security group tab and specific permissions for this article can be found here:
> Setup > Security Groups and access your security group to update your permissions. The relevant security group tab and specific permissions for this article can be found here:
 Create a lead
If a customer expresses interest in doing business with your company in the future, create a lead that can later be converted into a quote.
To create a lead:
- Go to Leads
 > Create New Lead.
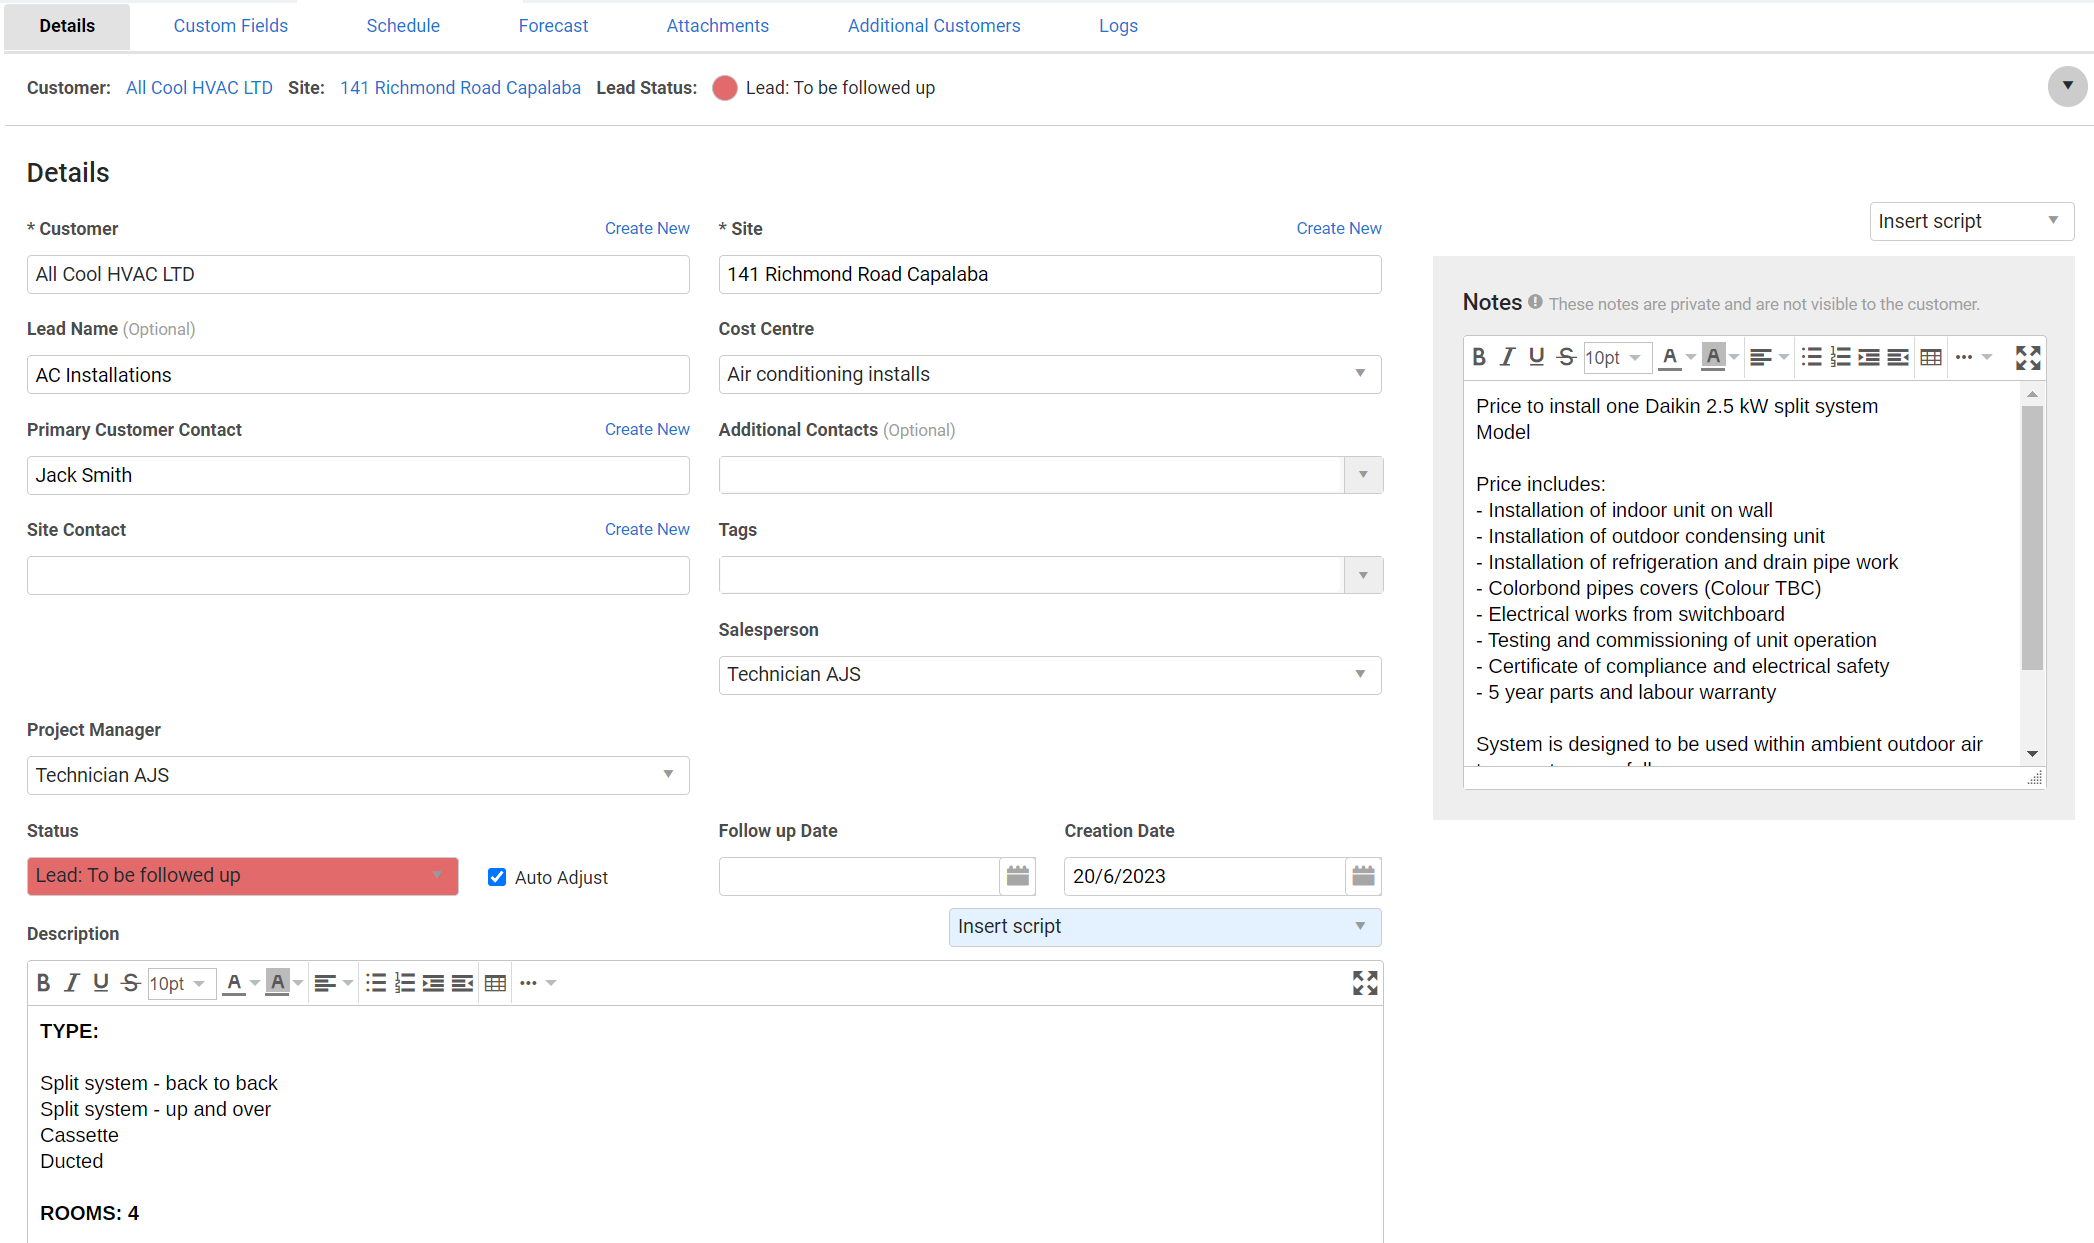
 - Select the Customer. If the lead is from a new customer, click Create New and enter the new customer's details. Click Save and Finish. The new customer is now created and you can continue creating the lead.
- Select the Site.
- Click Save.
- If required:
- Enter a Lead Name.
- Select the Primary Contact, Site Contact and Additional Contacts.
- Select Tags.
- Select the Cost Centre.
- Select the Status.
- Enter the Description.
- Click Save and Finish.
After creating the lead, you can assign or schedule it.
 Assign a lead
You can assign a lead to a salesperson and select a date for them to follow-up the lead. Learn more in How to Create Employees.
To assign a lead:
- Go to Leads
 > Open Leads.
 - Click the lead.
- In the Details tab, select the Salesperson.
- Select a Follow up Date from the date picker.
- Click Save and Finish.
 Schedule a lead
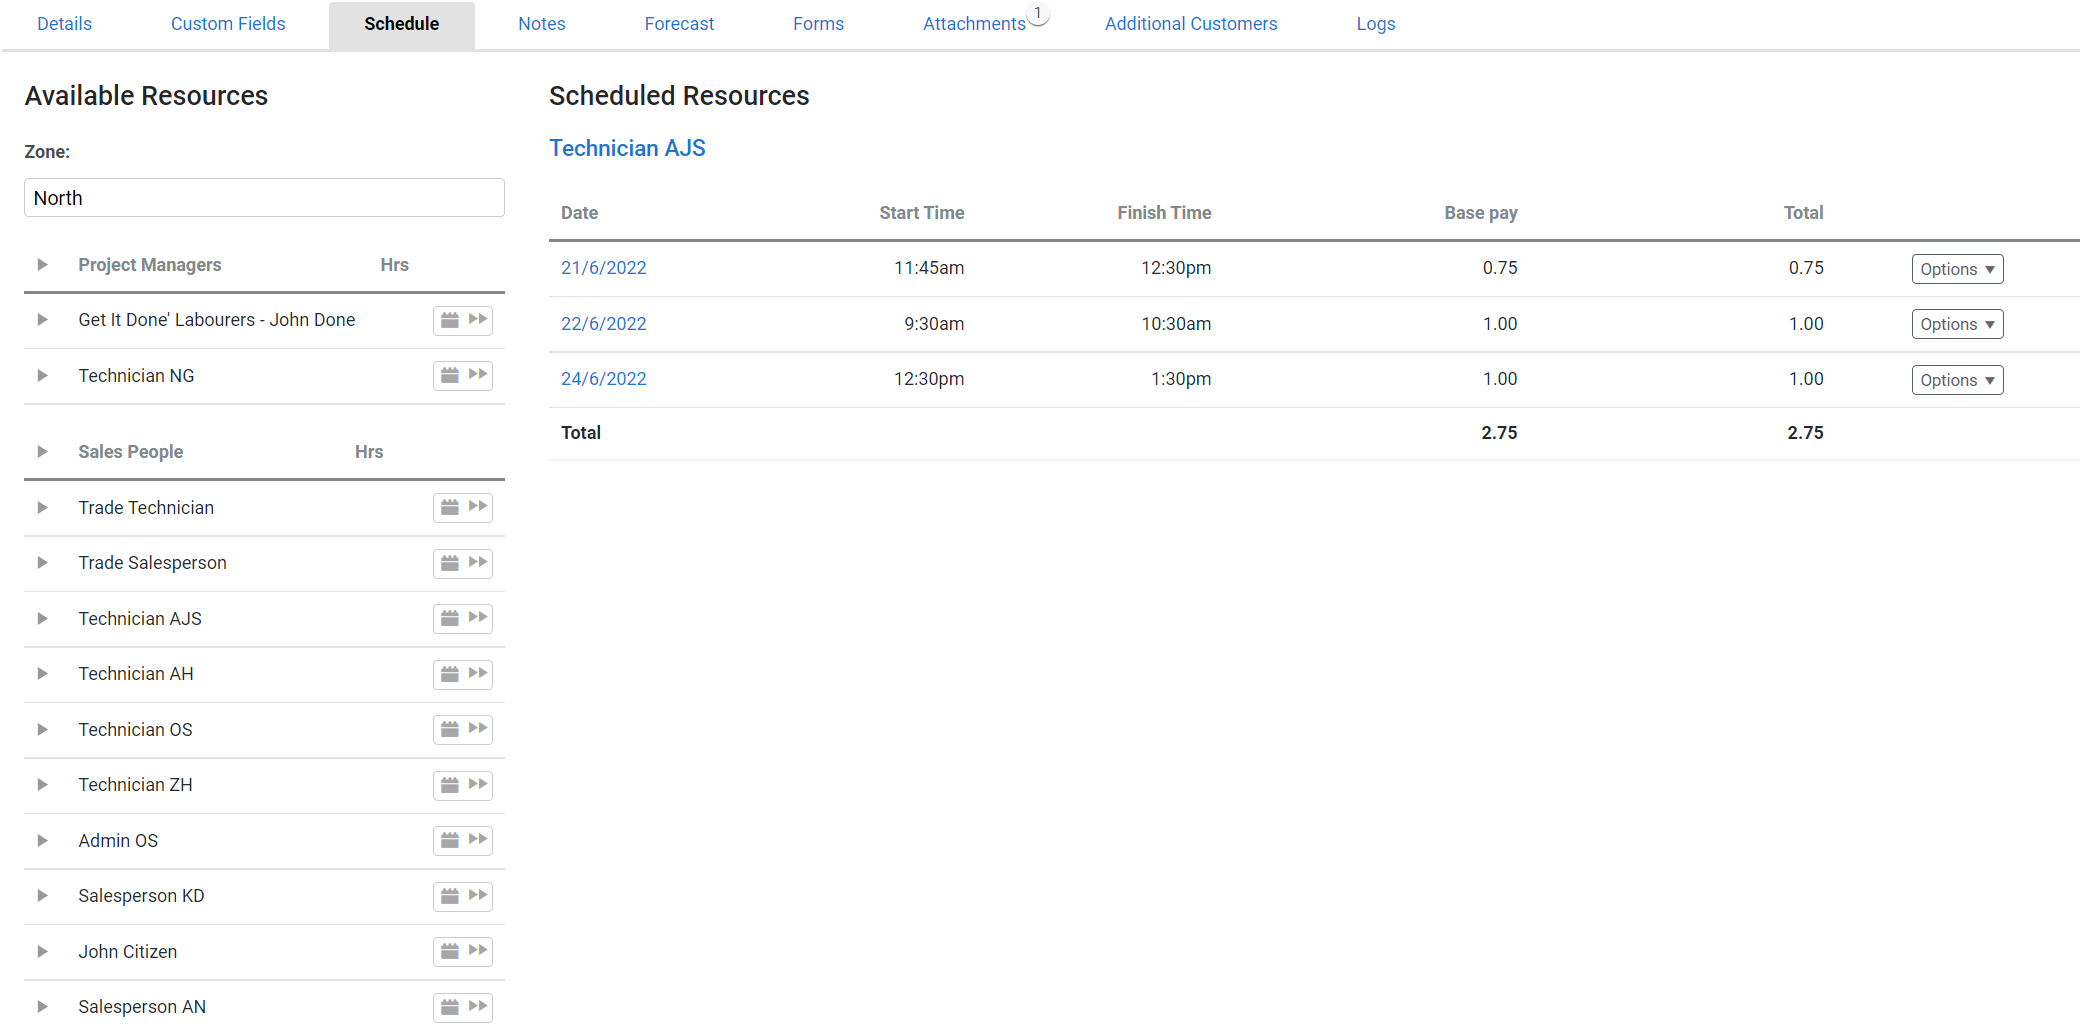
You can schedule one or multiple salespeople to a lead in the same way you would schedule a technician to a job. Learn more in About Schedules.
To schedule a lead:
- Go to Leads
 > Open Leads.
 - Click the lead.
- Click the Schedule tab.
- Next to the salesperson, click the
 icon.
icon. - Click and drag the schedule block and click the
 icon in the top right corner.
- Alternatively, click + ADD to manually select the Date, Start Time and End Time of a schedule.
- You can also schedule technicians overnight when setting the Start Time and End Time. If a schedule runs overnight, a warning text will appear.
- Repeat the above steps to schedule more employees.
- Click Save and Finish.
Once you have created a schedule block, you can go to the Forms tab to send a calendar appointment to the scheduled employee or the customer.
Schedules work in either 15 or 30 minute blocks, and it may not take this long for a salesperson to follow up on a lead. If you want to record time spent on leads more accurately, you can use the Notes tab to keep records of phone calls made to customers.
 Send a lead summary form
You can send a lead summary form to the customer or salesperson assigned to the lead.
To send a lead summary form:
- Go to Leads
 > Open Leads.
 - Click the lead.
- Click the Forms tab.
- Select Lead - Summary to Salesperson if you are sending the form to the salesperson, or select Lead - Summary to Customer if you are sending to the customer.
- Enter the email address.
- Any secondary contacts selected when setting up the lead / quote / job are pre-populated in the Cc field. You can also add more recipients in the Bcc field if you want to hide their email addresses from other recipients.
- Adjust the default Subject and Body if required. The default is set up in System
 > Setup > Forms Setup > Email.
- Alternatively, click Clear Email to enter a new Subject and Body, or select a script from the Insert Script drop-down. Learn more in How to Use Scripts.
- Click View to view the lead summary form.
- Click Send.
- Click OK to confirm.
 Send a calendar appointment to a salesperson / customer
If you have created a schedule for the lead, you can send a calendar appointment to the customer or scheduled employee.
To send a calendar reminder:
- Go to Leads
 > Open Leads.
 - Click the lead.
- Click the Forms tab.
- Select Lead - Calendar Appointment to Salesperson or Lead - Calendar Appointment to Customer from the Forms drop-down list.
- In the pop-up window, select the appointment from the Forms drop-down list.
- Select the Primary Contact to address the email to, then click to add additional Contacts.
- Alternatively, enter a new email address in the To field.
- Any contacts selected as the Contact For leads are pre-populated in the Cc field. You can also add more email addresses in the Bcc field.
- Adjust the email details and enter a Subject and Body.
- Click Send > OK.
Advanced
 Create a lead from a customer
You can create a lead from within a customer card.
To create a lead from a customer:
- Go to Customers and click the customer.
- Click Options on the far right.
- Hover over Create.
- Click Lead.
Continue creating the lead as normal.
 Record price estimates and expected due dates
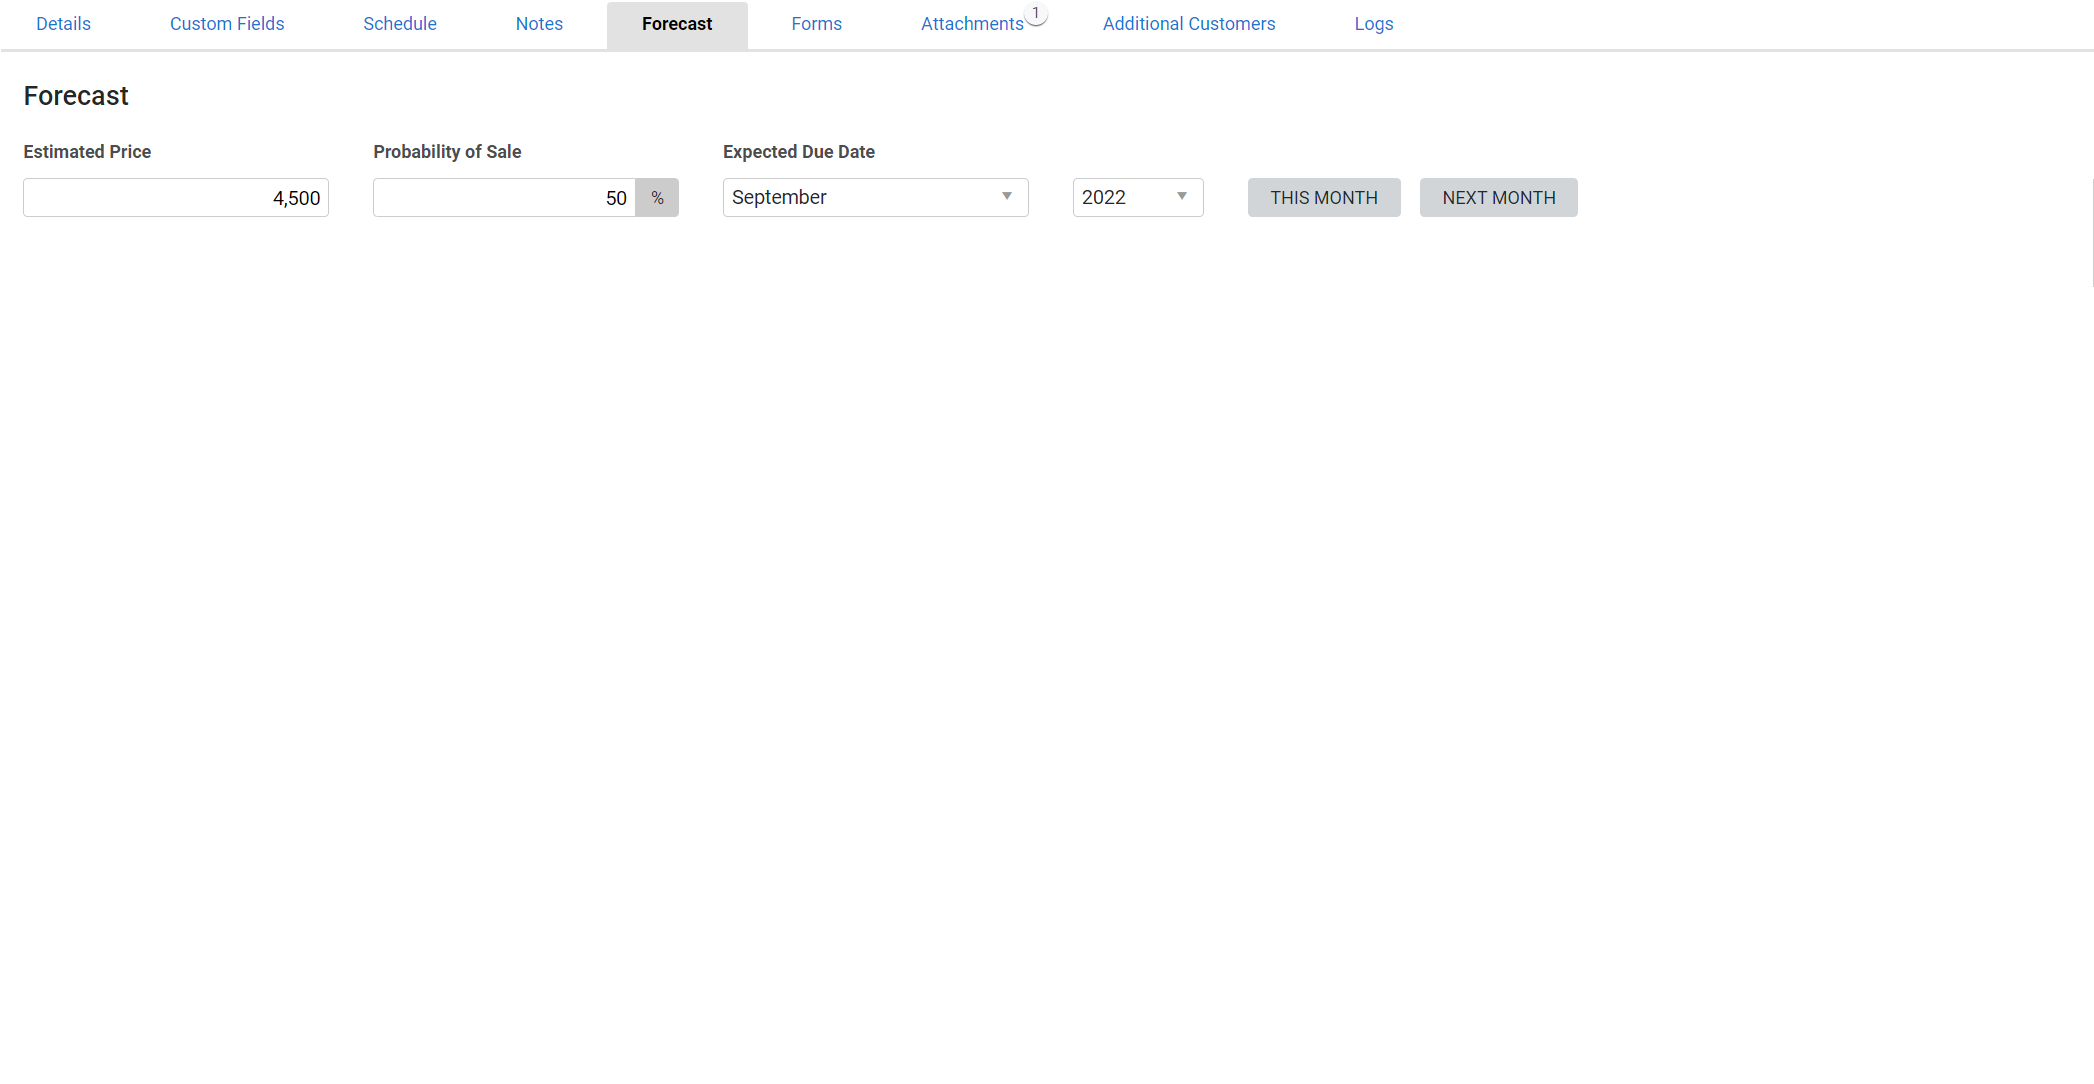
Use the Forecast tab to record estimates of the price and approximate date if a lead is successful. This tab is necessary for the Sales Forecast report.
To use the Forecast tab:
- Go to Leads
 > Open Leads.
 - Click the lead.
- Click the Forecast tab.
- Enter the Estimated Price.
- Enter the Probability of Sale.
- Select the month and year under Expected Due Date. Alternatively, click This Month or Next Month instead of manually setting the date.
- Click Save and Finish.
 Additional Customers
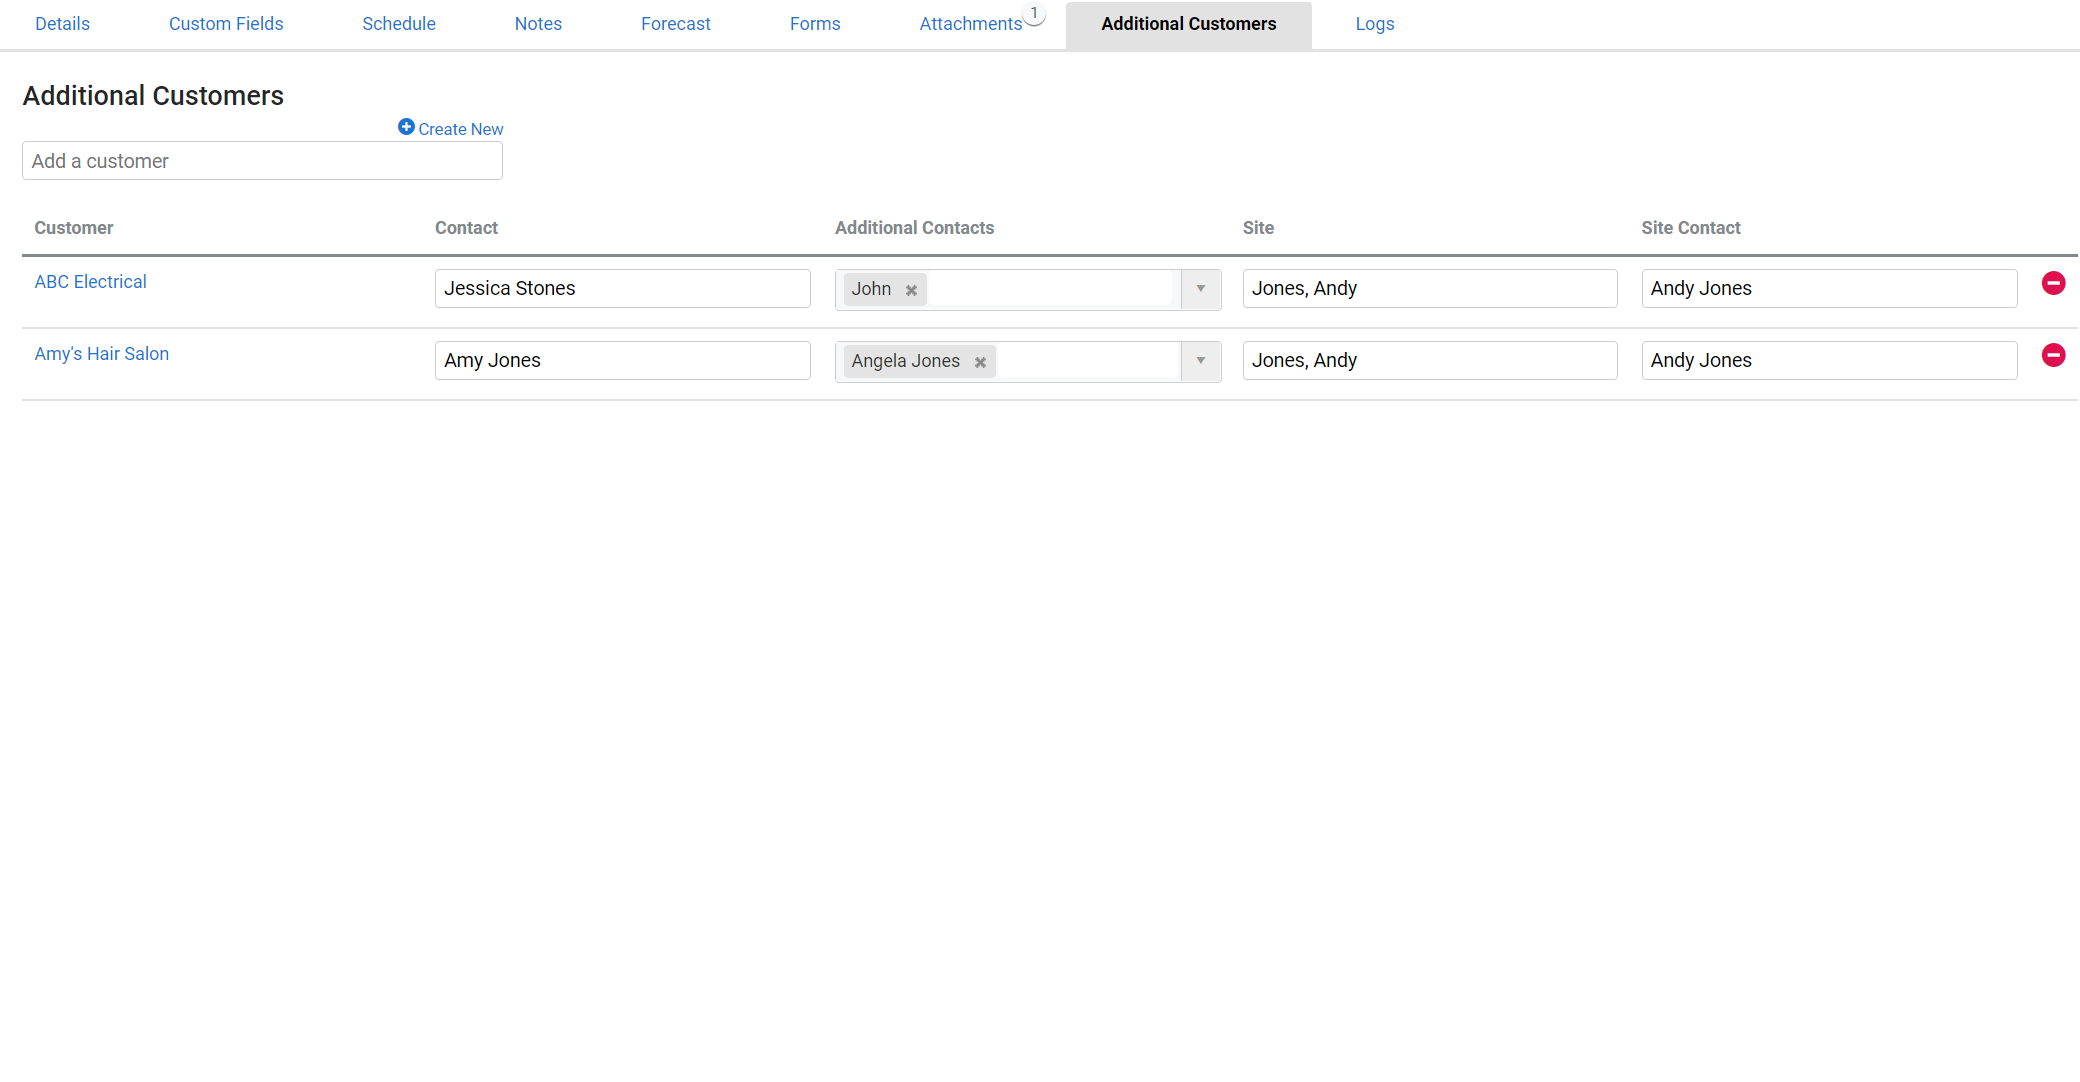
You can add additional customers to a lead.
To add additional customers:
- Go to Leads
 > Open Leads.
 - Click the lead.
- Click the Additional Customers tab.
- Select an existing customer or click Create New to create a new one.
- Each customer is added as a new row in the table. Make sure that the correct Contact and Additional Contacts are selected.
- Under Site, select the job site.
- By default, the primary Site and Site Contact for the selected quote is populated in the respective fields for this additional customer. Update the site details, if required.
- Click Save and Finish.
 View Lead Logs
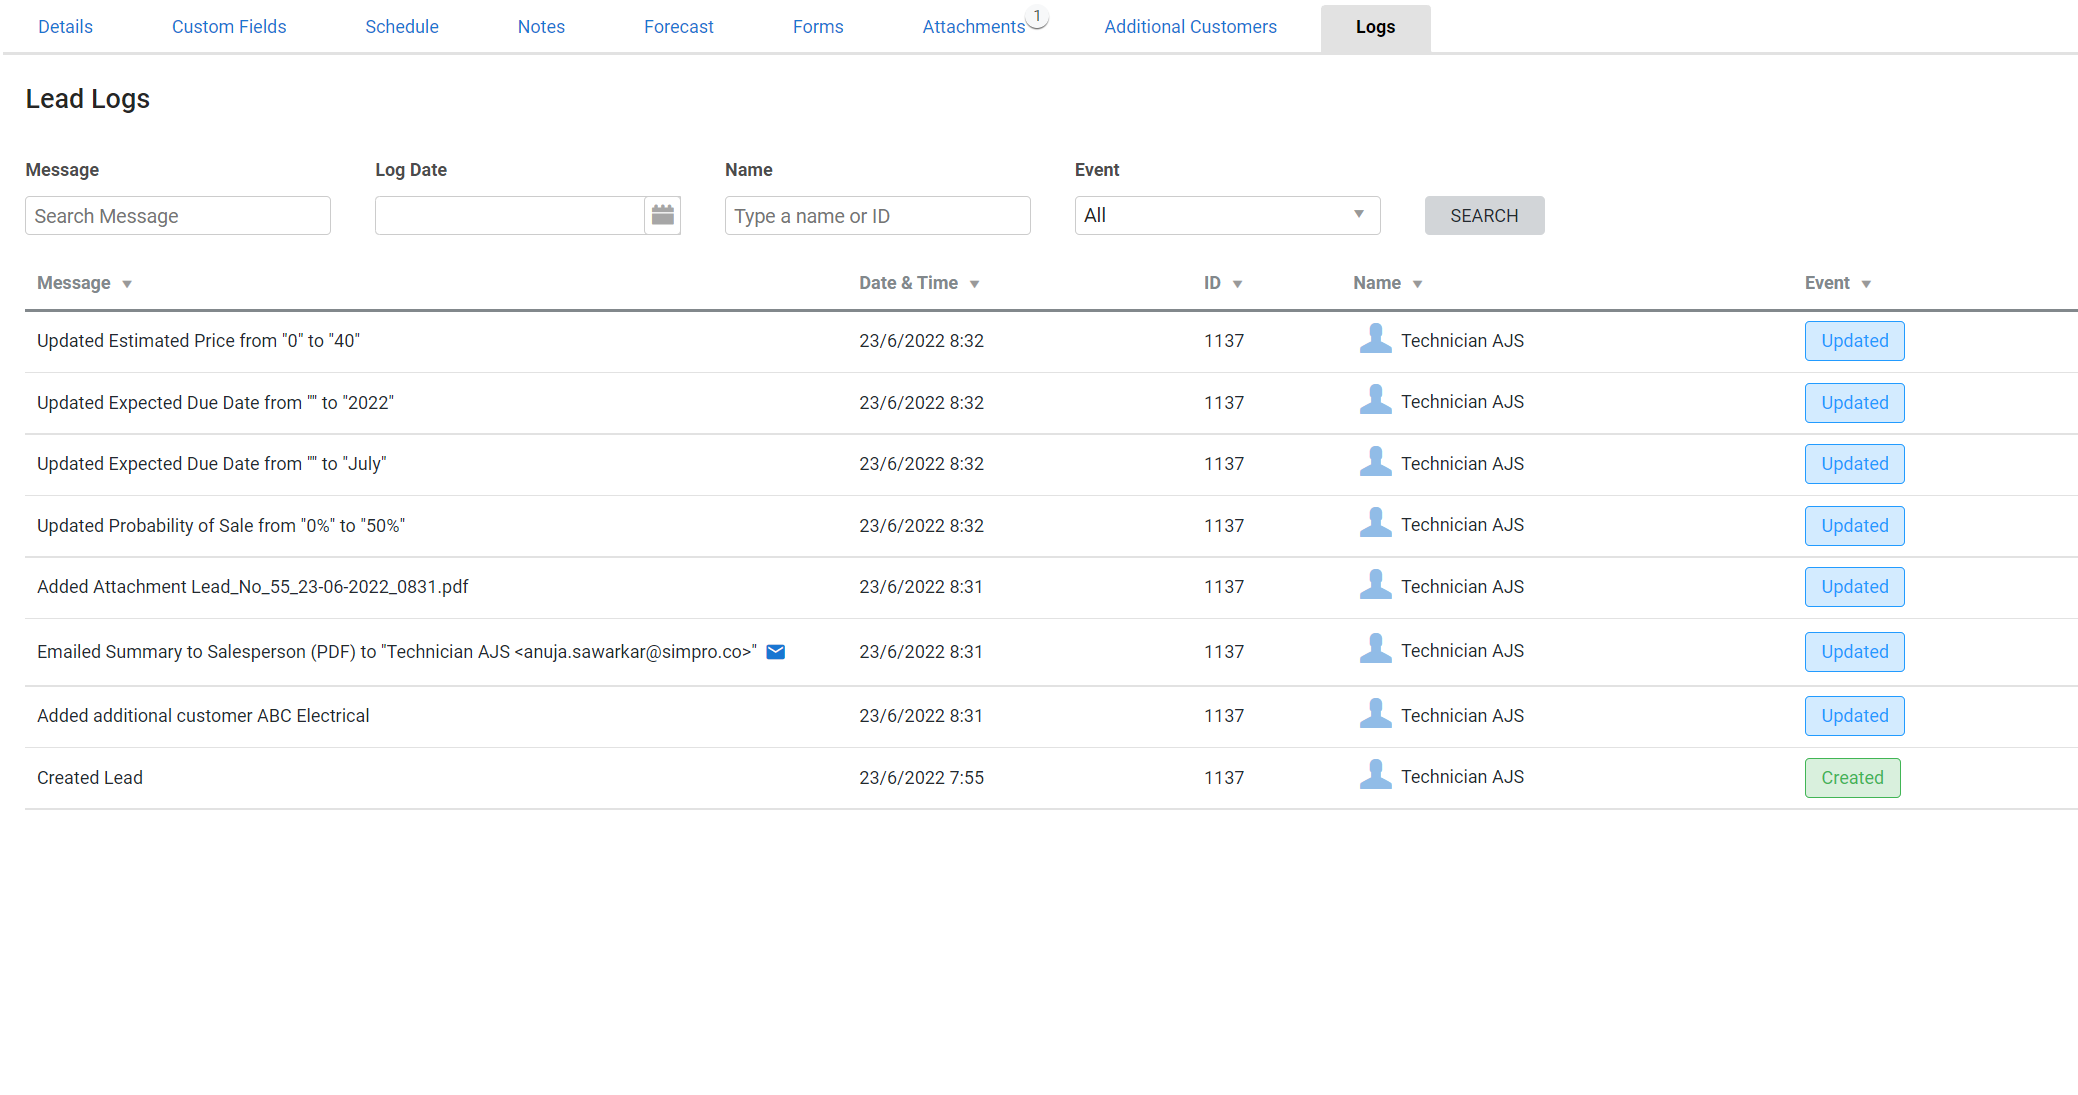
- Go to the Logs tab.
- Use the Message filter to search for specific logs, for example, you can enter terms, such as description, email, attachment in the Message field to find relevant records.
- Apply other filters as required, such as Log Date, Name of a relevant employee and the type of Event.
- Click Filter to view the list of events in the Logs tab.
 Walk Me Through
Need additional help?
Try Walk Me Through, our step-by-step guidance tool, to create a lead.
In Simpro Premium, go to Help ![]() > Walk Me Through and search Create a Lead.
> Walk Me Through and search Create a Lead.
Learn more in How to Use Walk Me Through in Simpro Premium.
 Learn more in the Learning Toolbox
For additional training, complete an interactive material in the Simpro's Learning Toolbox. Learn more in About Simpro's Learning Toolbox.
 Get a demo
Interested in Simpro and want to learn how its features can benefit your business? Visit the Simpro website to discover more and request a demo today.
