Last Updated: December 08 2025
Overview
Set up the layout of your gas certification forms, as well as the email template that automatically appear every time you email them.
These set up options affect the following forms available to send from jobs:
- Appliance Commissioning Report
- Appliance Service Report
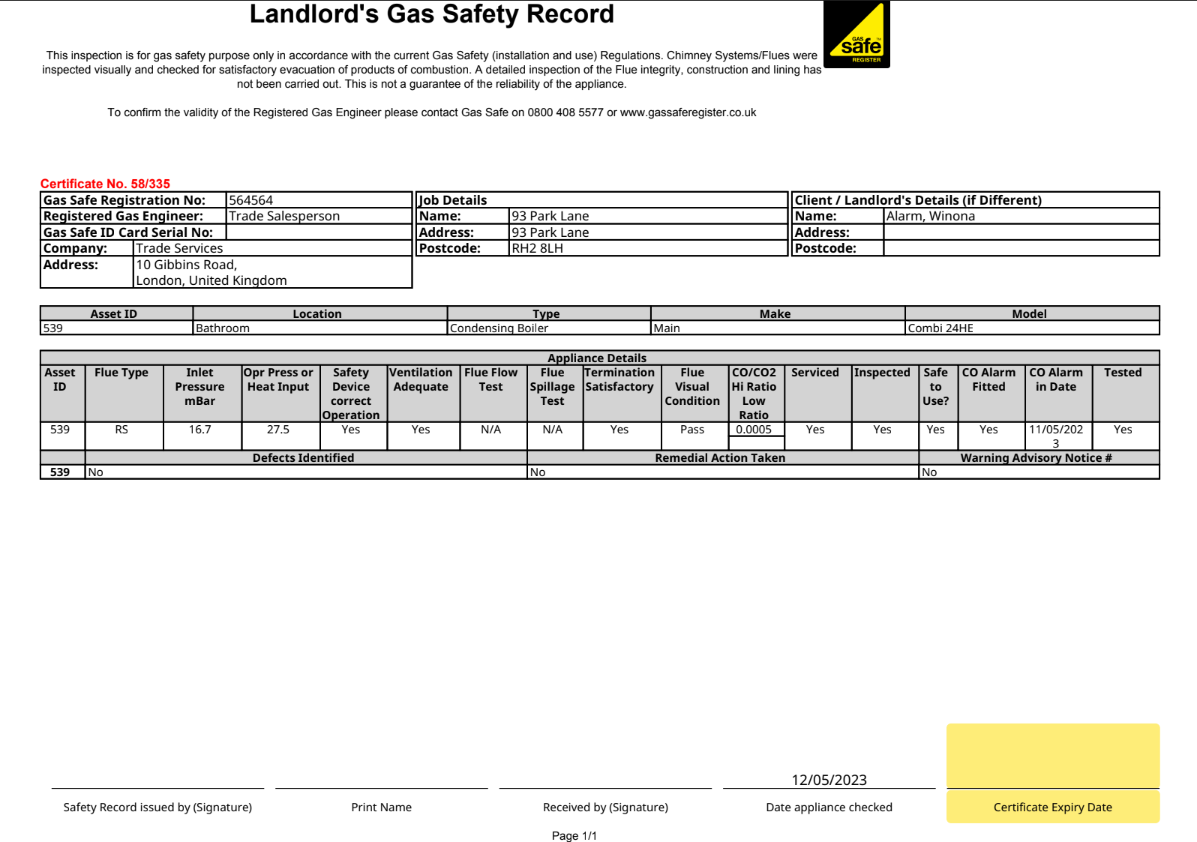
- Landlord Gas Safety Record.
 Required setup
In order to view content or perform actions referred to in this article you need to have the appropriate permissions enabled in your security group. Go to System![]() > Setup > Security Groups and access your security group to update your permissions. The relevant security group tab and specific permissions for this article can be found here:
> Setup > Security Groups and access your security group to update your permissions. The relevant security group tab and specific permissions for this article can be found here:
 Standard
 Set up general options
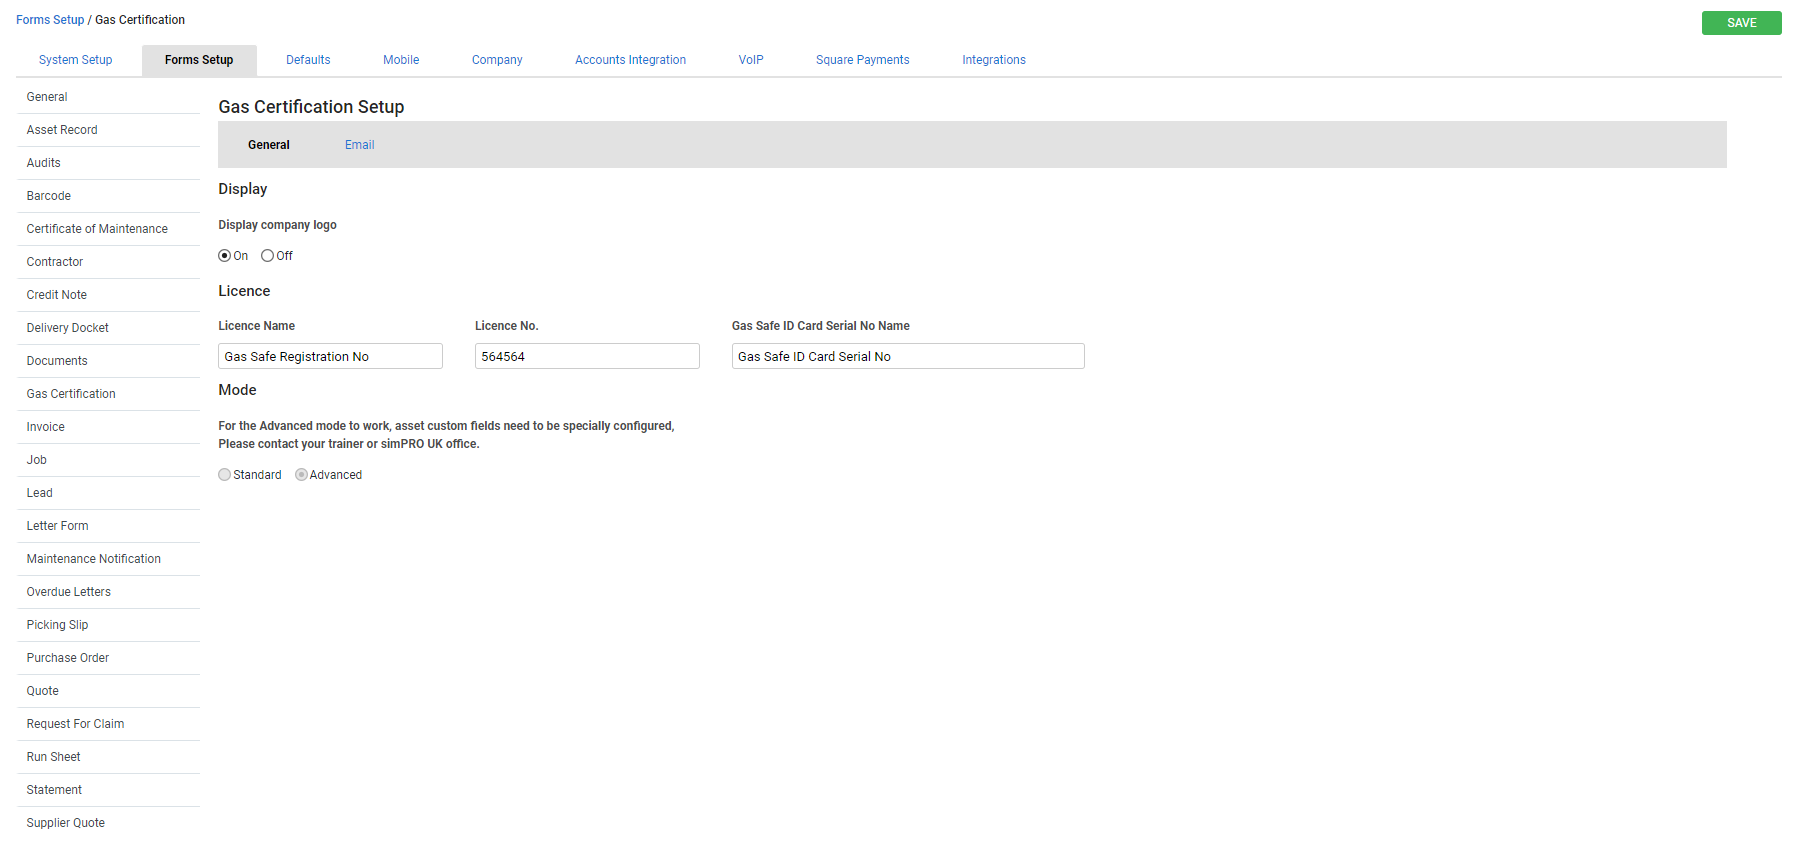
To set up the layout of how your gas certification forms appear when you print or email them, go to System ![]() > Setup > Forms Setup > Gas Certification > General and adjust the following options as required:
> Setup > Forms Setup > Gas Certification > General and adjust the following options as required:
| Display company logo |
Select On to show the company logo you have uploaded in the Company tab on the form. Learn more in Upload company logo. Select Off to hide the company logo you have uploaded. |
| Licence Name | Enter the name of the licence. This populates the first column in the first row. |
| Licence No. | Enter the licence number corresponding to the licence name. Alternatively, leave this blank to fill out the licence number on individual forms. |
| Gas Safe ID Card Serial No Name | Enter the name of the gas safe ID Card serial number. |
 Test how your settings apply
To test how your gas certification form settings apply to a real form as you update them:
- Access the job card. Perform an asset test as normal. Learn more in Record test results in a job card.
- Click the Forms tab.
- Under Form, select any of the gas certification forms:
- Appliance Commissioning Report
- Appliance Service Report
- Landlord Gas Safety Record.
- Click View to open the gas certification form in a new tab.
- Return to Simpro Premium, then click Finish.
- Go to System
 > Setup > Forms Setup > Gas Certification > General.
 - When you update your gas certification form settings and save a change, return to the gas form tab and refresh the page to view how the updated settings have changed the layout of your gas certification form.
 Set up the email template for gas certification forms
To set up the email template to appear when you email a gas certification form in Simpro Premium:
- Go to System
 > Setup > Forms Setup > Gas Certification > Email.
 - Under Use Default Settings:
- Clear the check box to Customise gas certification email settings.
- Select the check box to use settings defined in System
 > Setup > Forms Setup > General > Email Setup, including Request Read Receipt, Send CC of Email to Current User, From Name, From Address and CC to (email addresses separated by commas). Learn more in Email Setup sub-tab.
- Under Email Template, adjust the default email Subject and Body to appear every time you send the form:
- Adjust text in the email Body using the formatting options, for example, bold, italics, or underline, at the top of the text box.
- Use the [projectType] field in Subject, so that if the Show as Estimate option is selected, the email subject updates to Estimate. Also, any reference to Quote in the form template is replaced with Estimate.
- To insert information from Simpro Premium into the email template so that it is automatically retrieved from the system when you email the form, click to include the information in the Subject or Body, then click the field of information in the Insert Field list.
- For example, rather than typing out your company email, click to insert the Company Email field to automatically retrieve the email address from System
 > Setup > Company.
- For example, rather than typing out your company email, click to insert the Company Email field to automatically retrieve the email address from System
- When you have finished adjusting the email template and settings, click Save.
Note that some details, such as site fields and work order number are specific to work orders and shall not populate in the body of email sent from the Work Order invoice.
If you have entered text in System![]() > Setup > Forms Setup > Email Set up > Email Template > Body, it is automatically added to the body text in this email template when you email a form.
> Setup > Forms Setup > Email Set up > Email Template > Body, it is automatically added to the body text in this email template when you email a form.
 Customise gas certification email settings
When you clear the Use Default Settings check box, you can customise your gas certification email settings with the following options:
| Request Read Receipt | Select On to automatically request that the email recipient confirm their receipt of your email. |
| Send CC of Email to Current User |
Select On to CC the logged-in Simpro Premium user sending the email. This sends the email to the primary email address entered in the user’s employee card file. The secondary email address is not used. |
| From Name |
Enter the sender name to appear to the recipient of the email when sent from any Simpro Premium user. If left blank, the email uses the logged-in Simpro Premium user’s name as it appears in their employee card file. |
| From Address |
Enter the sender’s email address to display to the recipient of the email when sent from any Simpro Premium user. The email address used in this field is that which the recipient can reply to. If left blank, the email sends from the logged-in Simpro Premium user’s primary email address located in their employee card file. |
| CC to (email addresses separated by commas) |
Enter the email addresses, separated by commas, that you wish to receive all forms of this type emailed from Simpro Premium. This is the default CC. You can also select additional CC in a job in the Forms tab. |
When you have finished adjusting settings, click Save.
 Advanced
To turn on the advanced gas certification form, contact Simpro support. You also need to make sure that your employees and assets are set up appropriately.
Certificate Expiry Date
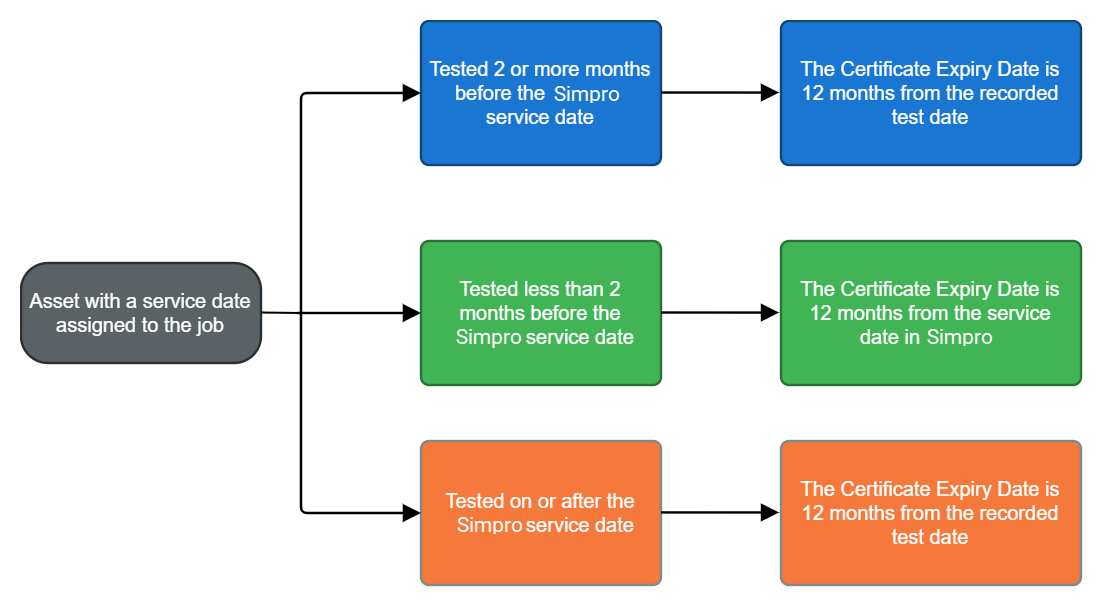
For jobs created from the Maintenance Planner, the certificate expiry date is based on the first asset assigned to the job, and is calculated based on when the asset was tested in relation to the service date.
For recurring jobs, the certificate expiry date is based on the recurring job expiry date.
For one off jobs, the certificate expiry is based on the job due date.
For Maintenance Planner jobs, the asset must have a 12 month service level assigned and be tested for the expiry date to display on the certificate. Learn more in How to Create Service Levels.
The certificate number on the form is generated from the Simpro Premium customer ID and job number.
 Set up general options
To set up the layout of how your gas certification forms appears when you print or email them, go to System ![]() > Setup > Forms Setup > Gas Certification > General and adjust the following options as required:
> Setup > Forms Setup > Gas Certification > General and adjust the following options as required:
| Display company logo |
Select On to show the company logo you have uploaded in the Company tab on the form. Learn more in Upload company logo. Select Off to hide the company logo you have uploaded. |
| Licence Name | Enter the name of the licence. This populates the first column in the first row. |
| Licence No. | Enter the licence number corresponding to the licence name. Alternatively, leave this blank to fill out the licence number on individual forms. |
| Gas Safe ID Card Serial No Name | Enter the name of the gas safe ID Card serial number. |
 Set up employees
Employees need to have the correct licence assigned to them to properly use the advanced gas certification form. Learn more in How to Create Employees.
To set up your employees for the gas certification forms:
- Go to People
 > Employees and open the relevant employee.
 - Go to Details > Licences.
- Under Licence Name, enter the same licence name that you have entered in the gas certification form setup. These names must match exactly.
- Enter the Licence Reference.
- Select the Licence Expiry Date.
- Click Add.
- Click Save.
Add the same licence to other employees who are servicing gas appliances.
 Set up assets
To set up your assets for your gas certification forms:
- Create an asset type and name it 'Gas Appliance'. Learn more in How to Create Asset Types.
- Create the following custom fields in this exact order:
- Create a text field named 'Location'.
- Create a list field named 'Type'.
- Create a text field named 'Make'.
- Create a text field named 'Model'.
- Go to the Test Readings tab and create test readings with the following names in this exact order:
- Flue Type
- Inlet Pressure mBar
- Opr Press or Heat Input
- Safety Device correct Operation
- Ventilation Adequate
- Flue Flow Test
- Flue Spillage Test
- Termination Satisfactory
- Flue Visual Condition
- CO/CO2 Hi Ratio
- CO/CO2 Low Ratio
- Serviced
- Inspected
- Safe to Use?
- Defects Identified
- Remedial Action Taken
- Warning Advisory Notice #
- CO Alarm Fitted
- CO Alarm in Date
- Tested
- Add any other asset type details.
- Click Save and Finish.
- Create an asset type and name it 'Pipework'. Learn more in How to Create Asset Types.
- Go to the Test Readings tab and create test readings with the following names in this exact order:
- Pipework Visual Inspection Satisfactory?
- Emergency control Valve Accessible?
- Gas Tightness Satisfactory?
- Earth Bonding Satisfactory?
- Add any other asset type details.
- Click Save and Finish.
Add this asset type to the relevant sites as normal. Learn more in How to Manually Create Assets.


