Last Updated: December 12 2025
Overview
After you have created your project structure using sections and cost centres, start planning the parts and labour that are used for each cost centre.
When you are creating a quote, use the Parts & Labour tab to add take off templates, pre-builds, catalogue items, and labour rates to estimate the work required. You can also add customer assets if the project involves asset maintenance.
Parts and labour can be added both in the quote stage and the job stage.
 Required setup
In order to view content or perform actions referred to in this article you need to have the appropriate permissions enabled in your security group. Go to System![]() > Setup > Security Groups and access your security group to update your permissions. The relevant security group tab and specific permissions for this article can be found here:
> Setup > Security Groups and access your security group to update your permissions. The relevant security group tab and specific permissions for this article can be found here:
 Add parts
In each cost centre, add parts including take off templates, pre-builds, catalogue items, and one off items to build your estimate of the works. These items contribute to your estimated budget in the project breakdown. Learn more in How to Use the Breakdown Table in Quotes and How to Use the Breakdown Table in Jobs.
If a catalogue item record is for a large quantity of a specific material, you can update it so that it can be added to a project in smaller quantities. For example cable that is purchased from the supplier in 100m coils and sold to customers in 1 metre lengths. Learn more in How to Estimate Pack Items.
To quickly add catalogue items, pre-builds, and take off templates to your project:
- In the Parts & Labour > Billable tab, click in the Add a Part search field.
- Note that this field is not visible if the cost centre is locked for items and prices
- Filter by Catalogue items, Pre-Builds or Take Off templates. You can also add a one off item.
- Search for the required catalogue item, pre-build or take off template by part number or name.
- Click the item in the search results to add it to the Parts table.
Alternatively, to add parts to a cost centre from different groups and subgroups:
- In the cost centre, go to Parts & Labour.
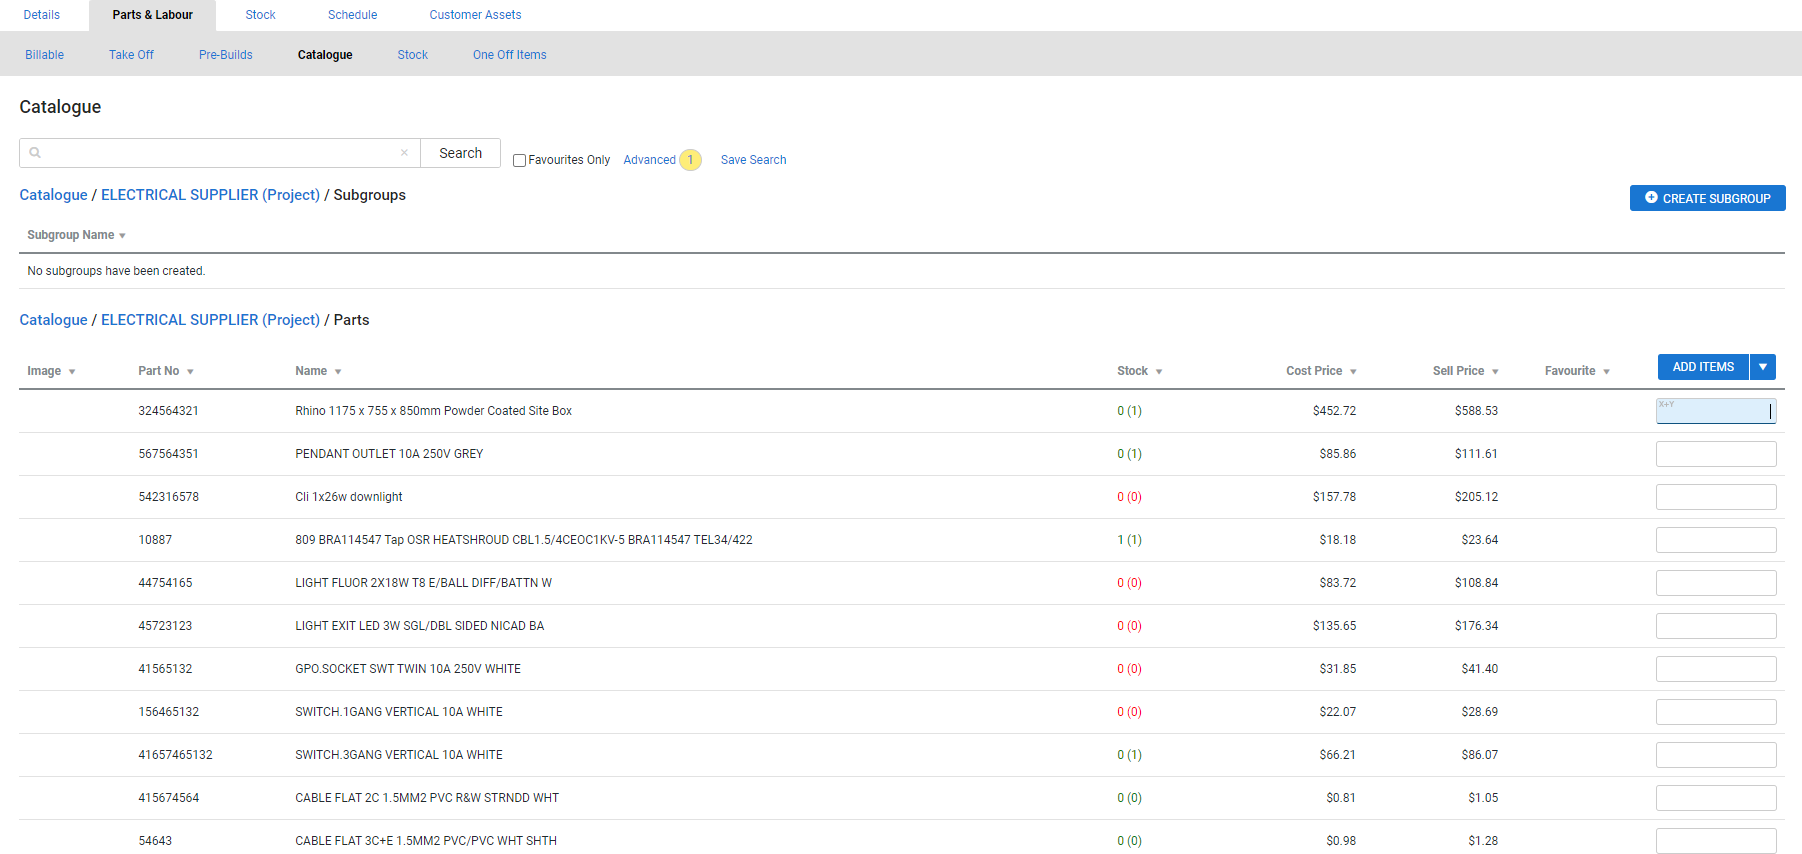
- Click the sub-tabs to add Take Off Templates, Pre-Builds, and Catalogue Items.
- Learn more in How to Create a Take Off Template, How to Use Pre-Builds, and How to Create a Catalogue Item.
- Locate the items you want to add by searching or clicking through the groups.
- In the Catalogue tab when you navigate to a group, click the drop-down arrow beside Create Subgroup and select Create Item to create a new item in the selected group.
- Similarly, in the Pre-Builds tab click the drop-down arrow beside the ADD ITEMS and select Create Pre-build to create a new pre-build.
- Note that if there are no items in the group or subgroup only the Create Item or Create Pre-build buttons are displayed.
- Enter the quantity and click Add Items.
- When you have finished adding items, click Save and Finish > Save.
 Add a one off item
To add a one off item:
- In the cost centre, go to Parts & Labour > One Off Items.
- Click Add One Off Item.
- To include this item as:
- a material cost, select Material
- as a labour cost, select Labour.
- To charge the customer for this item, leave the Billable? check box selected.
- To include this item in a purchase order, select Inventory Item?
- Enter a Description, the Estimated Time, and the Quantity of the item.
- Enter the Actual Cost, excluding tax, and Actual Cost Date.
- Select a Sales Tax Code.
- If Billable? is selected:
- Enter the Estimated Cost, excluding tax
- Enter the Markup %
- Enter the Sell Price, excluding tax.
- Click Save and Finish.
If you need to order the one off item, learn more in How to Order a One Off Item.
 Use add-on pricing
If any items added in the Parts & Labour tab have add-on pricing enabled, all items use regular pricing by default. Learn more in Create a pre-build and Enable add-on pricing.
To use add-on pricing:
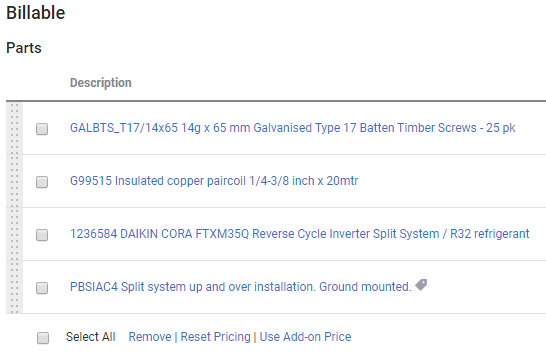
- In the Parts table, click Options > Use Add-on Price.
- Alternatively, select the check boxes for multiple items, then click Use Add-on Price in the footer options.
- A
 icon appears next to the item name, and the Markup and Sell Price columns update.
 - Click Save and Finish > Save.
To change the item back to regular pricing, click Options > Use Regular Price.
 Add service fees
To add service fees to a project:
- Open the cost centre in the project.
- Go to Parts & Labour.
- Select from the Call out / Service Fee drop-down list.
- Click Add.
- Click Save and Finish > Save.
Learn more in How to Set Up Service Fees.
 Add labour
Use labour rates to estimate the cost of labour on the project.
To add labour rates:
- Open the cost centre in the project.
- Go to Parts & Labour.
- Select the labour rates from the list.
- Each labour rate represents a single technician who is performing work on the job.
- To use the Estimated Time calculated from the items in the Parts table, select the check boxes next to each labour rate and the estimated time is divided evenly among the selected labour rates.
- Alternatively, manually enter the number of hours in the Time column.
- If required, adjust the Cost Rate, Markup, and Sell Price of the labour rate.
- To change the tax code on a labour rate, click Options > Change Tax Code, then select the new tax code and click Save.
- Click Save and Finish > Save.
To add labour rates to a project, you need to assign them in the customer card file. If the default labour type for the project has been automatically selected and the check box is selected, any estimated time associated with catalogue items or pre-builds automatically adds to the billable hours.
In the Parts & Labour tab the labour type that is selected inherits all cost and price changes made to the rate on the customer card. The cost centre must be unlocked and there must be zero hours entered for the labour rate to inherit changes. Alternatively, click the check box next to the labour type to remove the hours and force the labour rate to inherit any changes.
 Add customer assets
If the project involves maintaining assets, add the assets to the quote and / or job.
To add customer assets to a project:
- Go to Cost Centre List, then click the applicable cost centre.
- Go to Customer Assets.
- Under Add Asset, search and select the required asset.
- Click Save and Finish > Save.
Depending on your system defaults, assets associated with the job site may be automatically added when the project is created. Make sure you check the Customer Assets tab to unassign any assets not needed. Learn more in Customer Assets.


