Last Updated: December 15 2025
Overview
Raise progress claims to invoice for part of a job, such as when one stage of a project has been completed.
You can claim a percentage of the total value, manually enter a claim amount, or claim per item.
After you have completed and approved a progress claim, you can then email an invoice form directly to the customer, and view the progress claim summary on the form for an overview of the cost centres and sections claimed to date, the progress claims created and paid off, and the remaining claim balance.
Progress claims may be associated with retention. Learn more in How to Set Up Retention.
US only: If you use Simpro Premium in the United States, the term 'progress invoice' is used instead of 'progress claim'.
US only: If you use Simpro Premium in the United States, the term 'retainage' is used instead of 'retention'.
 Required setup
In order to view content or perform actions referred to in this article you need to have the appropriate permissions enabled in your security group. Go to System![]() > Setup > Security Groups and access your security group to update your permissions. The relevant security group tab and specific permissions for this article can be found here:
> Setup > Security Groups and access your security group to update your permissions. The relevant security group tab and specific permissions for this article can be found here:
Invoice a job
You can invoice individual or multiple jobs in the following ways:
|
Update and invoice the job |
Update a job that is ready to invoice. Click Save and Finish. And, Invoice Job. |
|
Invoice an individual job |
Go to Jobs If you have already raised a progress claim against the job, click Options > Create Progress Claim. If the job has multiple cost centres, only the cost centres that are not completely claimed are displayed. To show claimed cost centres, select Show fully claimed cost centres. |
|
Create a consolidated invoice |
Create one consolidated invoice for jobs that share the same customer and exchange rate:
The selected jobs are invoiced under the same invoice in Invoices Payments made on consolidated invoices cannot be calculated as an amount paid per job, so the Amount Paid table view column is not calculated for jobs on a consolidated invoice. Learn more in How to Organise Simpro Premium Data. When you email a consolidated invoice to the customer, select the Consolidated Invoice form in the Forms tab. This form is designed to show multiple jobs on one invoice and can be customised in your invoice forms setup. Learn more in Set up consolidated invoice forms. |
You can then Create a progress claim as normal.
Create a progress claim
Raise progress claims to invoice for part of a pending, in progress, or completed job, such as when one stage of a project has been completed.
You can claim per item or enter the decided Claim Amount value as a percentage or an absolute figure at the section level or cost centre level. If you choose to claim by value, the Claim Per Item option is not available for any subsequent progress claims for that job.
In the graph to the right when you create a progress claim, you can then view the Total Claimed in green, the amount Outstanding in red, and the amount you are Claiming Today in dark green.

There are several additional tools you can use in Simpro Premium to assist in calculating your claim amounts so that you maintain positive cash flow:
| Job WIP Report | Generate the report to view a total summary of costs and current billing for a job. |
| Financial View | When creating a progress claim for a project job, access the job, then go to Project Overview > Projected and select Financial View to view the current budget and actual margin in a breakdown of costs incurred and claims to date. |
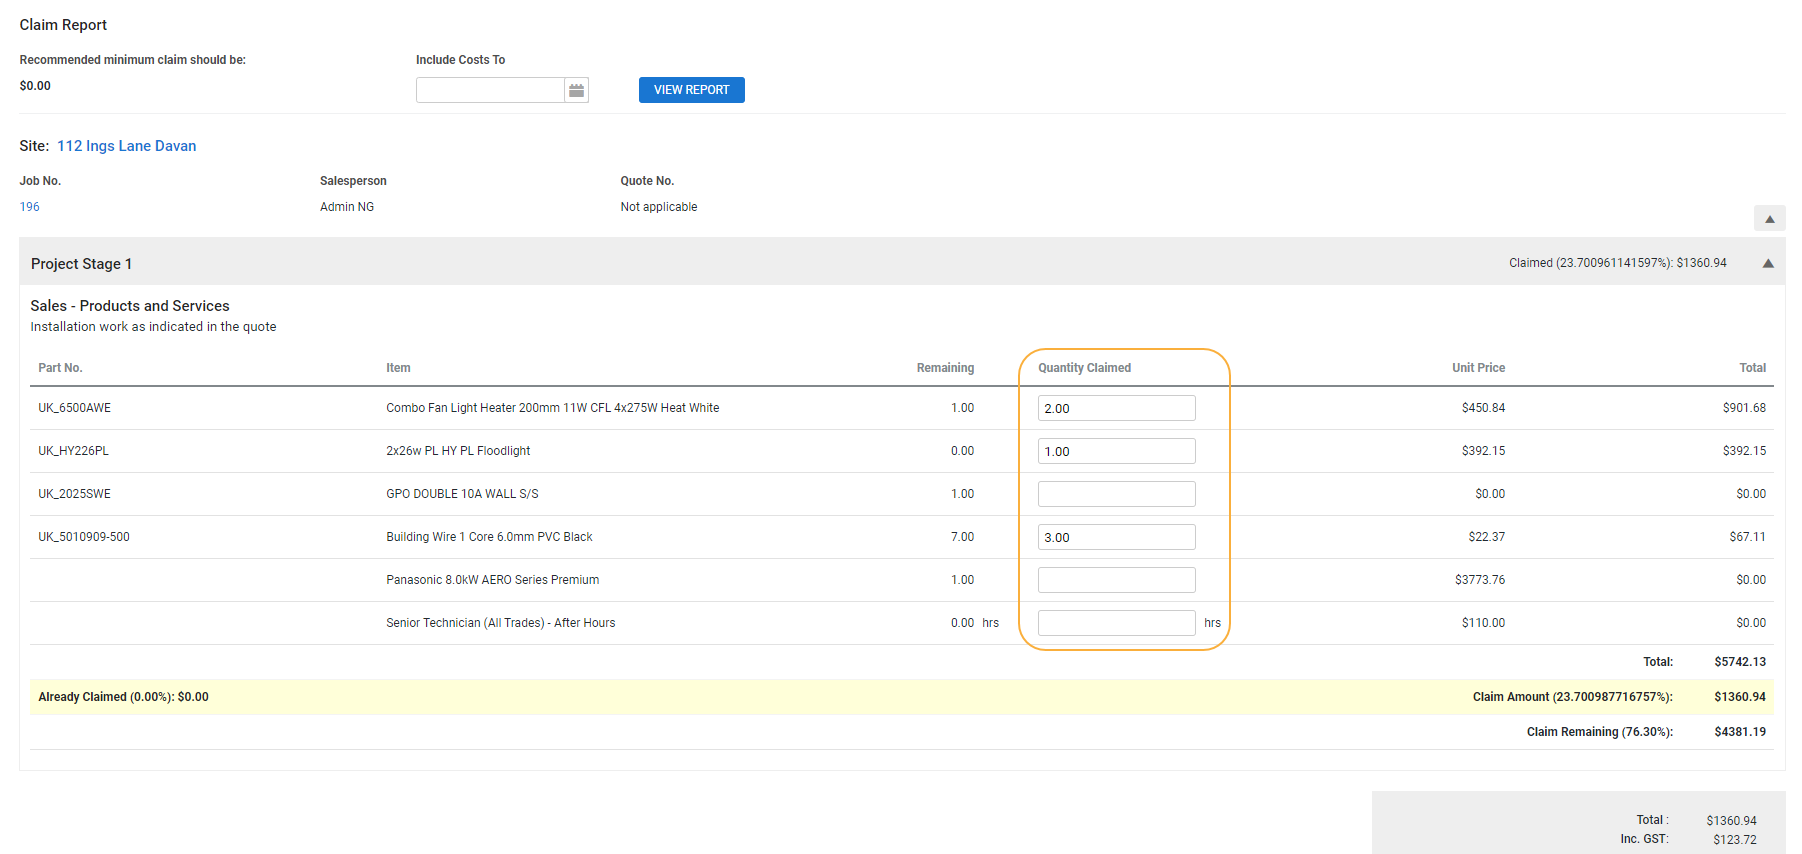
| Claim Report |
When creating a progress claim, generate the Claim Report to view the recommended minimum claim based on the costs incurred up to a specified date. Select when you wish to Include Costs To and click View Report above the claimable sections of the job. If you select to Include Costs To a future date, any costs not currently incurred but are due for receipt prior to that date is included in the report. The report is generated as a PDF form in a new tab, and shows a breakdown of committed costs to date, material costs to date, labour costs to date and labour overhead to date. |
To create a progress claim:
- Ensure all job details are updated, then Invoice a job as normal.
- Select Progress Claim as the Invoice Type.
- Select the Date Issued. This defaults to the current date.
- The Period indicates the first schedule date to the most recent schedule date on the job.
- Under Payment Due, select the number of Days from invoice date or Days after EOM (end of month) that the payment is due.
- This automatically populates according to your financial default / customer settings. Learn more in How to Set Up Financial Defaults and Adjust customer settings.
- Select the Invoice Stage.
- This indicates your business's internal approval, not the customer's approval, and depends on your security group permissions.
- UK, IE only: Select the applicable CIS / RCT Deduction Rate. Learn more in How to Manage CIS / RCT with Simpro Premium - UK, IE Only.
- Enter the Claim Amount for each cost centre as a percentage or absolute figure, or alternatively, click Claim All.
- To claim a percentage of an entire section, enter the Claim percentage in the grey bar below the section name.
- Alternatively, you can Claim per item.
- Click Finish.
Progress claims are numbered in order of issue. The first claim you raise is named Progress Claim #1, subsequent claims are labelled as #2, #3 etc, while the final progress claim is labelled as Final Claim.
The percentage claimed on each cost centre is passed onto the selected income account.
For example, a progress claim is raised to invoice 50% of a cost centre with a value of $100, $90 is assigned to Income Account A and $10 is assigned to Income Account B. The claimed percentage is split between each income account, therefore 50% of Income Account A’s value and 50% of Income Account B’s value is invoiced.
50% of $90 = 45
50% of $10 = 5
Total invoiced value = $50 (50% of $100)
If you are invoicing a job containing a membership cost centre to sell a membership to a customer, you need to invoice the full amount of the cost centre to make it active in the customer card file. Learn more in How to Sell Memberships.
Claim per item
Raise a progress claim with reference to the number of billable items or deliverables. You can add more non-billable items to a job after creating the invoice and then claim those items.
The items that you have already claimed are locked.
To claim per item:
- Ensure all job details are updated, then Invoice a job as normal.
- Create a progress claim as normal.
- Under Claim Per Item, select Yes.
- Enter the Quantity Claimed for the applicable items.
- Click Finish.
If you are invoicing a job containing a membership cost centre to sell a membership to a customer, you need to invoice the full amount of the cost centre to make it active in the customer card file. Learn more in How to Sell Memberships.
Raise the final progress claim
On the final claim of the project, click Finalise Claim to ensure all remaining cost centres are claimed, then click Finish. The retention amount is added to the final invoice.
View the claim summary
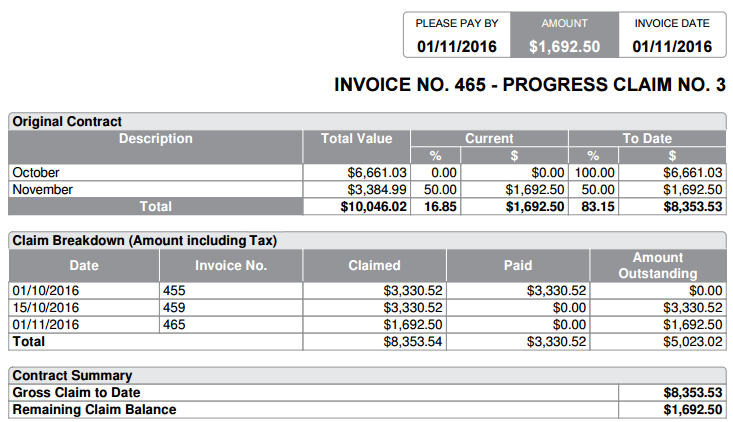
The progress claim summary provides an overview of the cost centres and sections claimed to date, the progress claims created and paid off, and the remaining claim balance.
You can view the claim summary on the itemised invoice form generated when you Email a progress claim if you have enabled it to appear in your invoice forms setup. Learn more in Claims .
You can then view the following below the Balance Due:
| Original Contract | The Description and Total Value for each project section, as well as the percentage or value claimed for each section in the Current claim and To Date. |
| Claim Breakdown |
The Date, Invoice No., Claimed and Paid amounts, and the Amount Outstanding for every progress claim raised against the job. Transactions such as credits and CIS / RCT deductions applies in the Paid column. |
| Contract Summary | The Gross Claim to Date and the Remaining Claim Balance for the job. |
Transactions such as finance charges and late payment fees do not appear in the Paid column of the Claim Breakdown as they are not part of the progress claim.
Approve an invoice
If you have selected Restrict Unapproved Invoices in System Setup, invoices must be in the Approved stage before they can be emailed to the customer, paid off, voided, or credited. If you have not selected Restrict Unapproved Invoices, invoices can be emailed to the customer before they are approved, but you must approve the invoice before applying payments.
To automatically approve claims upon creation, go to System![]() > Setup > Defaults > System
> Setup > Defaults > System![]() > Invoices > Invoice Stage and select Approved. Alternatively, select Pending to require them to be manually approved by an employee with the correct security group permissions.
> Invoices > Invoice Stage and select Approved. Alternatively, select Pending to require them to be manually approved by an employee with the correct security group permissions.
To approve a claim still in the Pending stage:
- Access the applicable claim.
- Click Unlock.
- Under Invoice Stage, select Approved.
- Click Finish.
Email a progress claim
After you have completed and approved a progress claim, you can then email an invoice form directly to the customer from Simpro Premium.
Learn how to adjust how your invoice form PDFs display, including the form title, form totals, materials and labour information, footnote, header fields, and more in How to Set Up Invoice Forms.
Learn more about using form builder templates in How to Use Form Builder Templates.
To email an invoice form:
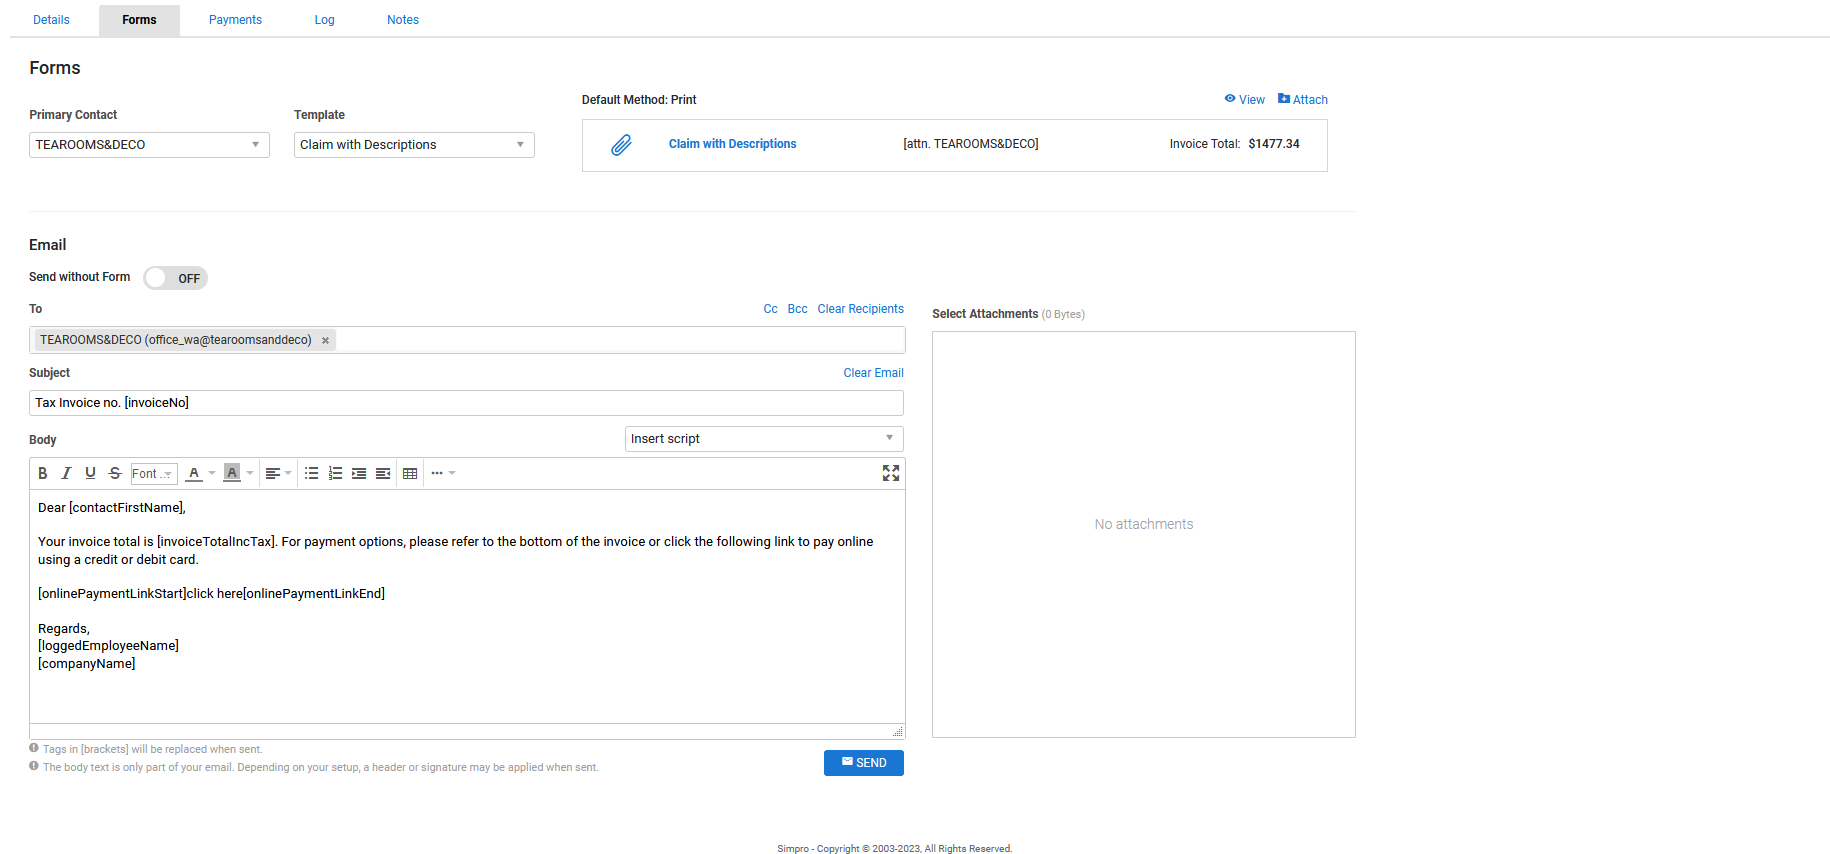
- Click the Forms tab in the claim.
- Select the form you wish to send from the Templates list.
- See Assign form templates to appear when emailing a customer invoice to learn how to update the forms that appear here.
- Click View to preview and / or print the form.
- Select a Primary Contact to address the form to and click to add additional Contacts if required.
- This is automatically populated by the primary contact for invoicing defined in the customer card file.
- Alternatively, you can manually enter email addresses and separate them with a comma. To remove recipients, click Clear Recipients.
- Any secondary contacts selected when setting up the lead / quote / job are pre-populated in the Cc field. You can also add more recipients in the Bcc field if you want to hide their email addresses from other recipients.
- Adjust the default Subject and Body template if required.
- See Set up the email template for customer invoices to learn how to update this template.
- Alternatively, click Clear Email to enter a new Subject and Body, or select a script from the Insert Script drop-down. Learn more in How to Use Scripts.
- Click Send > OK > OK.
A log entry is then created in the Log tab, where you can view the email text and any form attachments.
If you need to send multiple invoices, consolidated as a customer statement, use the Aged Receivables Report. Select the customers you want to email a statement to and click Email in the footer options. Alternatively, to send multiple individual invoices use the Sales Invoices Report. Generate the report as required, select the check boxes for the invoices to email and under Print Options, select the invoice form and click Email at the bottom of the page.
It recommended that you do not generate DOCX when you click View as it allows you to alter the invoice outside of Simpro Premium. This can cause errors within your accounting system and impact reporting.
Learn more in the Learning Toolbox
For additional training, complete an interactive material in the Simpro's Learning Toolbox. Learn more in About Simpro's Learning Toolbox.