Last Updated: January 29 2026
Overview
In Simpro Premium, sites are physical locations where you perform work for a customer.
You can identify a site by a defined site name that your business easily recognises. This may be the same as the street address, or alternatively, a building name or customer name, for example, 'ABC Lighting - Head Office'.
Sites must be associated to customers in order to be selected when creating a job or quote. You may wish to associate multiple sites to one customer, or in some cases, multiple customers to one site.
After you have created your sites, learn how to manage them in How to Manage Sites.
 Create a site
To create a site in Simpro Premium, hover over People ![]() , then click Create New Site. Alternatively, you can create a new site within a customer, quote or job. You can then manage site details, enter custom information, add site contacts, add a preferred technician and adjust tax settings.
, then click Create New Site. Alternatively, you can create a new site within a customer, quote or job. You can then manage site details, enter custom information, add site contacts, add a preferred technician and adjust tax settings.
To create a site:
- Go to People
 > Sites > Create Site.
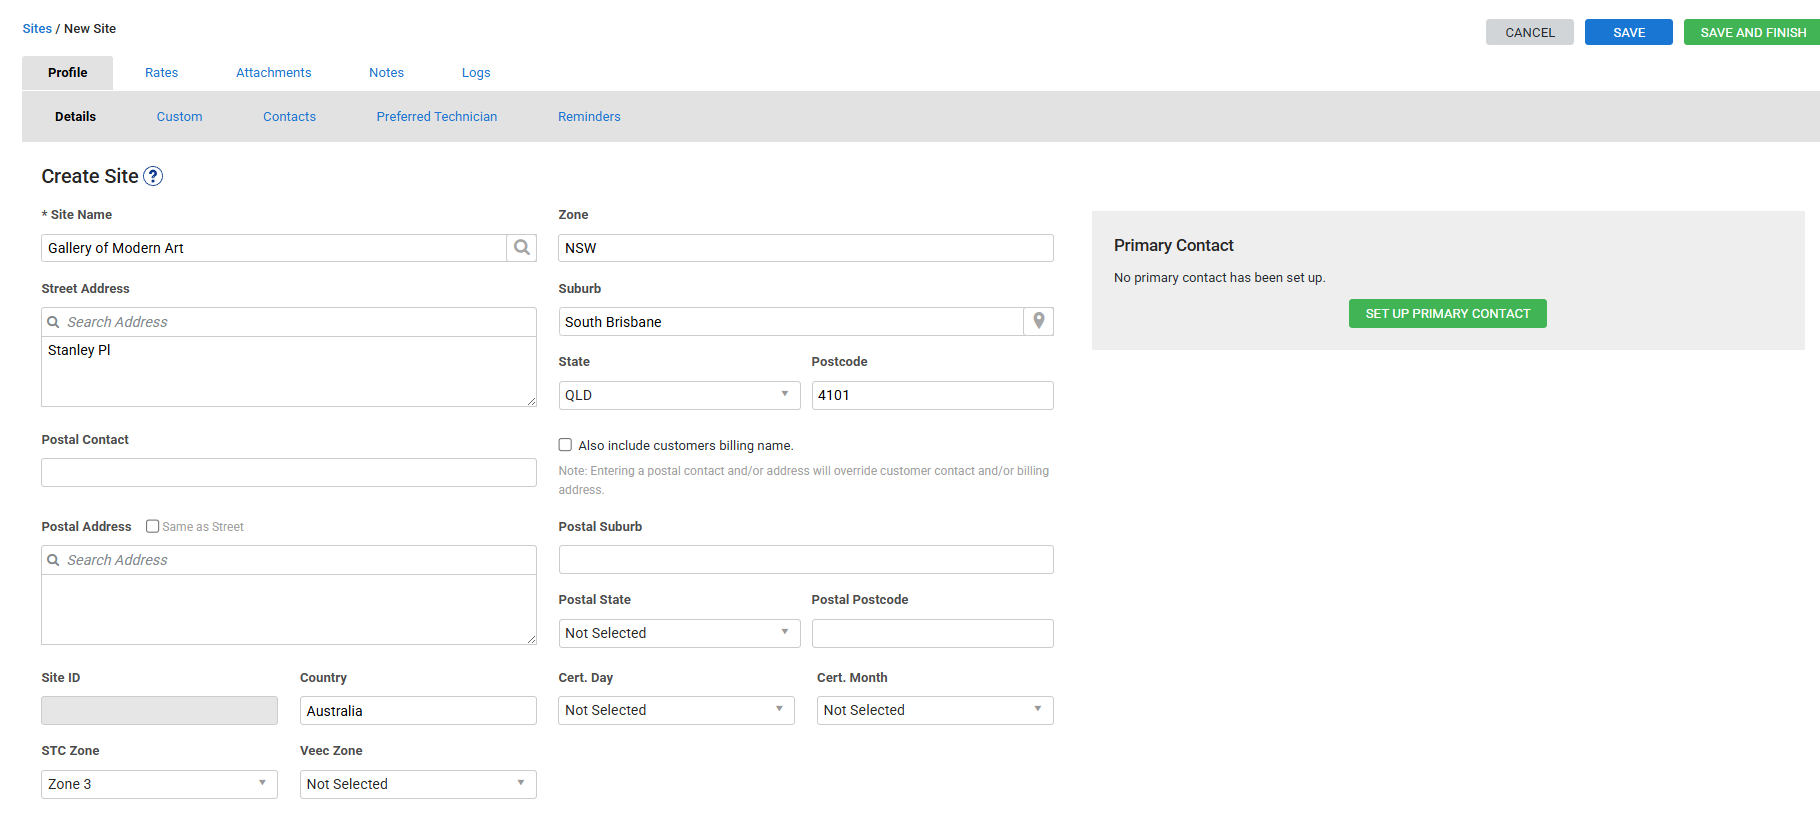
 - Enter a Site Name that clearly identifies the site.
- Search and select a Zone if applicable.
- AU / NZ / US: Click Search Address and enter the required address. Choose from the suggestions list to populate the Street Address, Suburb, State / Province and Postcode.
- Alternatively, enter the Street Address details manually.
- If your site does not have a street address, such as a sign on the side of a road or a structure in the middle of a large park, you can enter the longitude and latitude of the site, for example -27.580695, 153.129879, and Simpro Premium will pin the site to that exact location on the map.
- UK: Enter the Street Address details manually. Enter the Postcode, then click outside the text box to generate a selection of addresses.
- IE: Enter the Street Address and Eircode manually.
- To record international addresses, you can select the required country and enter in the appropriate address manually.
- Enter a Cert. Date and Cert. Month to record the date the site was first certified and mark the day when the servicing should commence. If you use the Maintenance Planner add-on, this is the date that service levels should be incremented from. This information is included on the Certificate of Maintenance Report.
- Click SET UP PRIMARY CONTACT.
- Enter details for the contact and click Create.
- Click Save and Finish.
Postal Contact and Postal Address information is required only if a billing address differs from a site address and customer billing address. For example, if your customer is a real estate company, the Site Address is a tenant's physical address, and you use the Postal Contact and Postal Address if you need to enter an owner's name for billing and override the billing address saved in the customer's card file.
In the Street Address field, if you enter the geolocation with specific coordinates of the site, Simpro Premium pulls the map data from LocationIQ.
Note that results from LocationIQ and other map providers, such as Google Maps and Apple Maps, may differ to some extent.
If you are conducting solar industry work in Australia and have enabled STC![]() Small-scale Technology Certificates, an Australian Government rebate used in conjunction with the renewable energy sector. or VEEC
Small-scale Technology Certificates, an Australian Government rebate used in conjunction with the renewable energy sector. or VEEC![]() Victorian Energy Efficiency Certificates, a Victorian state government scheme for the renewable energy sector. zones, you can also select a zone from the STC / VEEC Zone drop-down list. Learn more about STCs in How to Set Up STCs - AU Only.
Victorian Energy Efficiency Certificates, a Victorian state government scheme for the renewable energy sector. zones, you can also select a zone from the STC / VEEC Zone drop-down list. Learn more about STCs in How to Set Up STCs - AU Only.
 Complete custom fields
Use the Custom sub-tab to store additional information under custom fields created in System ![]() > Setup > Custom Fields. You can then search using these custom fields in local and global searches.
> Setup > Custom Fields. You can then search using these custom fields in local and global searches.
Learn more in How to Use Custom Fields.
 Add site contacts
Learn more in How to Create Contacts.
 Add a preferred technician
Assign preferred technicians to sites in Profile > Preferred Technician in the site card file. If you have nominated preferred technicians in the associated customer card file, they are automatically assigned to new sites created against that customer. This is useful if a technician knows the site well or has specific skills required to work on the site.
Then when you create a job or quote for that site without Maintenance Planner, the technician with the number one Preference is automatically assigned. If you create a job or quote using Maintenance Planner, the employee with the relevant Asset Type or Service Level listed highest in the Preferred Technician table is assigned as the technician.
To assign a preferred technician to a site:
- Create or access the site. Learn more in Create a site.
- Go to Profile > Preferred Technician.
- Search and select the technician from the drop-down list.
- Click Add.
-
 Assign a preferred technician to an asset type and / or service level in a site if required.
 - Click Save and Finish.
Click the ![]() icon to remove a preferred technician.
icon to remove a preferred technician.
Additional preferred technicians defined in the site card file override those set at the customer level.
When you add preferred technicians to a customer card file, they are not automatically added to any existing sites associated with the customer.
Learn more in What are Preferred Technicians in Simpro Premium?.
 Add a Reminder
You can display important information prominently for specific sites using reminders.
These reminders are visible in both Simpro Premium and Simpro Mobile.
Reminders are intended to be used to convey simple bold warnings. Due to how reminders are presented, some formatting options such as bullet points, number sequences and tables are not supported.
It is recommended to test and preview the format when creating reminders.
To create a reminder:
- Go to the Reminders tab and click Create Reminder.
- Enter the reminder Name.
- Select a Trigger or multiple triggers for when the alert should appear.
- Select whether to Show in Mobile.
- Enter the Message.
- Click Create.
 Manage Rates
Go to the Rates tab of a site to assign specific rates for that given site.
General rates
- Toggle on Site Specific Rates to enable and assign labour rates on the relevant site. This overrides any Customer Rates when creating a job.
- Select a Service Fee to automatically apply to all new jobs created for the customer. This is useful if you use a specific service fee for the majority of quotes and jobs raised against this site. Learn more in How to Set Up Service Fees.
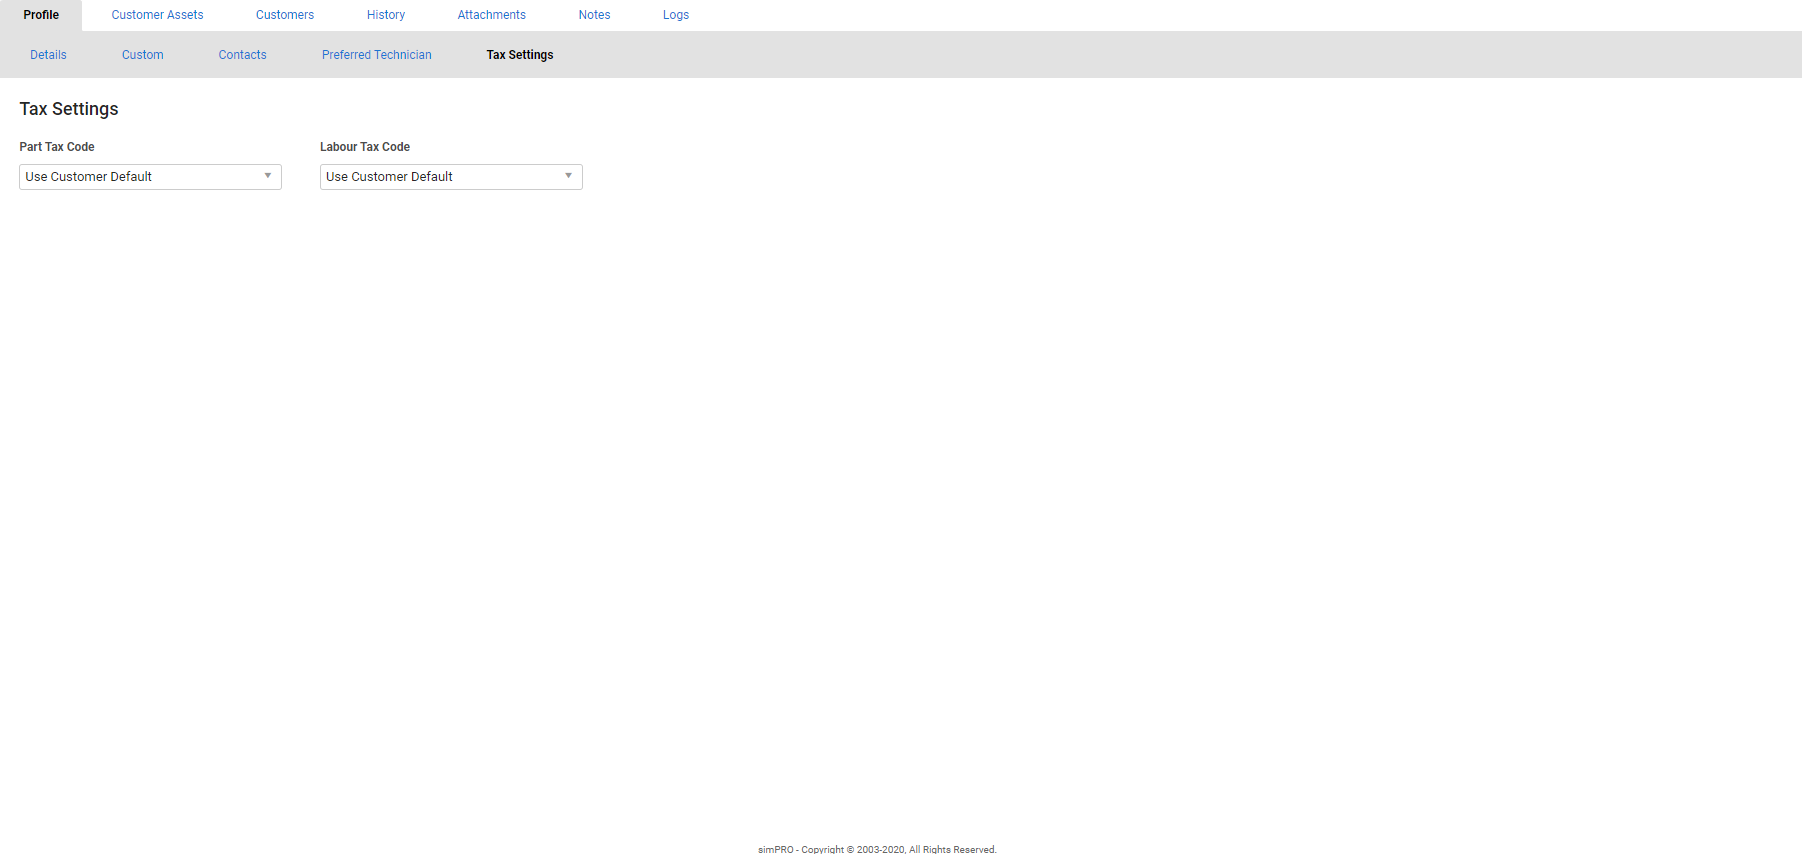
- You can also select a customer-specific Part Tax Code and Labour Tax Code to apply to quotes and jobs. Alternatively, select Use Customer Default to apply the individual item's tax code. Learn more in How to Use Tax Codes.
Labour rates
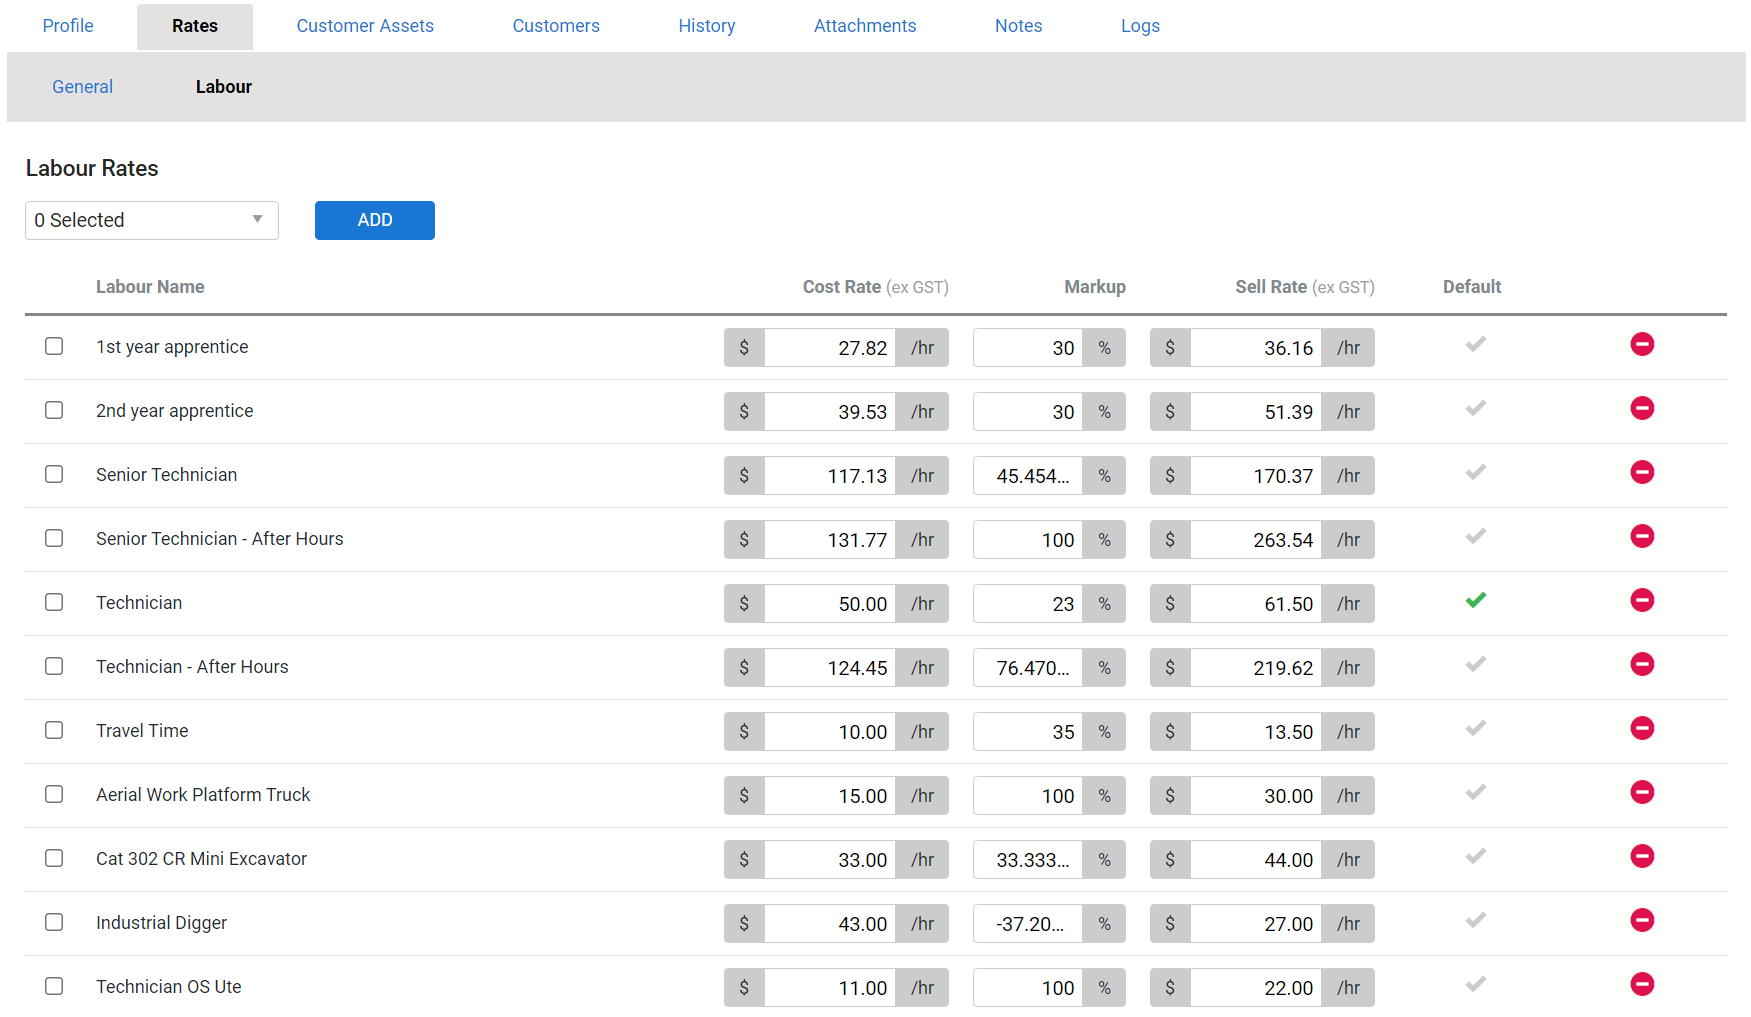
You can manage labour rates in the Rates > Labour tab of a site to assign specific rates for the given site.
In the Labour sub-tab you can add or remove labour rates defined in System Setup > Labour > Labour Rates. Learn more in How to Create Labour Rates.
You can also override the system default labour rate by selecting a site specific default, or modify the Sell Rate of a labour rate according to your agreement with customers on this site.
To add labour rates against a site:
- Create or access a site and go to Rates > Labour.
- Select a labour rate in the drop-down list and click Add.
- To specify a labour rate as the site Default, click the tick icon.
- Click Save and Finish.
Click the delete icon to remove a specific labour rate from the list.
 Manage customer assets
Manage customer assets![]() An item or piece of equipment you service or maintain on behalf of your customer. Customer assets could include items such as fire equipment, air conditioners, security equipment. in the Customer Assets tab of a site to provide preventative maintenance and repair. Learn more in How to Manage Customer Assets.
An item or piece of equipment you service or maintain on behalf of your customer. Customer assets could include items such as fire equipment, air conditioners, security equipment. in the Customer Assets tab of a site to provide preventative maintenance and repair. Learn more in How to Manage Customer Assets.
You can also create new assets from here. Learn more in How to Manually Create Assets.
 Access customer asset options
Click Options on an asset to access the following options:
| Edit Customer Asset | Enter the customer asset and edit details. You can also access the asset by clicking it. |
| Create Job | Create a new service job with the Job Cost Centre defined in the asset type in System |
| Print Barcode | If applicable, print a barcode entered in a custom field if applicable. |
| Transfer Customer Asset | Transfer the asset to another site by searching and selecting the site, then clicking Save. |
| Maintenance Planner |
Click:
|
| Archive Customer Asset |
Archive a customer asset. You can view archived customer assets by going to Utilities |
| Delete Customer Asset | Permanently delete a customer asset |
 Associate customers with a site
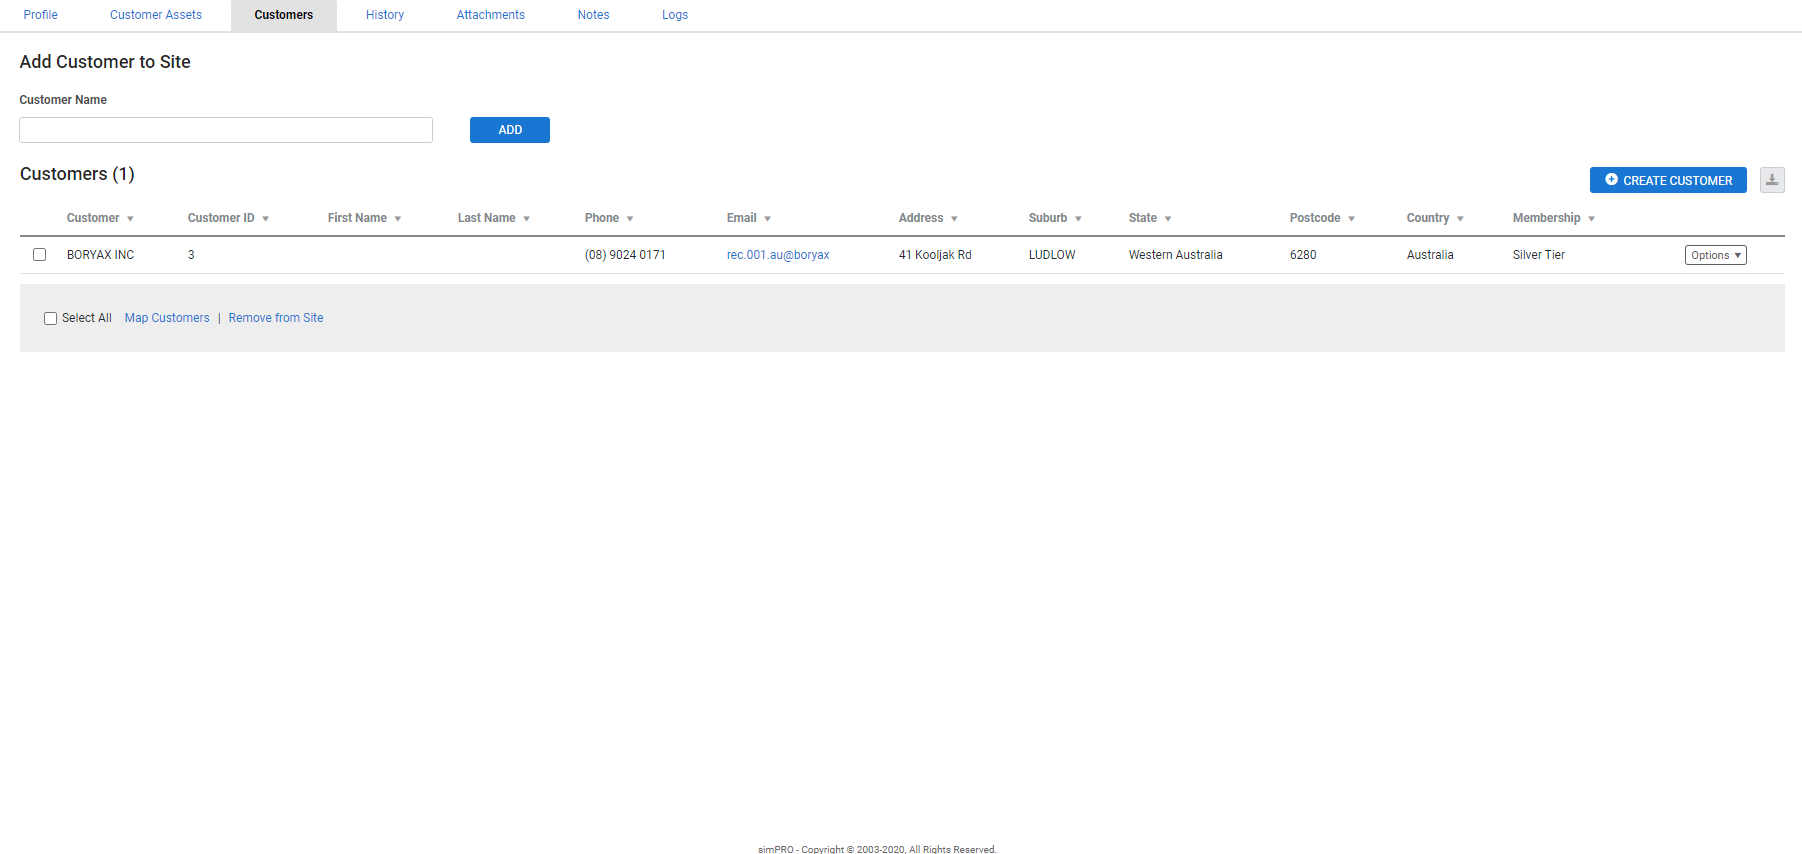
Use the Customers tab to create or add existing customers to associate with a site. If you have created a site within a customer card file, the customer is automatically associated. Learn more in How to Create Customers.
To create a new customer to associate to a site:
- Access the site, then go to the Customers tab.
- Click Create Customer and enter details as required.
- Click Save and Finish.
- Click Save and Finish.
To add an existing customer to a site, search and select the Customer Name, then click Add.
To remove a customer from a site, click Options > Remove from Site, or alternatively, select the customer, then click Remove from Site.
As customer assets are managed within sites, multiple customers associated to one site may be able to access other customer assets when accessing jobs and quotes in the customer portal.
 View site history
Use the History tab in a site card file to view a history all quotes, jobs and invoices raised against the site in Simpro Premium.
 Manage site attachments
Add, organise and download site-specific attachments, such as blueprints and maps, in the Attachments tab of a site card file. Learn more in How to Use Attachments.
 Enter site notes
Enter site-specific notes in the Notes tab of a site card file. Public Notes are visible in Simpro Mobile and could include public site information such as parking instructions. Private Notes are for internal reference only and are not visible in Simpro Mobile.
 View Logs
The information displayed on the Logs tab details all the actions and changes performed for the selected record in Simpro Premium. You can use this for accurate and comprehensive auditing.
The details displayed include:
| Message | A short description of the update performed on the record. |
| Date & Time | Date and timestamp of when the action was taken. |
| ID | The Simpro Premium ID of the user who performed the action. |
| Name | Name of the user who performed the update on the record. |
| Event |
The type of action performed.
|
 Learn more in the Learning Toolbox
For additional training, complete an interactive material in the Simpro's Learning Toolbox. Learn more in About Simpro's Learning Toolbox.


